Welcome to my creative online journal

Showing posts with label Lettering. Show all posts

Friday, 22 October 2010

Having fun with letters

I love writing, lettering and calligraphy, in fact I love letters, full stop!

Tonight I have done a couple of pages of lettering that show you how you can do your own.  Using a computer is obviously one way of doing it, but sometimes it is better to add your own handwritten words for a more personal touch to your cards and scrapbooking pages.

In fact this technique is so well known, you may well know it already, but just in case I have readers that don't know, I have done this for you.

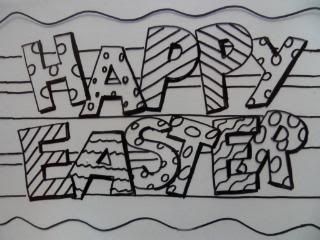
I have two methods of writing to show you, one is by adding dots:

First write out your alphabet in the normal way:
..then add a 'dot' with your pen to the ends of letters, like this:
Looks much more 'interesting' - you can also vary the angle of the letter.

The second method is to add lines.  Again, write out your letters in the normal way:
and then add lines to the ends of the letters:
Again, you can vary the angles of the letters and lines.

Sorry, my post is late today, Blogger is still causing me problems when I try to add more than one photo.  I have to save the page as a draft and then edit the draft.  Hope they fix it soon.

Thanks for looking and any comments,
See you tomorrow,
qwiksave

Saturday, 11 September 2010

Letter Photo Mosaic

Surprise! I've done an earlier post today.   I was a bit more organised today and got my craft done earlier than usual.

It's this:
(Click to enlarge)
A photographic letter collage.

The letters themselves weren't created by me, they were found on Flickr, created by Leo Reynolds, who generously lets you copy them (Some Rights Reserved). I copied and saved each letter and then put them together in this format using bighugelabs.  (This is a free mosaic maker but you need to register to use it).  You could also compile your message/name in Word or other word processing programs.

I found the information about creating this whilst bloghopping today.  The site I found it on was this one, Under the Table and Dreaming.

I'm liking the idea of making all kinds of words, and the letters are so creative.  It's the kind of thing you could do yourself, photographing letters in the environment.

It's quite time consuming to create the mosaic but also

..with gift making potential too! :-)

Thanks for looking and for any comments you may leave,
See you tomorrow,
qwiksave

Friday, 27 August 2010

Creative Lettering

Today I've been looking at lettering for my art journal/altered book.  The instruction manuals and videos on journalling suggest you try this 'higgledy piggledy' style - where you draw guidelines using curved lines and you write in different sizes and thicknesses, like this:
I also made myself another 'Everyday' type of journal using a non-leather A5 Filofax which I have decorated with abstract scribbling:
I used white shoe polish and coloured markers.  I couldn't possibly have a creative journal with a plain black cover!
I decorated the inside too:
I've made myself some canvas pages by cutting up a roll of canvas from 'The Works' and hole punching them with my 'Big Bite'.
(The filofax was another charity shop bargain £2!)

Thanks for reading,
See you tomorrow,
qwiksave

Tuesday, 17 August 2010

New Waste Bin!

Now, there's a surprising blog title! And yes, I have got a new waste bin to show you that I got for my craft room - isn't it lovely?:

Look closer! (ignore the mess in the garden if you can!) It's got a metal framework with twigs all around it like a big bird's nest and those coloured dots?  They are buttons!  How sumptious is that? 

It's got a handle on it too!
Love it! (Well, as much as anyone can love a bin! lol) and no, I didn't make it, but I did get it today in a half price sale.  It's like a work of art it is, not just somewhere to put your discarded thingamabobs and whatnots...

Moving on.... and my craft today was again inspired by something around my house.  It was a skirt.  It's not actually one I've ever worn (its a bit small) but I've intended to one day.  At the moment I've got it pinned to my noticeboard as artistic inspiration (this is a detail):
 
I love the way the letters create other shapes where they overlap.
Another detail:
So this inspired me to do my own lettering picture:
..using stencils of different sizes.
I then put the photo of it into a different free photo-editing program called paint.net (which was recommended by Webuser magazine) and added this embossing effect:
 
(The colour was changed using Picnik).  
I really like the way it has created depth. 

What have you got around your house that you could use to inspire your crafting? 

Thanks for reading,
See you tomorrow,
qwiksave

Saturday, 10 July 2010

Mmm Choccie!

I LOVE chocolate! Like quite a few of you reading, I expect.  Wish it wasn't so bad for the waistline!

Tonight's craft was to find and write down some funny quotes about chocolate.  Here's a couple:

and
Hope you are enjoying your weekend.  My youngest son is sleeping under canvas in his friend's back garden tonight and we have the boy's School's Summer Fayre tomorrow.  Still very sunny here.

Thanks for reading,
See you tomorrow,
qwiksave

Wednesday, 28 April 2010

Letter Writing

Some people don't look at their children's toys as potential crafty materials, but I do. I think, 'when they grow out of that I'll be able to use it for such and such' or 'I wonder if they'd miss that, because I could do such and such with it now!' (lol) [I should point out that I don't actually act on that one, I'm not that bad!]  Sometimes I don't just use the toys my children have, I actively look for potential (cheap) new or secondhand toys or games that could be used for crafty purposes when I am out & about on my (frequent) shopping jaunts. 

This card that I made a few years ago (which some people may recognise) was made with an old name jigsaw, plastic letters and a few crafty embellishments:
The centre of this card is a photo of a Daniel jigsaw placed on a blue background.  No toy was damaged in the making of this card! 

And that is the idea I have, using letter toys to make personalised cards.  You construct your message with the toy letters and take a photo, then simply print the photo out and stick it onto a card. (Embellish as required).  Maybe make it into a decoupage type too, if you print out several copies.

...And you don't have to stick to just children's cards:
This was made today from a Travel Scrabble game, bought from a charity shop for £1.  If I only photograph the image rather than actually sticking down the letters, I can reuse the idea again and again. 


Still on the letter theme, whilst blog hopping yesterday, I came across a (free) site that lets you  do some whacky things with words that you type into it.  Here are some examples of ones I have done today:

Heart effect

Wave effect

..and Spiral effect
The site is called festisite, and to use your constructed word shapes after you have written them you save them to your computer and print them out.  They would look interesting on the front or inside of a greetings card.

Thanks for looking today
and I'll see you tomorrow,
qwiksave

Friday, 12 March 2010

Magic Piccy

Where does the time go?  I'm in the middle of crafting and before I know it the time runs out! Don't you find that?  Real life gets in the way and you are called out to make dinner, take the kids to school or one million other things that pull us away from the masterpiece we are in the process of creating! 

Well, I wouldn't call what I'm doing tonight a 'masterpiece', in fact its a bit of cartoony fun for the kids again, which is back onto the theme of Easter. Don't know why I have the Easter theme in my head so much these days, we haven't even had Mother's Day yet! (On Sunday for us in the UK).

For tonight's project, I revisited an old site I used to frequent YEARS ago! Neil Buchanan's Art Attack!  I have done this project:

A Magic Frame  (under 'Art Attacks' heading, go to G-M,  Magic Picture Frame)

The instructions are a bit complicated, so if you want to make one yourself, please follow the instructions from the link.  It looks impressive though, the picture appears to be completely Black & White, you pull it out from its frame and it is in full colour!  The type of thing my little boys will like anyway. 

UPDATE:  I made a mistake making this project - I drew this outline freehand and then realised I couldn't colour it in for this project.  Doh! Lesson learned - Follow the instructions!:
So I made another one....
This time I used the Disney Club Penguin Book and a light box to trace these Puffles...
You pull it out of the frame and as if by magic...
....They colour themselves in!

I made one of these a few years ago that I've also dug out to show you:
Enjoy your weekend and I'll see you tomorrow!

qwiksave x

Monday, 11 January 2010

Happy Birthday Banners

Today I'm exhausted!  I was up until the early hours of this morning preparing for my elder son's 10th birthday, and  a good part of it was spent making these enormous banners! 

And thats what today's craft is in case you were wondering, great BIG banners! 

I made this one to go above the sofa:


and this one went above the fireplace:


To make these I simply drew the letters with a thick Sharpie marker pen (they really are good!)  freehand onto lots of different coloured papers, cut them out and  then stuck them onto the banner paper. (These  white paper banners were from our local 99p shop).  To get each letter the right size I measured it up against the ones I'd already done. 

For my son's birthday he said that he wanted money towards an expensive Lego Star Wars model  but because the weather has been so awful  recently I haven't ventured out as far as a cashpoint.  So what did I find myself doing in the middle of the night last night?  I was forging money on my home printer!!  I found an image of a £10 note on the internet and duplicated it lots of times.  I felt like a right criminal cutting up all the individual notes on my pink crafting guillotine!  It worked a treat though and gave him something to hold in his hand other than an IOU! lol (there's no back on them so there's no danger of him trying to spend them!):


Ryan and the forged tenners

For his birthday tea his grandparents came and treated us to a meal at Pizza Hut!

Here he is with his Pizza Hut balloons:


(Picture modified using Picnik)

Happy Birthday Ryan
Related Posts with Thumbnails