Welcome to my creative online journal

Monday 14 January 2013

Love Your Handwriting by Heidi Swapp

I am still actively creating as part of the Creative Jump Start Course and today's activity will follow after I show you what else I've been doing today.

One of my creative loves in life is doing lettering, calligraphy and fun styles of writing and so this year I decided that I was going to do more of it which is why I purchased from America, this book of Heidi Swapps called 'Love Your Handwriting'.  I got it from Abe Books for something like £5 including postage so was delighted when I got it to see how good it was.  I've always loved the way Heidi Swapp writes and was interested to know something about her style.

The book came as a set with a step-by-step guide, a workbook, a ruler, Zig Millenium Pen, a technical pencil and a rubber.    I've decided I may as well just work through all the exercises as they are pretty short and this was my exercise 3:

Writing in different sizes, different styles, with different pens.

The book I've been refering to is this one:
which may be a few years old (?) but it had an original price of $29.95 so I was dead chuffed. 

I know I don't need to learn how to letter really, but its such fun and I really enjoyed doing the exercises shown above. 

Onto the Creative Jumpstart course and I am having to miss the odd lesson out as I don't have all the materials but it's not a problem, there are enough I can do.

This one was another of Natalie Kalbach's. 

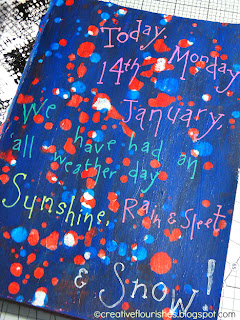
It was to make a fun journal background.  We gessoed our page up first, then put down a first colour of paint.  In my case it was red.  We then splashed water on the paper and dried the paint around the wet dots.  Next we dried the wet splashy bits off with a paper towel and where the wet drips had been, it remained white:

Then we painted a layer of blue on top and splashed that.  We dried it off like before, as in the paint around the wet drips was dried with a heat gun.

After towel drying, you get spots from both layers coming through and in some cases, where the drips overlapped the previous ones, you got white too:
I have always loved the effect of glaze pens on dark paper so decided to write some journalling about today's weather with a few of my neon Sakura glaze pens:
.. and today was a perfect day for staying indoors and crafting!

Thanks for looking and for any comments,
Nicky
Saturday 12 January 2013

JumpStarting Continued and Creative Lettering

I haven't been around for a couple of days because it was my eldest son's birthday yesterday and I had to do some preparations.  He's now a teenager (eeeek! lol)

It hasn't stopped me doing some more work on the Creative JumpStart Summit course, which I have to show you.

First of all this journal page:
...Which was me working out about the balance I need in my life towards art and happiness levels, possiblities surrounding a job, money, etc.  It was loosely based on one of the projects set by Catherine Scanlon.

Second of all, I have this rather strange page where I was experimenting with transparencies, a project we learned about by Natalie Kalbach:

 I used an image of a soft face to contrast with the harshness of my stamped images (this is a doll photo that I took years ago).  The squared texture images were stamped on the transparency with black gesso and layered. 

Finally, I have started a notebook to put in examples of lettering found in magazines, leaflets and books:

This book will be similar to a scrapbook.  I plan to do another one that will be full of my own lettering experiments.

Thanks for looking and for any comments,
Nicky


Wednesday 9 January 2013

On a Roll Now - Creative Jump Start 2013

I really got into these two projects!

Yesterday's on the left...:

...and today's on the right.

Yesterday's project, another part of the Creative Jump Start Summit course was about using your stencils in different ways.   Karen Ellis demonstrated using a 3 house stencil that she had designed for Crafter's Workshop.  I didn't have that particular stencil, so used one (the middle house cottage) that I found in a children's book of stenciling.  The other houses you can see  I ended up just freehand drawing and paper piercing using different handmade coloured papers.

For the background I just used distress stains and water and then drew the background houses on using a water soluble felt tip pen.  I like the way that they blended and resemble charcoal.  The front houses were drawn with a sharpie to make them stand out more.    The resulting page has ended up being pretty similar in style to the card that Karen Ellis demonstrated, minus the title that I added to the front.  

On the right hand page of my journal was today's project, a clever technique I didn't know about, using gel medium through a stencil.  When I first spread the gel I was delighted to see how thick the effect was:
It's like paper... but..it does show how a stencil that you think is clean isn't!  It shows no mercy and any bits left on the stencil (tut, tut) show up.  When it dries it does dry a little flatter, but this one being gloss meant that the letters had a glossy sheen.
After spraying (in my case, a bit heavy handed) over the whole thing with my new Dylusions spray, I decided to emphasise the edge of the letters with black.  First I tried indian ink, then a bit of black pan pastel.  The letters still looked lost in their background so I went loosely around the edges with a black technical pen.  

I really enjoyed doing these two projects, my favourites so far, and am looking forward to seeing what is in store for us next....

Thanks for looking today and for any comments.
Are you taking part in Creative Jump Start?


Tuesday 8 January 2013

Continuing to Creatively Jumpstart 2013

Excuse me if in my last post I sounded as if this course was getting to be a chore, it definately isn't and I am loving it!  I'm learning lots of interesting techniques from some of the greatest teachers in the crafting world and all for free! (well, donations welcome)....

Today I've got two days of my coursework to show you as I did them over the weekend.

First up, we have another technique from Nathalie Kalbach, stamping with acrylic paint on foam stamps:


 (Right hand page)  
I had a foam heart stamp years ago that was meant for decorating walls with.  Not sure I'd ever do that, but it was ideal for my experiments for this project:

 We added texture with various textured objects, like sequin waste and net curtain.  (The red paint around the hearts was for 'deliberate' artistic effect).

When I was an art student years ago, we had a photographic project on decay and I loved it.  I loved taking pictures of paint peeling off doors and mouldy cabbages! 

Which is why I really liked Louise Nelson's project of recreating crackles on paint.  I couldn't find my crackle glaze (messy art room again!) so had to make do with a textured stamp to get an almost crackle effect in my journal.

 ...and I added some of our wedding photos to my page:

I also added buttons and white tippex to frame the photos.  My wedding dress was pink and white so the colour scheme was set.  

I will show you today's project (Monday's) tomorrow (Tuesday)

Thank you for looking,
Nicky


Saturday 5 January 2013

Sharon Laakkonen's Tags

Today's project for Creative Jump Start 2013 set by Sharon Laakkonen vaguely resembles the technique we were set...  I modified my version because I wanted to play with a new raindrop stencil that I received in the post this morning!

The first tag (left) was me having a go at making my own glass gel.  It didn't work too well because I couldn't see how many of the teeny glass beads that I added to my Golden gloss gel medium actually stuck into the gel.  When it dried I found out ..... it was only about four!  Strange really, because I added loads....ah, well.  I was also hoping the blue ink that I swiped on the top would stick to the rain drops but it resisted it instead!  The bit that was successful was the cutting around the raindrops at the bottom to make the tag an interesting shape.  I did that on the tag on the right too.


The other tag was made using various types of washi tape.  I decided to make mine on the topical  theme of watching my figure.  Thats why its got the graphs and numbers, like a tape measure. 
(I added the pretend graph lines with a pen after taking this photo)

Four days in and still enthusiastic, only about 27 days more to go!.... (Aaagh!)

Thanks for looking today,
Nicky

Thursday 3 January 2013

Heidi Swapp's Stenciling Technique

Today's Creative Jump Start challenge set by Heidi Swapp didn't go as planned at all!  It didn't help that it involved using sprays again!

I even tried the technique that Heidi suggested which was to press the spray trigger all the way down on the spray bottle.  Again, (like yesterday),  I created pools of spray on my work and spray all over my hands, my workbench, my craft equipment....  

I also didn't quite get the technique of masking 'in the correct order.'  This time I blame watching the video in the morning and doing the technique at the end of the day.  The ol' grey matter can't seem to cope with remembering something for that long, lol.

To get round 'doing it wrong', I paper punched some stamped elements and stuck them onto 3d pads.

(Some of these stamps were from a free set of stamps from Simply Cards & Papercraft magazine this month).

All in all its acceptable, and doing these challenges with equipment I have but don't use is very valuable, even if its not quite what the creator (in this case Heidi Swapp) had in mind....

Thanks for looking and I will be back tomorrow with the next Creative Jump Start challenge. 

Nicky


Wednesday 2 January 2013

Stenciling with Julie Fei-Fan Balzer

Today's Creative jump start activity was stenciling techniques with Julie Fei-Fan Balzer. I've been following Julie's blog for ages and I'm a big fan of her work, in fact I would go so far as to say I love it!  I also love her teaching style, its so full of enthusiasm and humour. 

Here are pictures from my activity today:


I tend to shy away from sprays as mine never seem to spray right.  So often I end up with pools of ink (see top picture, left) rather than an even distribution of colour.  I've heard that the Dylusions sprays are meant to be good, maybe I need to treat myself....

My favourite tag was the one using the orange and red distress inks (third picture).  I love the way they create tones where they overlap.

Thanks for stopping by today,
Nicky


Tuesday 1 January 2013

Creative Jump Start Summit 2013

Hello and a Very Happy New Year to all my readers, old and new.  Welcome to my first post of 2013 where I have just started the first day of the Creative Jump Start Summit 2013.


For our first task we were given a technique to try using double sided tape and embossing powder. I just knew I'd find a use for my set of neon coloured embossing powders one day!  

This was how mine started out.  I laid 3 strips of thin double sided tape onto my craft mat and pulled some of it off to reveal the sticky side.  I then applied neon green embossing powder to it.  Then I cleaned up after myself, that pesky powder gets everywhere!  After putting what I could back into the pot I used one of  those clean up wipes called 'Dust Buddys', they are absolutely brilliant at getting up all those little bits of  glitter and embossing powder that stick to everything.  

Then it was time to get mucky again with the orange embossing powder:
(Pulling up the remaining sticky cover and adding orange to the sticky tape)

I wasn't actually going to use these colours but couldn't find my other pots! (New Year's resolution to clean up my craft room!) 

Then, after another clean up, I heat embossed my strips and made them into a frame in my journal:
(I also did the same technique on the 3d squares, bottom right)  

I've decided this year that a lot of my art will involve lettering, including hand lettering, so to start this off I added this writing into my frame.

A fun bit of creativity to start 2013, I wonder what project will be on the cards for tomorrow?....

Thanks for looking today and for any comments,
Nicky

Related Posts with Thumbnails