Welcome to my creative online journal

Saturday 28 April 2012

Stop Thinking! (And Create!)

First of all, may I welcome the many new viewers I have had recently as a result of a referal from http://philofaxy.blogspot.co.uk I never knew there was such a thing as a blog that was dedicated to users of filofaxes.  I don't think many of the other followers that use that site use their filofaxes in quite the same way as me either!  Hope those of you that came from there weren't too horrified at the way that I have scribbled with oil pastels all over the cover of mine - I'm planning to cover that up soon anyway (with acrylic paint)...

Following on from the abstract pages I showed you the other day, I've done some more:

I liked this quote because it is so how I am!  I keep thinking of squillions of things that I could create (Pinterest gives me so many ideas!) and I need to actually get on with them instead of thinking about getting on with them! 

I used the back of a junk mail envelope for the background.  It's great, its got teeny little hexagons on it and it incidently came from Virgin Media correction, Legal & General Insurance  (I actually want them to send me some more junk mail, lol).  The lightbulbs image was from an old engineering book and the head from a magazine.  I stamped the clouds and did a lot of colouring with neon highlighter pens. 

The 'Chill Out' page shown here on the left was a 'cheat,' its a scanned picture from a greetings card - that I've added to one of my shaving foam marbled backgrounds.

These pages already had a background:
..and so I just doodled randomly on top of them with my neocolor crayons. 
Pictures and journaling can be added at a later date. 

Hope you've enjoyed your visit today, 
Nicky
Friday 27 April 2012

Olympic Torch made from a Pram Cat Net

My son and I had fun tonight, doing his homework.  It's on an Olympic Games theme and given a choice of things to create, he chose to make the Olympic torch.  I don't know if you have seen this year's torch but if you see this close up detail you can see it looks as though it was made from gold punchinella:

Bonus points for us him this homework because how many people in his class do you think will make a torch looking like this?  Betcha the others will all do the standard type with a paper cup on a kitchen roll tube  - boring!  (Not that I'm competitive or anything!...)

Look, its even multilayered punchinella!   

My first thought was punchinella would be great to use to create ours but could I find it? No....  But then I spotted this Pram Cat Net that I had purchased solely for craft making (who uses these nowadays anyway?) and we set about wrapping it round several times and sticking it with some spray glue to a gift wrap tube.   We were hoping to use some spray paint to colour it gold but could I find it? (Are you spotting a theme here? lol) er, No.  So my young son (age 9) and I set about painting it with paintbrushes. 

Here he is in action:
(No pics of me, I was ze camera person)

We had a thoroughly good, fun time, painting and singing loudly as we painted.  Took ages with all those layers ('makes mental note to  find the spray paint') but we hardly noticed as we were having such a good time (Not sure the neighbours were though!)

(inbetween verses)

To finish we have stuck the olympic symbol on the side of the torch and last minute tomorrow morning before school (lol), we will stick some tissue paper in the top to represent the flames.

Gotta be some Gold Medals in it for us?...

Thanks for looking today,
Nicky

Wednesday 25 April 2012

Wet, Wet, Wet! (A Smelly Craft)

This morning here where I am in the centre of England it POURED down with rain and it has being doing so (on and off) for days now.   So what do you do when it is like this?.... You make a craft about it! (Well, I did anyway...)

This 'sculpture' isn't the craft, see explanation below!

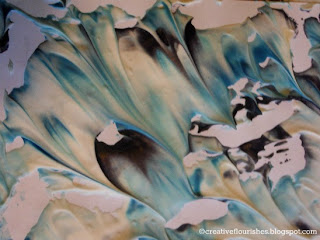
I decided to make a page in my filofax journal about the rain, so set about making myself a background using the shaving foam and food colouring technique that I have read about. (Its dead simple, you just put a layer of shaving foam on a tray or plate and add drops of food colouring to it. Place a piece of paper on the top and then scrape off the foam from the paper with some cardboard).  This is why its a 'smelly craft', the shaving foam is perfumed!  

This is one of those crafts where I like the pictures of the 'craft in progress' better than the finished result! That picture above is one and here are another couple:

(The light wasn't great so this bottom picture isn't in focus)

And this is the finished journal page:
I used a photo of the house opposite that I took through our rainy window this morning and added the text using the Picnik substitute website, PicMonkey.

Thanks for stopping by today,
Nicky


Tuesday 24 April 2012

What's in the Box?

When I got this item from a charity shop last week the person serving me gave me a strange look:

And what was in this old battered box that got me secretly squealing with excitement and the rather odd look from the assistant?

This:
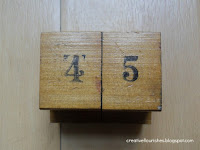
 A ginormous stamp set to play shops with!

It was used to price up products by hand in the good old days.
 Just look at those titles - 'Finest Quality,' 'Per lb' and 'Sure to Please.'

I'm not really using it to play shops, I have been stamping some 'everyday' labels to stick on my magnetic reminder board so I don't have to speak to my kids I can remind my family of daily events.


(I've mixed capitals and lower case letters deliberately because I love the quirky effect).

The numbers look small in the box but stamp bigger:


I'm so pleased with this purchase and want to label everything in sight! Not bad for a purchase price of just £8.50....

* * * * *

It was my husband's birthday today and I made him this (Hidden) Toblerone container for one of his pressies:

(If I made another one I'd use card rather than paper).  I think they could also be used as table setting cards for an informal occasion.  The bonus is that they are very simple to make with just three simple folds of one piece of paper/card.  I do like this kind of simple craft!

Thanks for stopping by today,
Nicky

Sunday 22 April 2012

An Altered Filofax Art Journal

Last year I altered the cover and inside of a charity shop-sourced A5 black filofax with pastels with the intention of using it as an alternative art journal.

Today I finally got round to making the pages for the inside. 

I used printed pages that were taken from an old children's book and artistic pages that I have made myself.
The pages were cut & torn to size and I used my Crop-o-dile and a template to make the 6 holes needed to fit the filofax rings. It would have helped to have a 6 hole holepunch but they are very expensive!

Some of the pages are complete as they are, just waiting for some photos, magazine pics and journalling but on some I'm going to add more layers to with paint or papers.
Detail of some of the other pages.
 I also added some squared graph paper, acetate and envelopes.

I'm rather looking forward to doing some more creativity on these already interesting pages.

This is my entry for WIP Monday on Scrapscene

Thanks for stopping by today,
Nicky

PS - Apologies for any ads that pop-up, nothing to do with me, I think its a new addition that is courtesy of Blogger!

Wednesday 18 April 2012

A Beach Memory Jar and Picasa

This main page will still be all about crafting and with the closing of photo editing site Picnik tomorrow, I decided to try out one of the optional alternatives, Picasa (as recommended by Carmen of Whoopidooings, thanks!) and see what I could do with it.

This picture was created by the rain itself outside in my garden today! I bought a Rainbow Aquadraw set (charity shop £3!), (which I know is meant for little children but I thought I'd use it creatively myself!) and, for this picture I took the aquadraw mat into the garden - when it was raining- and photographed the result.  I've used Picasa to deepen the colours a bit but I'm not sure I've mastered the lettering part yet. 

One more practice and this picture was taken out of my sitting room window earlier on this evening:
I added the outside frame, which makes it look like a window itself.  Think I could get used to this Picasa....

Another craft I have been making recently is a decoration for the bathroom:

It's a memory jar with a picture from an October holiday we took in Lowestoft in 2006.  (If I remember correctly, the weather was a bit like it is now, freezing cold and rainy!)  Anyway, it is a fun picture (a fabric transfer onto thick white felt) which I added to a jar with some children's play sand and some shells.  I did have the lid on the jar originally but the sand is a little damp so it caused condensation to form on the glass so I have left it off until the sand dries out.  Memory jars are fun things to do and you can do them on all kinds of themes, I already have some others in mind on my never-ending 'Crafts to Do' list.

Thanks for stopping by today,
Nicky

Tuesday 17 April 2012

New Pages on Creative Flourishes

The observant ones amongst you may have noticed that I have added some new pages to my blog recently (You will need to come out of a blog reader to see them, in blue, under the main heading).   I will be filling those pages with content shortly but with me not being technically savvy I'm not sure how you as readers get to find out when I've added to these extra pages.  All I can think of is that I tell you on this main page and you can choose to go have a look - or not!... 

For example, today I have added some more books to the page 'Live Your Best Life' (There is also a recent 'Before & After' photo on there too!) Click on its title page (or select from the pulldown menu on a phone, etc)  

..and then scroll down (& down) to the bottom of the page to see the new content (dated today).

Thanks for stopping by,
Nicky

Monday 16 April 2012

Printable Daily Water Consumption Record

As my regular readers will know, I am trying to keep myself healthy.  I'm doing OK but one of the things I have found difficulty with is drinking as much water as all the books, websites and healthy leaflets tell us we are meant to have -  8 to 10 glasses a day!  If I remember, I have one or two glasses of water and then that's it (apart from the squillions of cups of PG Tips Tea that I somehow have absolutely no difficulty with!)

So today I made myself a laminated, reusable record sheet that I can use to mark off each of the hours I have a glass of water.  I used it today and managed to pace my water consumption to one glass every two hours, so, starting at 8am, I had one at 10am, 12pm, 2pm, and so on. To mark it off I put a ring in red pen around the time - or an alternative option would be to cross it off.  At the end of the day I can see how many glasses I have had, aiming in my case for a target of 8.  I have made it so I can start and finish earlier, say start at 7am and finish at 9pm.  As it is laminated, I can wipe it clean and start again tomorrow. 


I have been on Pinterest and found out how to share files so if you would like your own (Free!) high quality B&W A4 downloadable copy click here
  

This is how mine looked today.  I have it clipped to a clipboard for portability:

..and that on the right is the 'funky' portable drinking cup that I have my water from.  It's one that I got from ebay that I can change the picture inside.  

(This water consumption page was created using Picnik, maybe for my last time! Sob!)

Thanks for stopping by today,
Nicky


PS - Please take note of Happy Daze's comment (below) about the danger of drinking too much water.

Saturday 14 April 2012

Homemade Pencil Crayon Storage

Goodness me, what a long break that was!  I didn't plan to be away that long but once I was out of the swing of things it made it more and more difficult to come back in, if you know what I mean.  I have missed this form of 'show and tell' though so am really looking forward to getting back into it again.  Hope you're still out there and happy to welcome me back again!

(For those of you that are interested, I have some more dieting fiction books to add to my 'Live your best life' page which I will do in the next few days and am delighted to say that I did get down to a (UK) size 10 (from a size 14) for my friend's 40th birthday party.  I am still a size 10 (though sometimes a 12, particularly in the bust!) with a new goal of swanning around my back garden in a bikini for the Summer - a task that is no mean feat when you are the wrong side of 40!)

Those of you that follow me on Pinterest, (link top right sidebar) will probably have noticed that I am addicted spend an awful lot of time on there, avoiding all my housework and pinning squillions of creative and inspirational ideas that are compiled from all over the web.  This craft, made by my husband, a crafty friend and myself was a modified version of an idea that was spotted on Pinterest: 

It is a multi-layered pencil/pen/brush pot. 

 (and yes, these are all my pencil crayons!)

My husband hacksawed each of the pots to size from large cardboard tubes and my friend and I (thanks Chris!) helped him to cover all the pots with glue and newspaper.  (Alternatively they could be just painted or covered with decorative paper).

The pots were glued to the cardboard base with a hot glue gun and further tubes and shelves were added to make the back layers.  

It works fine as it is but for extra durability it will need a layer of varnish or two.


Thanks for stopping by today,
Nicky

Related Posts with Thumbnails