Welcome to my creative online journal

Showing posts with label tutorial. Show all posts

Tuesday, 23 November 2010

Christmas Angel Tutorial

Today, I have a tutorial on how to make this:
A Mini fabric Christmas Angel

Materials:
2 pieces of scrap material,
scissors
glue suitable for fabric
button
peg
permanent markers in pink and red
glittery pipe cleaners

To make this decorative angel, first cut two 3.5" circles out of the different materials:
(No need to iron, lol)  Then fold over and stick the two halves together:
Then on one semi-circle create the arms(sleeves) by folding in two of the sides towards the middle, glue and use a peg to hold them in position:
(Red lines show you the edge of the material)
Remove the peg and stick these sleeves onto the other semi-circular piece of material. Stick on a button (holes are eyes) and some glittery stuff (I used pipe cleaners) for the hair and halo:
Finally, add with permanent pen, a smile and two dotty cheeks:
..and you're done! :-)

You could attach a ribbon to the back to hang it up or maybe stick it on a tag.  It is also another Christmas craft that children could do in the holidays or for school fairs.

(Project found on the web a couple of years ago, sorry, can't find source, if you know, please mention in the comments and I will credit them)

Thanks for looking and for any comments,
See you tomorrow,
qwiksave

Friday, 22 October 2010

Having fun with letters

I love writing, lettering and calligraphy, in fact I love letters, full stop!

Tonight I have done a couple of pages of lettering that show you how you can do your own.  Using a computer is obviously one way of doing it, but sometimes it is better to add your own handwritten words for a more personal touch to your cards and scrapbooking pages.

In fact this technique is so well known, you may well know it already, but just in case I have readers that don't know, I have done this for you.

I have two methods of writing to show you, one is by adding dots:

First write out your alphabet in the normal way:
..then add a 'dot' with your pen to the ends of letters, like this:
Looks much more 'interesting' - you can also vary the angle of the letter.

The second method is to add lines.  Again, write out your letters in the normal way:
and then add lines to the ends of the letters:
Again, you can vary the angles of the letters and lines.

Sorry, my post is late today, Blogger is still causing me problems when I try to add more than one photo.  I have to save the page as a draft and then edit the draft.  Hope they fix it soon.

Thanks for looking and any comments,
See you tomorrow,
qwiksave

Thursday, 21 October 2010

Paper Flower Tutorial

During the year that I have been posting on this blog, I have seen many handmade flowers out there in Blogland and have never attempted my own, until now! 

I picked up a copy of 'Crafts Beautiful' whilst out shopping today (I'm a sucker for all the cardmaking and scrapbooking magazines, especially Christmas editions), and they had an excellent tutorial on how to make some flowers so I had my first go.

This is how it mine turned out:
Using an old dictionary, a scallop circle punch, a pokey tool and a button

To make it I did the following:

Cut 5 circles out with the punch:
(I forgot to check what was on them!)

Then make a hole through each centre:
Secure them all together using a small brad:
Then turn it over and scrunch up each layer individually:
..and unravel each layer to suit.  This is the stage I added my Distress Ink:
..but perhaps you could do that before you start?..
Finally stick on a button with glue in the middle of the flower, with some twine for decoration:
.. I then looked at my finished flower and discovered that the word 'austere' was prominantly positioned on the front of the flower! lol.

Thanks for looking and for any comments,
See you tomorrow,
qwiksave

Friday, 9 July 2010

Crafty Equipment File Tutorial

A few days ago I mentioned I was going to put a tutorial on about how to make a file for cataloguing your rubber stamps or stencils.

This is the one I made a while back for recording my rubber stamp collection:


I showed forum members on the scrapbooking thread of mse how I made it from a giftbag. 

This is a couple of pages from the inside:

 Today I made another one of these with a slight variation, this one opens sideways.


TO MAKE AN INDEX CRAFT EQUIPMENT STORAGE ALBUM:

1. First of all you need to get yourself a giftbag that is big enough to store your paper in:

(This one was £2.49 but I saw they sold some different types in our local pound shop)

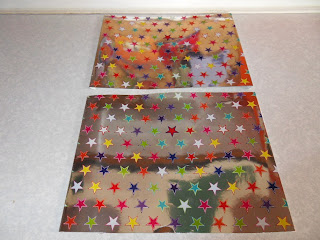
2. Cut a front page and back page (both the same size) from the front and back of the giftbag. (Add on a bit for folding over).
3. Then, using your cutout pieces as a template, cut out some cardboard the same size (minus the add on) and stick your patterned paper onto one side of  the cardboard.

This shows the paper stuck onto the cardboard.  I used my trusty ATG Glue Gun to stick the patterned paper onto the cardboard.  When you do this, make sure you only roll the gun in ONE direction, just saying thats all... (don't wreck your tape by trying to do it in the opposite direction like me!)  Alternatively, use a different type of glue.

4.  Cover both inside pages with plain coloured paper - I chose purple to match the star gifttag shown above.  I also cut two additional strips to use for decoration on the front of the file. 

5.  Place your inside pages in position and mark where you need to make your bookring holes - I used my Big Bite to make the holes.  Thread a couple of bookrings through the holes you have made.

This finished picture shows the inside pages with the stencils inside the page protectors and bookrings threaded through all the pages.

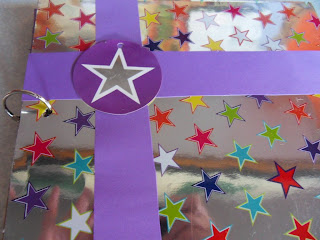
6.  Finish off by decorating the front
(I added the strips of coloured paper I'd cut and the gift tag that came with the bag)

FINISHED BOOK:
(Just needs some more labels and some corner protectors)

Hope these instructions are clear enough, and as Neil Buchanan would say, "Try it Yourself.  Your very own gift bag scrapbook."

Thanks for reading,
See you tomorrow,
qwiksave
Related Posts with Thumbnails