Welcome to my creative online journal

Showing posts with label rubber stamping. Show all posts

Thursday, 17 March 2011

Oriental Themed Necklace

I stayed up really late finishing the second of the 'stamped cup of tea tree' cards for my friend's birthday celebration today.  I will show you that in a bit but I thought I'd show you what I also made for my friend [this morning before I saw her at lunchtime! :-O ]

This Tim Holtz Fragment necklace:
The script is a rubber stamp of some (ancient?) oriental lettering, which was part of a Crafty Individuals stamp set I got when I subscribed to 'Craft Stamper' magazine. 
I stamped it with Black Stazon onto red mirror board and when dry glued a Tim Holtz Fragment on top of it with Glossy Accents.  After that was dry I cut around the outline of the shape and added the chain.  

This was the other card I made using my fab new tree stamp:
The card opens where the flowered paper is scalloped.
I coloured the all white flower ribbon with a brown Sharpie to match the flowers on the patterned paper.. 
...and coloured a pale yellow flower embellishment with a blue promarker. 

Its a handy money saving tip that, rather than buying your embellishments in lots of different colours, colour them yourself with your existing stock of pens, paints and alcohol inks.

Thanks for looking and for any comments,
qwiksave

Wednesday, 16 March 2011

Quirky Distressed Birthday Card

I got a fab new stamp yesterday and couldn't wait to use it on a couple of birthday cards I need to make (for tomorrow, eek!).  I thought I'd do them in two different styles, one with an old fashioned, distressed  look and the other one using more up to date, modern papers.  That was the plan and so far I have just done the distressed card:

The background stamps were deliberately done in an incomplete distressed style.

This is the main image though, it is such a fun stamp, very quirky:
Sentiment says 'Meet under the tree for a nice cup of tea'

The stamp is a Crafty Individuals stamp from Aldridge Crafts.
The fake stitching is a rub on, the papers (distressed with sandpaper) were freebies from card magazines and the image and the Happy Birthday sentiment were attached with 3d dots.  The placement design was from an old CPS sketch.  

I would like to enter it into the following challenges:
LITTLE RED WAGON - St Patty's Day - Green 

Good news for me yesterday! I won a couple of tickets to the Hobbycraft show at the NEC in a couple of weeks.  Yay!

Thanks for looking and for any comments,
qwiksave

Monday, 24 January 2011

Early Valentine Craftiness

I've been having some initial thoughts about Valentine's Day coming up soon, so have been 'playing around' with ideas.

One of my favourite crafty motifs is the flourish (you'd never guess looking at my blog would you? lol)  and I'm pleased to say it is still very much in vogue in the craft world at the moment.  So, what better idea could I come up with than to combine the heart with some flourishes, because that is exactly what I did:

It was just a sketchy idea - I stamped the large heart and the flourishes in black. I then drew and coloured in the little hearts around it freehand with a red pen.  I was going to leave it like that but then started to sketch over the flourishes with the red pen and before I knew it I'd sketched all over it with the red.   It has given it a loose calligraphic effect which I quite like.  I'm not sure whether I'll use it as part of my card this year or maybe I could frame it as a decoration?  Perhaps it needs some words...?

Another idea I was playing with was this:
It looks like a squashed boiled sweet, but it is in fact an embellishment made out of glue from a glue gun that has been stamped with a wooden stamp and then coloured with red alcohol ink.   It was a new technique I had read about and thought I'd try.  After heating up the glue I just put the message stamp into it and left it to set for about 10 minutes.  To colour it you just add the alcohol ink straight from the bottle (on a craft mat).  Think it mght make a nice Valentine's card envelope seal.

Finally, not Valentine's related, I altered a box file:
Ryman's, a UK stationers has a great range of stationery at the moment with this multicoloured type on it but they don't do a box file in the range so I photocopied the image from this other plastic file that I bought and stuck the photocopy (after laminating) onto my existing box file.

This was the file they had in the range (they also do note books, address books, go take a look):
It's good, but just a little too flimsy for the rough treatment I give my everyday files!

I'm just a little bit excited this week, because I've treated myself to a couple of craft items that were in the sales and they should be coming in the post any day now - the new Cuttlebug and a Suze Weinberg Melting Pot!  Wahay!

Thanks for looking and for any comments,
qwiksave


Tuesday, 7 December 2010

Watercoloured Christmas Pictures

I really enjoyed making tonight's craft:
Mini Christmassy pictures using rubber stamps, watercolour pens, a plant sprayer and a white pen.

I just love the blending effect that watercolours create when lots of water is added.

I made a few:
Not so keen on the 'Merry Christmas' one but I love the Father Christmas:
After stamping the image (using Memento Dye Ink) and leaving it to dry, I coloured him & the background normally with some watercolour felt tip pens...
..and then I 'zapped' the paper all over with the water from the plant sprayer.

I mopped up the excess with a kitchen roll and after leaving him to dry for a little while, I went around his outline with a uni-ball Signo White pen.  I love the almost magical, unpredictable results.

I also went on to making this non-christmassy one:
...using a 50p charity shop stamp.   Pretty flowers are not my normal style but I took great pleasure in doing this to them!   Zap! Zap! :-D

Thanks for looking and for any comments,
See you tomorrow,
qwiksave

Saturday, 27 November 2010

Stamped Christmas Card

With all these other makes going on, I've been neglecting one of the most important crafts of Christmas - making my own cards!  With the weather the way its been, I now have the perfect opportunity to stay indoors and get them done.  That saying, I did make one today!
I've used a scrapbooking paper with swirls already on it and I have Christmassified (do you like that word?) it by adding stamps of holly, snowflakes and baubles.

 In the middle I have done the sentiment.  The wording 'Merry Christmas' was stamped onto plain paper and 3-d dots were placed behind it to bring it out of the worded background.

I think I'd best start on the others that I need to do, post haste!

Thanks for looking and for any comments,
See you tomorrow,
qwiksave

Sunday, 22 August 2010

New Techniques to You

Today I got covered in black and white! For a lot of the day (until my sons came home from their grandparents) I've been gessoing pages and pages of that altered book I started a while ago.  I also have made its title frame for the front and also for the binding:


I decided that aswell as its pages being full of techniques, it would be more of an art journal with a theme.  And whilst listening to some religious music this morning when washing up, it gave me the idea to make the theme of this book Religion, and more specifically, God.  I've been looking at 'how to' art journal sites recently and they have inspired me by saying you make the journal for you!  Nobody else has to approve, nobody else even has to see it, you do it in your way, and you choose how you wish to do it.  This is me being brave! Not something I do very often.  

Anyway, here is the full cover and front inside page:

Yes, I've called it 'New Techniques to You  Subtitle God?'
I've added black distress ink and scroll stamps (which is how I ended up covered in black!) around the exisiting frame.

Part of the reason I chose this subject was because the original book was religious, so I'm keeping with its theme.  

And even though I will be keeping my views private, I still plan to show you the book as it progresses as I'm going to be doing artistic techniques on the backgrounds of the pages. 

And this was the reason I got covered in white today:
Lots and lots of pages that had to be brushed over with gesso!  Strangely soothing to do though as gesso (it works as a paint primer) has a nice texture to it.   I've still got quite a few pages left to do though....

Thanks for looking,
See you tomorrow,
qwiksave

Wednesday, 11 August 2010

Boy Craft - Badges

Today I made a craft for my boys whilst they were in London enjoying the Science Museum with their dad.  He took them on the train this morning and I had the whole day and evening to myself!  A rare treat indeed. 

What I have made for them are some boy themed badges:
..with my favourite effect on them - distressing!

I didn't make the backs of these, I just used some old ones that  I already had and stuck new fronts on them.  The designs were all from a new set of small stamps I'd purchased in Germany called 'Heroes & Explorers.'

Some of them had a dry brush effect background and to do that this is what I did.  First of all I drew around the old badge so I knew what size I was working with and then stamped my design into it.  Then I used masking fluid (also purchased in Germany but available here) and painted over the stamped design.  When that was dry, I dry brushed over the whole badge area with red paint (it looks orange on the pic, but it is red).  After that paint had dried, I then rubbed off the masking fluid. After sticking the front down I added handrawn lettering & circles and finally inked the edges.

These other badges have Glossy Accents on the characters to give them a 3d effect:
Badges aren't exactly in fashion atm, but I notice that the shop Paperchase have several ranges in.  Not that my boys will worry about being in fashion.  Hopefully they will wear these, maybe on their hat?  They have got a resemblance to Playmobil characters, so maybe that will persuade them.  ;-)

My boys had a great time in London, they visited the 'Ripley's Believe It or Not' Exhibition as well as the Science Museum.  The photos they have taken at Ripley's are a bit gruesome so I'm not going to show you  those, but here they are in Picadilly Circus:

and sitting on the stand of 'Stephenson's Rocket':
Thanks for reading,
See you tomorrow,
qwiksave
Sunday, 23 May 2010

Finished Birthday Card

I think the sun took it out of me yesterday and I was too tired to finish off the card I started last night so I did it today instead. 

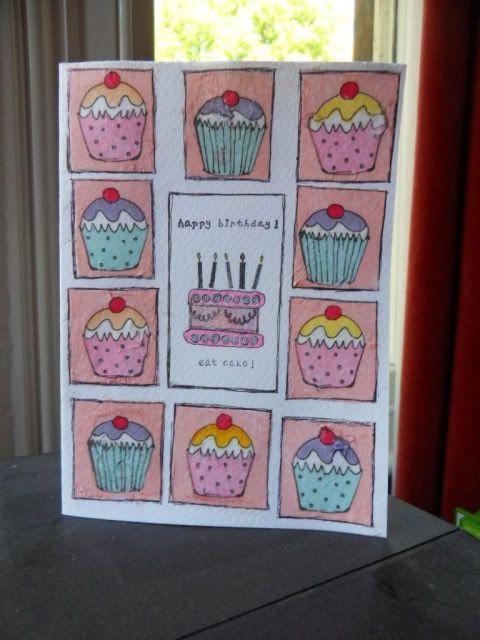
I used PVA glue to stick down the cake designs on the napkins which gave quite a professional effect, almost like an image transfer, but I encountered a problem.  The napkins I used must have been such poor quality (£1.50 for 20 from Tesco) that they were very delicate and ripped in places when being stuck down.  I had to use pencil crayons to disguise the rips.

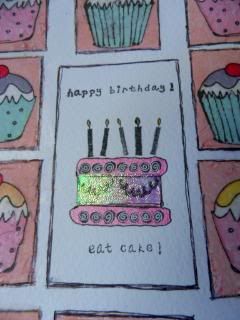
For the middle section, I didn't use acetate in the end, I just stamped onto the card.
I used glitter paper underneath and coloured the cake in with a Sakura glitter pen .

The card was finished off with some messy 'shabby chic' handrawn lines.

* * * * *

My younger son woke me up this morning with this, that he had written on my notepad:

Awww!

See you tomorrow,
qwiksave
Related Posts with Thumbnails