Welcome to my creative online journal

Showing posts with label mini scrapbook. Show all posts

Friday, 5 November 2010

Mini Tim Holtz Booklet

I've made a mini book with pockets using Tim Holtz papers tonight.  It was not my idea, I got a fab video tutorial from Creations by Christie .

It's very easy and made with just one sheet of 12x12 paper!  Some clever folding, a bit of glue and a titchy bit of cutting.  Please see the step by step instructions on the video on Christie's blog.

This is the front of the booklet.  I've used a large button and some twine to tie it together. 

The page was from the Retro pad and I distressed all the edges with sandpaper.  Think Tim would approve! ;-)

This picture shows how you can put photos in the pockets.  The boy in these photos is now in his 30's and 'just happens' to be the son of the lady who is 60 this weekend.  This will be another 'extra' little pressie for her.

* * * * *
I have an apology to make about my post earlier with the fireworks.  You may not have seen it, but you may have heard it! {{Blush}}   It (a slide show with pictures of my makes and some fireworks), was so noisy that it even played in Google Reader when you weren't even looking at this blog!  I didn't realise it would do that, big Ooops!  (Luckily it's safely deleted now).

Thanks for looking and for any comments,
My husband has just walked in the door from working in Germany, best go,
See you tomorrow,
qwiksave

Tuesday, 19 October 2010

Christmas Tag plus Scrapbook

I almost forgot to do a craft today because I was so absorbed watching QVC's craft day! 

But I managed to do a christmas tag:

I think I have stunned most of you into silence with my Halloween costume scrapbook (particularly yesterday's gruesome page!) so I've decided to finish it off, at least for now, anyway.

I added a book ring and ribbons.

How one side looks (so far):
..and the other:
I was thinking I might put it on the hall table on Halloween night.

Today I was also delighted to discover my tip about photocopying 3d objects (used on the skeleton page) was picked out by Mr Linky on the Top Tip Tuesday blog challenge so I have won some digital images from Softpencil, yay!  (Link on sidebar).

Thanks for reading and for any comments,
See you tomorrow,
qwiksave

Monday, 18 October 2010

Horror Decoupage

I had an idea to do tonight's craft whilst doing helping my son do his homework tonight.  He has been asked to do a finger puppet of some kind of character from the Tudor times.  I'll show you that after I show you the craft that it inspired.

It was my next horror costume scrapbooking page:
(All FAKE blood I should add from our fancy dress supplies)

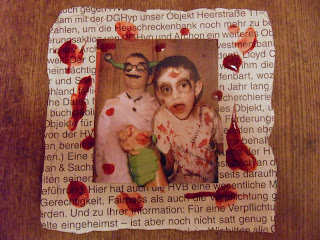
It's a decoupage page, the boy in the front and the hand were cut out and decoupaged:
I haven't cut out the shape of the scrapbooking page yet because the FAKE blood (sorry, it does look a bit too real!) is still wet.

This was what we did for the homework:

I got my son to cut out this image of Elizabeth I.
and then I added some decoupage to it.  After I had done that, I thought it would look good rounded around something, so found a polystyrene cup:
Sorry, these pictures aren't terribly successful. It really does look much more effective in RL.
(..and if I was cutting it out, I would have cut off all of the green, but it was his homework! ;-)

Doing the decoupage on this project is what gave me the idea to do it on my craft tonight.  Glad I did, it makes yet another way of doing a page to add to my Halloween Costume mini scrapbook.

Thanks for looking and for any comments,
See you tomorrow,
qwiksave

Sunday, 17 October 2010

Costume pages part 2

I'm sorry but I have been hunting high and low for that picture of my son with no head but haven't found it yet! 

I've done another couple of pages though:
Say Cheese!

I personally think those teeth are revolting, but you can tell my youngest son, who was about 3 at the time, was quite happy to wear them.

This second page is a bit spooky! That skeleton on the left seems to be like a ghost coming out of the page:
It's a rubber toy skeleton that I have photocopied onto the page by placing it on top of the copier.

TipMake your own designs and embellishments by photocopying 3d objects (using your home printer, if available)
I have then used distressing ink (black) to go around the edge of the page.

I've got a quiet week next week, my eldest son goes on a Residential with the school (he was the one that got sent home from Cub Camp in the Summer, remember?)  He's going to be sent with strict good behaviour instructions and hopefully this time will get to enjoy the many activities including abseiling, orienteering and canooing.

My husband also goes back to work in Germany for the week, so its going to be quiet with just me and my youngest to entertain. 

* * *
I wish to enter this tip into the Top Tip Tuesday Challenge

* * *
Hope you've had a good weekend,
Thanks for stopping by,
qwiksave

Saturday, 16 October 2010

Costume pages part 1

Aaaaaaaaaaaaah! This is the title of one of my halloween scrapbook pages that I've done tonight:
This 'lovely' picture is of my husband on one of our samba dress up occasions.

Admitedly this is a 'bit of a cheat' as I've added a post camera effect onto this - its a 'wrapped in cling film' effect which makes it look extra gory.  The arrows were real though, they were painted on with face paints. 
The photo effect makes it look as though the face is outlined with white, so I continued that theme by outlining the scallop around the edge of the paper with white pen.

Another theme I will be continuing thoughout this Halloween scrapbook will be that of splatters,  which I did on this one and also on another page I did tonight:
I also added a rubber stamped 'blood stained' hand. This is going to be the 'title' page of the book.

I have found most of the photos I've been looking for but there is a great one of my older son taken last year that I can't find.  We made him a great homemade costume that made him look as though he'd lost his head and was carrying it!

Thanks for looking and for any comments,
See you tomorrow,
qwiksave

Friday, 15 October 2010

Spider Make-Over

I really wasn't very keen on the way I did this mini-scrapbook cover yesterday so I have changed it to this: 
I found a great idea today on the Art Institute Glitter (?) blog about glittering up your plastic spiders:
You soak it up (to clean it) in rubbing alcohol before covering it in glue and then glitter.  I've covered mine in 'Glamour Dust' and he looks ready for the ball!

Overall, I'm much happier with the cover than I was yesterday:
Unfortunately I had some more printer problems again today- it suddenly decided to refuse to accept its usual cable connection - which meant I couldn't print off any more halloween costume pictures for this album.  I have managed to fix it now, with just a few choice words to jog its memory (lol), so should be able to crack on again with the inside pages.

Thanks for popping by and for any comments,
Have a great weekend,
See you tomorrow,
qwiksave

Thursday, 14 October 2010

Halloween Fancy Dress Album

My family and I love a good dress-up! Give us a good theme for a fancy dress party and we go to town!  You may remember some of the outfits and wigs I showed you here on this blog that my boys were wearing on one fun day in the Summer Holiday.  When my husband and I played in our local samba band a few years ago we occasionally got to dress up and we revelled in it.

So, today, I decided to make a mini scrapbook of some of the outfits we have worn, mainly for Halloween, which will be the theme of the scrapbook, but I will include a few of us in other fun outfits too.  In America they don't only wear horror type outfits for Halloween anyway.

So far I have just been working on the front cover:
I've sprayed white paint onto black paper, added a 'mock' silver web and a real plastic spider.  I'm going to look on the web for a suitable 'horror' font for the title...
That spider is looking a bit too realistic! Aaaah!

I've found a few pictures to include:
But there are loads more to find...

I'm also looking for more potential background accessories too:
..and these will make some good spooky templates.

Hopefully this WIP (Work-in-Progress) will be finished in the next few days! WTS - Watch this space!

* * *
Finally, I stamped a sentiment on the clay heart that I made the other day:

Thanks for stopping by and for any comments,
See you tomorrow,
qwiksave
Related Posts with Thumbnails