Welcome to my creative online journal

Monday, 24 January 2011

Early Valentine Craftiness

I've been having some initial thoughts about Valentine's Day coming up soon, so have been 'playing around' with ideas.

One of my favourite crafty motifs is the flourish (you'd never guess looking at my blog would you? lol)  and I'm pleased to say it is still very much in vogue in the craft world at the moment.  So, what better idea could I come up with than to combine the heart with some flourishes, because that is exactly what I did:

It was just a sketchy idea - I stamped the large heart and the flourishes in black. I then drew and coloured in the little hearts around it freehand with a red pen.  I was going to leave it like that but then started to sketch over the flourishes with the red pen and before I knew it I'd sketched all over it with the red.   It has given it a loose calligraphic effect which I quite like.  I'm not sure whether I'll use it as part of my card this year or maybe I could frame it as a decoration?  Perhaps it needs some words...?

Another idea I was playing with was this:
It looks like a squashed boiled sweet, but it is in fact an embellishment made out of glue from a glue gun that has been stamped with a wooden stamp and then coloured with red alcohol ink.   It was a new technique I had read about and thought I'd try.  After heating up the glue I just put the message stamp into it and left it to set for about 10 minutes.  To colour it you just add the alcohol ink straight from the bottle (on a craft mat).  Think it mght make a nice Valentine's card envelope seal.

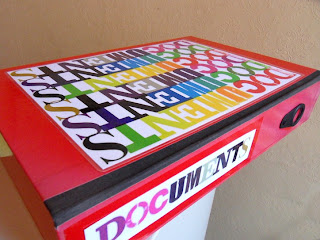
Finally, not Valentine's related, I altered a box file:
Ryman's, a UK stationers has a great range of stationery at the moment with this multicoloured type on it but they don't do a box file in the range so I photocopied the image from this other plastic file that I bought and stuck the photocopy (after laminating) onto my existing box file.

This was the file they had in the range (they also do note books, address books, go take a look):
It's good, but just a little too flimsy for the rough treatment I give my everyday files!

I'm just a little bit excited this week, because I've treated myself to a couple of craft items that were in the sales and they should be coming in the post any day now - the new Cuttlebug and a Suze Weinberg Melting Pot!  Wahay!

Thanks for looking and for any comments,
qwiksave


Thursday, 20 January 2011

Family on Display

A few year's ago (must go back!) on the way back from visiting Legoland in Windsor, we popped in to see one of my cousins and one of the things that struck me and I still remember it today was how lovely it was that she had loads of family and friend's photographs up in lots of rooms of her house.  They were fascinating to look at for visitors (particularly for us family) and a lovely reminder of special events, both the celebrated and the everyday.  That cousin of mine had in the past (thankfully on remission) suffered from Cancer, which may be a part of the reason for the photos, but it got me thinking, both then, and again now, just what a lovely idea it is to be surrounded by memories of special times with your family and friends.  Some of you probably already do this, but for me, apart from a very few pictures of my boys, most of my family pictures are hidden away in boxes.  Well, not any more they are not (going to be).  I'm going to start displaying pictures of my nephews, nieces, 2nd cousins twice removed (well, maybe not them ;-)  ) aunts,  uncles and grandparents... and bring them out of hiding and on display! 

I also decided that I will not just display them in a frame, I'm going to make 'mini' scrapbook pages to bring out aspects of their personalities.  Which brings me onto this:
Tonight's craft, a mini scrapbook page of my young Nephew, Daniel.

Number one on my list (because my sister gave me his up to date picture in her Xmas Card) and it's me putting my idea into action! 
I used stamps for the circular star images, stickers for the letters and gummed stars for further embellishment.  I didn't have red stars so coloured the white backs with a red Sharpie.  I also used my new stitch gizmo from American Crafts for punching holes for the fake stitches drawn around the photograph.  As it will be behind glass, I had to use flat embellishments but for some dimension I used some Glossy Accents.

Thanks for looking and for any comments,
qwiksave


Tuesday, 18 January 2011

Motivated

Hello! Ooh, it does feel good to finally feel 'human' again. I think I've had more than my fair share of illnesses recently.  In a way it's my own fault.  Previously I have been months without so much as a sniffle and had been feeling just a little bit too smug about how 'I never get ill' - so, 'just to show me' I was given 3 lots of the dreaded lurgy during December and the start of January.

I have to say there is one good thing about being ill and that is that it can give your diet a good kickstart.  If you can't swallow, even chocolate loses its magical appeal!  :-O  Now I'm better I'm not even back on it but I'm sure over time it will sneak its way back in.  Meanwhile I'm just appreciative of the loss of 5lbs...

I'm feeling invigorated and motivated to create again (yay!) and so as a kickstart, I decided to hunt out some artwork that I have done years ago for some ideas.  When I say years ago, I really do mean years (like 20, or some, gulp, 25 years ago!) I scanned it in and simply tidied it up using Picnik.

This one was originally done by simply scratching the surface of the magazine picture with a slightly dampened Brillo pad (a kind of stainless steel scrubbing cloth).  Nowadays, people would probably use Photoshop or the like but its fun to actually physically do it to the picture.
You can get unpredictable results that aren't correctable! But that's all part of the fun.

I do fancy doing some more of this kind of experimentation... and you can of course work with the image afterwards, paint on top, add further images, text around it...

Some of the work I have done in the past isn't really suitable for showing here (ooer) but I have done a sort of summary sheet of a few of the things I found.

The rather strange display of bird claywork (Top Left) was a photo of an exhibition I went to. No idea of the artist. The facework pics were part of my Foundation art course. The rather gruesome doll pic was part of my 'A' Level Photography. It was actually 2 negatives printed onto one piece of paper, again, something done with computers these days.  Top right and bottom left were my experiments with encaustic wax painting (love the textural look).  Bottom middle was a photo I took in Scotland (Balmoral estate) and the last one is of some random textural painting showing the brushmarks.

Phew! What a lot of talking! But seeing all this past work has got me all fired up into creating, which is good because the resolution word I have given myself for this year is MOTIVATED.

Thank you for reading and for any comments,
qwiksave

Friday, 14 January 2011

Craft Storage Idea

I've been having a bit of a sortout of some of my craft materials and thought of this idea for storage  Some of you probably already do it but for me it was new and very useful.

When you put all your paints/fluids etc into boxes you can't tell which bottle is which from above.  Instead of pulling each one out to find the one you want, write on the top what it is:

I used a Sharpie pen.

Its also useful for embossing powders:

I haven't been crafting for a while because I am ill AGAIN!  My temperature keeps flutuating and I can't swallow.  I'm off to the Doctor's later this morning, hopefully he/she will give me some nice medicine. 

Thanks for reading and for any comments,
qwiksave

Tuesday, 11 January 2011

Happy 11th Birthday

...today to my eldest son, Ryan.  His age will always be easy to remember as he was born in the year 2000.

I made him an old fashioned card as he loves steam trains:
...using a Create-a -Scene stamp set which I got from a charity shop for 50p!

I had to mount it on Kling-On backing first:
..and the photo corners I had were black so I coloured them gold using
...Inka Gold by Viva
..a moulding type paste you apply with a sponge. Rich!

I drew a gold line frame around the image using my Promarker Gold pen and used my Versafine Sepia inkpad to stamp the scene onto a brown paper bag. 

*****

And here he was this morning, before school, opening his pressies:

I got him a few jokey pressies like the long haired wig (centre) because he told me he doesn't want his hair cut anymore, he wants to grow it long! lol.  I also gave him the jokey cockerel nose.

He is very into Lego
..so I was pleased to get this Lego wrapping paper from M&S.  He was so delighted with it he tried his best not to rip it when opening up his pressies.

(Fun coloured flamed candles)
HAPPY BIRTHDAY RYAN

Thanks for looking and for any comments,
qwiksave

Friday, 7 January 2011

Sparkle, Sparkle


I was putting the decorations away as you do (did!) and nearby was one of those plastic lenses that you can use to see multiple images so I used it to snap this. Loving all those sparkly rainbow colours!

..And then I added an effect to this same picture using Picnik:
Wow!

It's been strange not being on here every day but I haven't been resting, oh, no.  I've been trying to learn to knit! I've got nothing to show you because knitting and me are poles apart despite using this children's knit book (75p charity shop) and youtube lessons, I still can't do it!  Grrr! (my language whilst practicing was a bit stronger than that!)  I am in need of some personal tuition from a kindly Shreddies granny I think.
The book itself has got some great illustrations:
..and these look wacky:
Such a shame I can't do it!

Finally, I had a bit of doodling fun whilst watching TV last night:
It almost looks like a journal page!

Thanks for looking and for any comments
qwiksave

Wednesday, 5 January 2011

Craft Humour


Blush, Blush, this image is so me! I think the artist was spying on me when he/she thought up this cartoon. I don't actually know who the artist is - I cut this out of a magazine years ago and found it again yesterday, in amongst my own 'creative mess!' lol.  If anyone out there knows who the artist is, I'd be happy to give them some proper credit. 

 I'm sure I'm not the only one out there (am I??) like the person featured in this cartoon but I am trying to get better this year at being just a bit more domesticated (..and so far, so good!)

* * * * *

Thanks for looking and for any comments,
qwiksave
Tuesday, 4 January 2011

Moneysaving New Year Tip

I've thought of a little tip for saving us a few pennies (and time!) in the New Year, and with VAT going up in the UK today, we could do with it!

I've simply used the crafts I made this time last year and changed them to this year.

For example, this was a 'Memories of 2010' jar that I made. It was used to put in little slips of paper with memories of days in the year that we wanted to remember - usually good memories! :-)

Here it is with 2010:
Simple bit of correction pen on the '0':
..and rewrite with a '1':
Job done! Saving both time and money. :-)  Now we can create some new happy memories!

Another one:
This 'Important Dates' Calendar
Just take off the old and stick on the new year's calendar.

If you like the calendar craft you have done, and/or spent a lot of time on making it, (maybe you have received one as a gift?) think about how you could make it last longer than just the one year!

I would like to add this tip into the Top Tip Tuesday challenge.

Thanks for looking and for any comments,
qwiksave

Sunday, 2 January 2011

Journal Calendar

Today I finished the Journal Calendar for January that I started yesterday:
Yesterday I used post-its to mask out the date squares and today I cut out squares from past painting experiments and dated them.

Here is a close-up of some of the squares:
and here is a close up of what one of the sides looks like:
I used a clock and key stamp around the sides and also lots of star confetti and doodling.
..and lots of colour and texture on each of the day squares.
This was done on one piece of a very large sprial bound watercolour sketchpad (WHSmith's Sale), that has just 14 pages in it.
I'm hoping to keep up this project all year with one new page done every month.

As I mentioned yesterday, this is part of this creative project:

Link here
Thanks for looking and for any comments,
qwiksave

Saturday, 1 January 2011

New Year, New Craft

I've decided to craft, cold or no cold! The addiction is too strong!
This is it! I know it's difficult to see and I will be adding some clearer pictures on shortly, but its an 'airbrushed effect' calendar.

I used these 'child craft' pens that I treated myself to at Hobbycraft the other day:

You have to blow to get them to work, which isn't ideal with a cold, but they still worked.

I've decided to take part in this project where you do a journal kind of calendar each month:


Looks like fun!
To join in follow this link.
(Further details of this craft to follow tomorrow, I've spent hours tonight trying to sort out my old blog background, grr!)
Thanks for looking and for any comments,
qwiksave
Related Posts with Thumbnails