Welcome to my creative online journal

Sunday 31 October 2010

Trick or Treat!

Happy Halloween to all!
(Stickers on our front door from pound shop)

My boys have just gone out trick or treating (they never trick!) with their dad and a few of their friends.

Younger son gets into his role:
(wearing the same outfit as last year)
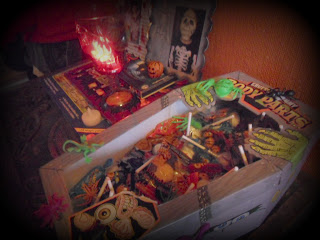
..and I prepared our treats (spot my recent crafts on display!)
Aaagh!:
Have had quite a few so far, hope the treats last the night (and that they save some for me!)
* * * * *
Thanks for looking and for any comments,
See you tomorrow,
qwiksave

Saturday 30 October 2010

My Abstraction Period

I've moved into my 'Abstraction Period' as 'artists' would say, lol. Hope you don't mind looking at background effects, texture and wild abandoned colour, because that is what I've been doing today!

The effect above is part of my trying out a new background effect, as found in my new 'wonder book' by Claudine Hellmuth (see yesterday's post).

I was trying out an effect called 'Big Crackle' which is to get big crackles on paint just using glue and acrylic paint.

My crackles weren't as big as the ones Claudine has in her book, but she used the american Elmer Glue, while I used PVA.
Wish I could show you them!... :-(
I put a thick layer of PVA on top of a cheap dictionary (Poundshop) and then dropped some acrylic paint on to it. I then gently mixed in the paint with the glue and used the heat gun to get the crackles.
(Sorry, I am having SO many problems with Blogger lately, I was going to add other photos of this, but it just won't let me! Grrr! ......)
* * * * *
I did manage to put this other work in progress photo on before it refused to let me put any others on:
This is my altered book. I have gone over those pages I did the other day with watersoluble crayon to break up the white, I also added random crayoned lines on top of the painted colours. (Page on left, before, Page on right, after)

Thanks for looking and sorry that this is not a complete post,

See you tomorrow,

qwiksave

Friday 29 October 2010

Altered Art Shopping

Today I have a shopping post (as well as a craft). I have not had a shopping post in oh-such-a-long time and felt that both you and I were long overdue. Oh, and what a treat I got today! I had to contain myself from shrieking and jumping up and down in the shop.

There it was. Casually sitting on a display table, minding its own business in the charity shop.
This:
OMGoodness! A practically brand new, fabarooni Claudine Hellmuth collage/altered art book for just £1.50!! Regular followers may remember I got her previous book from a charity shop earlier in the year, for £1.85. I am determined to get more into altered art/journalling and this drawing/collage-y style of Claudine's is so my kind of thing. Woo ... and breathe...

Yesterday, I went to Warwick and bought this back for altering (cost £3.40) - on the bus!:

The things we do for our craft!

On a 'normal purchase level,' I also bought this fab file (£4):

..which is great for putting my printouts from the 'True Stories' getting-back-to-writing e-course I'm doing at the moment.

My craft tonight was a Claudine Hellmuth inspired picture:

The violinist is being oh-so-serious playing her violin that she just had to be wearing very silly clothes and the out-of-tune notes add to the tone, I mean theme!

Thanks for reading and for any comments,
See you tomorrow,
qwiksave

Thursday 28 October 2010

Children's Xmas Decoration

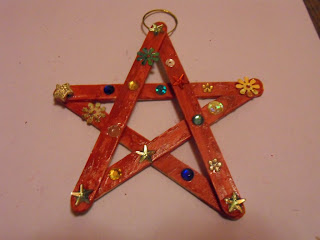
I've been working on a christmas decoration idea that my two boys could help me with.

This is the result:

It does, of course, look more impressive in RL, where you can appreciate all the bling and shine from the embellishments.


The star was made using lollipop sticks:Stick them together, then paint:

..and finally add your sparkly bits:

...and a hanger on the back.

Think this would be a fun activity for a group of children to do, maybe for the tree?

I also had a go at a walnut mini pumpkin:

(based on an idea suggested by K on .hand.made.heart.felted)

Thanks for looking and for any comments,

See you tomorrow,

qwiksave

Wednesday 27 October 2010

Clay Pendants

Just time for a quick craft tonight, I've been getting myself lost in Blogspace looking at all the wonderful inspiration and creations out there!  There really is some fabulous stuff.

I decided to use a product I bought from a charity (thrift) shop a while ago for the grand price of 30p, in combination with some air drying clay.  This 'coaster' made a great impression on the clay.

I made these two shapes that lend themselves to being pendants or keyrings:
I think I may have to have another go, the clay I was using was a bit crumbly so they wouldn't come out of the moulds easily.  I may have to treat myself to some more.

When I do get them looking right, I think painting them in two colours will bring out the raised flourishes perfectly.

* * * * *

I've been reading Roald Dahl's autobiography recently, the first one called 'Boy', goodness me it's scary, no wonder the stories he wrote were like they are. Enough to give anyone nightmares! 

On a cheerier note, my family and I went to see the cartoon adventure, 'Despicable Me' today, in 3-d, at the cinema. I loved it - possibly more than my  two three (counting husband) boys did!

Thank you for looking and for any comments,
See you tomorrow,
qwiksave

Tuesday 26 October 2010

Creative Wall

Today, whilst out shopping, I came across this:
Wow!

It was amongst all this:
(All pictures taken by me, compiled using Picnik)

It is actually an old pub garden that is now a car park.

This is the car park wall:
..With this floor:
..and it used to have lots of sunloungers and brightly coloured plastic tables and chairs on it.  I think the realities of the British weather put a stop to this unconventional idea, and this is probably why it is now just a car park.  The pub owners haven't sprayed it conventional colours yet, maybe they are letting it go naturally.  I personally love all that decaying colour!

One last thing...

I did a bit of my own grafitti  - but only by using a Picnik doodle brush of a man's face on top one of the photos:
and apologies for the bad hair! lol.

Thanks for looking and for any comments,
See you tomorrow,
qwiksave

Monday 25 October 2010

Altered book and Halloween Treat Bag

I have made a (singular) halloween treat bag today.  I think I might need to make some more or the neighbourhood kids will be fighting over this one, lol.
I found out how to make it whilst blog-hopping today on 'Scrap Time' - Creations by Christie.  There was a step-by-step video which you can follow here (it also has a halloween blog candy offer).
On mine I also added a hole and threaded through some co-ordinating ribbons.

I think my sizing was a little out, so when I do them again I won't make them quite so tall.

The other activity I did tonight was to paint some abstract colours in my 'New to You' altered book:
I just love the dry brush effect:
..and I also like the fact that you can still see the original writing in between the colours.

I may have a problem doing my journalling on all that colour though, so will need to think of a way of toning it down.
* * *
Regarding 'True Stories', Shimelle's writing course that I started today, I have had a bit of a think about the questions people ask me and the one question that I get asked the most is, 'Where do you come from?'  The answer to that is England but I am really only Half-English, as my father was yugoslavian (as was then).  I have the look of an Eastern European, with olive skin, which I guess is the reason people ask, but I have only ever lived in this country. 

Sorry for the lateness of this post, technical problems,
See you tomorrow,
qwiksave

Sunday 24 October 2010

Reader's Digest Snowflake

Woohoo! I've finally signed up to one of Shimelle's classes!  My very first!

It starts tomorrow (Monday) and its called 'True Stories'
I'd been um-ing and ah-ing about this and what made the decision for me was the fact that one of my most favourite multi-media artists, Dina Wakley (of Ponderings), is signed up as one of the guest artists. 

This particular class doesn't seem very picture based, as its all about getting us writing.  The equipment list was just this:
A notebook and pen! 

I don't know if you spotted, but the pen I have chosen for writing this is a Yoropen:
They have this unusual nib shape and they are sooooo comfortable to write with, I could write a book!

I'm probably like you though, don't get to write very often, too busy tapping keys on a keyboard.  This in some ways is why this course appealed, as I said the other day,  I lurrrrrve the physical process of writing (the content is what I have the problem with!...)

I will share with you what I can but obviously with a subject title of 'True Stories', I'm sure some of it will have to remain private.

****
So, whats a 'Reader's Digest snowflake' then?  I hear you ask. 

It's this:
(my craft for today)
It's called a Readers Digest one because the instructions on how to make it were in a RD book called 'Extraordinary Uses for Everyday Objects' and the unusual part of this is that the white part is Epsom Salts!  To make it you cut a snowflake out of blue paper and then brush over it with a thick mixture of Epsom Salts and water.  When its dry (I used a heat gun), you do the other side.  It's meant to produce a 'frosted effect'.  I have to say I was hoping for something a bit more 'crystally' but at least I've learned and discovered another technique to try.

Thanks for looking and for any comments,
See you tomorrow,
qwiksave

Saturday 23 October 2010

Christmas House Glitter

I've got a stash box specifically for glitter and I very rarely use it.  It's a shame because I love the sparkly effect it can give.  Glitter is difficult to get right though.  Years ago, it was big chunky stuff that you would put on with glue and it would rub off on the envelope you put the card in - I've probably still got some of that in the box, untouched and unloved.  Now, thank goodness, its made of cleverer stuff, and doesn't (very often) rub off.  So why don't I use it?  One of the reasons is its difficult getting the right shade of glitter, by that I mean the white one that has the sparkles in it.  So many of them have green sparkly bits in them - why?  You have to look very carefully when you buy.  Not all glitter is the same.

For some of my personalised christmas cards to my family last year I added glitter highlights to a snowy picture of the house I grew up and lived in for over 20 years.  My family loved the card - particularly as the house is no longer there. :-(  (It has been knocked down and has now got a block of flats in the space).

This is an example of how to do it (not my old house! :-)  ) using a picture from the internet:
(From a game site called Gamers Walkthrough - these are screengrabs from a game)

First take a picture of the house in the snow.  Print out the picture and then add glitter (or glitter glue)  to where the snow is at its highest points. Also to window frames, icicles, branches, signs...

Another example (picture from the same site):
Last year I also did one of these of my children's primary school adding fun snowman stickers.  My friend said at her house they don't keep christmas cards, but I noticed that this one was still up on display in February! :-) 

The best glitter glue I found for multicoloured glitter particles, used on these two examples was called Craft Twinkles Writer in Crystal by DecoArt (bought in Hobbycraft).

* * * * *
Other news and its half term next week, my husband came back from Germany today, yay, and my son came back safely on Friday from his Outward Bound school course.  His suitcase was a bit heavy when I carried it back from school.  It turned out that he'd brought back 4 rocks from the top of a mountain!  Boys, eh!..

Thanks for looking and for any comments,
See you tomorrow,
qwiksave

Friday 22 October 2010

Having fun with letters

I love writing, lettering and calligraphy, in fact I love letters, full stop!

Tonight I have done a couple of pages of lettering that show you how you can do your own.  Using a computer is obviously one way of doing it, but sometimes it is better to add your own handwritten words for a more personal touch to your cards and scrapbooking pages.

In fact this technique is so well known, you may well know it already, but just in case I have readers that don't know, I have done this for you.

I have two methods of writing to show you, one is by adding dots:

First write out your alphabet in the normal way:
..then add a 'dot' with your pen to the ends of letters, like this:
Looks much more 'interesting' - you can also vary the angle of the letter.

The second method is to add lines.  Again, write out your letters in the normal way:
and then add lines to the ends of the letters:
Again, you can vary the angles of the letters and lines.

Sorry, my post is late today, Blogger is still causing me problems when I try to add more than one photo.  I have to save the page as a draft and then edit the draft.  Hope they fix it soon.

Thanks for looking and any comments,
See you tomorrow,
qwiksave

Thursday 21 October 2010

Paper Flower Tutorial

During the year that I have been posting on this blog, I have seen many handmade flowers out there in Blogland and have never attempted my own, until now! 

I picked up a copy of 'Crafts Beautiful' whilst out shopping today (I'm a sucker for all the cardmaking and scrapbooking magazines, especially Christmas editions), and they had an excellent tutorial on how to make some flowers so I had my first go.

This is how it mine turned out:
Using an old dictionary, a scallop circle punch, a pokey tool and a button

To make it I did the following:

Cut 5 circles out with the punch:
(I forgot to check what was on them!)

Then make a hole through each centre:
Secure them all together using a small brad:
Then turn it over and scrunch up each layer individually:
..and unravel each layer to suit.  This is the stage I added my Distress Ink:
..but perhaps you could do that before you start?..
Finally stick on a button with glue in the middle of the flower, with some twine for decoration:
.. I then looked at my finished flower and discovered that the word 'austere' was prominantly positioned on the front of the flower! lol.

Thanks for looking and for any comments,
See you tomorrow,
qwiksave

Wednesday 20 October 2010

Christmas Abstract Background

I revisited a craft I did on here in April today.  I haven't been doing repeated techniques much on here as I do like to try new ones.

But I remembered liking the abstract effect of this particular craft so decided to try doing it again using Christmas colours:

As you can possibly tell it is still wet as I've only just finished - I am such a 'do things at the last minute' person. 

This technique uses watercolour pens, Pearl-X powder and Spray starch (the type you use for ironing) which react with each other.  They carry on working for a while after you've mixed them and when they are dry they look different again.  
I personally love the abstract look, but I know its not everyone's cup of tea.  Looking forward to seeing how it dries and if it looks OK I will probably put it onto a Christmas card.

Thanks for looking and for any comments,
See you tomorrow,
qwiksave

Tuesday 19 October 2010

Christmas Tag plus Scrapbook

I almost forgot to do a craft today because I was so absorbed watching QVC's craft day! 

But I managed to do a christmas tag:

I think I have stunned most of you into silence with my Halloween costume scrapbook (particularly yesterday's gruesome page!) so I've decided to finish it off, at least for now, anyway.

I added a book ring and ribbons.

How one side looks (so far):
..and the other:
I was thinking I might put it on the hall table on Halloween night.

Today I was also delighted to discover my tip about photocopying 3d objects (used on the skeleton page) was picked out by Mr Linky on the Top Tip Tuesday blog challenge so I have won some digital images from Softpencil, yay!  (Link on sidebar).

Thanks for reading and for any comments,
See you tomorrow,
qwiksave
Related Posts with Thumbnails