Welcome to my creative online journal

Thursday 31 July 2014

Seaside Themed Ceramic Plaques

When you have visitors coming to your home and in some cases, stopping over (like children's sleepovers), it is a good idea to let these guests know whereabouts they can find your facilities. We have two such rooms next to each other so it would be very useful for these guests to know, at a glance, which door is which.

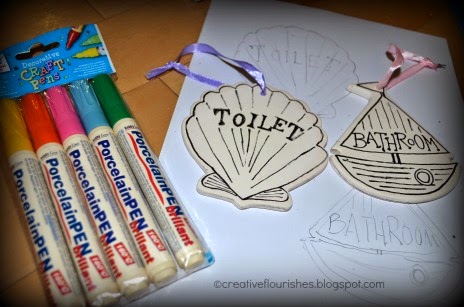
The online craft supplier, Baker Ross, who sent me the glitter used in yesterday's post also very generously sent me a set of seaside themed ceramic plaques and some porcelain pens to decorate them with.  I decided to use mine to make some signs for my bathroom doors.

The plaques arrive completely blank of decoration but are cut in various shapes to guide your creativity.  What I did to mine was to draw around the shape on paper so I could work out using pencil what design I was going to add to them. 
 
Then, using a black porcelain pen that I already had I drew directly on to my plaque using my proposed drawings as a guide.  This particular pen incidently caused me a few problems, I got spots everywhere when I was shaking it (my fault) and it created some very messy splodges onto my plaque when I was drawing onto the plaques (pen's fault!) Fortunately, just by trying, I found out that you can get rid of these errors by scraping them away gently with a craft knife.  A useful tip to know if you make any mistakes too.

Having completed my outlines, I then used the set of coloured pens that I'd been given.
(This was Set A)

I thought they were going to be subtle and maybe a bit pale but they weren't, they were bright and glossy.
These were the other shapes in the set that I have yet to decorate:
After decoration the instructions on the pens say to allow 4 hours to dry before heat setting in an oven.  See pens for complete directions.

To put them on my doors, I took out the ribbons that came with the plaques and used nails.

There! No confusion now (except that there does happen to be another toilet in the bathroom too...) .  I just need to work out what I am going to write and draw on to the other shapes now...

Thanks for stopping by today,
see you soon for some more creative ideas,
Nicky
Creative Flourishes

 Disclosure: I have not been paid to do this review, I was sent the products to try out free of charge but I did not and will not receive any commission on any links listed.
Wednesday 30 July 2014

Make Your Own Super Sparkly Glitter Gems

I have to admit that I am a girl that loves sparkle and as a result I love glitter!  Well, very luckily for me I have recently been sent a few pots of the wonderful sparkly stuff to try out from the lovely people at Baker Ross, a UK web craft supplier (I'm sure my international readers will be pleased to learn that they also deliver their products worldwide, just check out their website for details).


I spend a great deal of my time procrastinating searching through the boards on Pinterest (my boards are here) and came across this idea to make some glitter gem magnets.  This seemed like the perfect project to try out my new glitter pots...except that the ones that I made didn't end up as magnets.  They could be of course, just by sticking a magnet to the back, but you can also use them for other things like rings or necklaces.  As I've been once again watching my weight, mine have been added into two jam jars to indicate how much weight I've lost (like this pin here).  To see my weight related posts, take a look at this separate Creative Flourishes page here.

Anyway, enough waffling, on with how to make them, or how I made them. Starting with gathering your materials together:
I also used some different nail polish colours, other glitters I owned, teeny nail decorations and a jar of clear nail polish to seal them.  I couldn't take photographs whilst making them so there aren't any other 'in progress' shots but basically what you do is turn over your glass nugget and spread an even layer of glue on the bottom.  Different to the pinterest post I used, I added glitter using my fingers and patted it down into the glue.  After letting that coat dry I added more glue & glitter to fill the gaps.  I used the traditional way of putting the excess glitter back in the pot using bits of folded scrap paper.  I should also add that I did mine outside - on a non windy day!

These were the ones created with the Baker Ross glitters:
..which I noticed are now on offer down from £3.50 to £2.99.

I love the way the gems magnify the glitter particles.  I'd never noticed that they were teeny little hexagons before!
 
So pretty:

As you could see the backs of my gems when they were in the jar, I added some dark sparkly nail polish to the back of some of my gems but that isn't necessary for jewellery or magnet use.  I should also point out that the nail polish made them and the jar smell very strong!

Don't forget to seal the gems with clear nail polish or varnish of some kind and when dry they are ready to use.
*Sparkle, sparkle*

Hope you enjoy making some of these and
Thanks for joining me today,
Nicky,
Creative Flourishes


Disclosure: I have not been paid to do this review, I was sent the products to try out free of charge but I did not and will not receive any commission on any links listed.


Sunday 18 May 2014

Organising Series: Part 3: Notebooks


Today's instalment in my mini organising series is all about my shopping organisation.  I have only recently started using this system because the way I used to do my shopping was very chaotic and inefficient.  I would go out into town with a vague idea of what was needed and come back without the very things that I went for! Not to mention unused discount coupons and offers that would have been useful, had I remembered them before they went out of date!

So, armed with information gained from Pinterest (I have a useful board on organisation here) and after watching a few youtube videos, I set about getting myself an efficient shopping system.

First of all, I put a notebook & a pen in lots of different rooms in my house so that I can write down what I need immediately that I think of it.  I have notebooks in my craft room, my bedroom, the bathroom, the kitchen and the lounge and when I need to go shopping I go into each room in turn gathering all the lists together.

Kitchen Notebook


I list all the items on my iphone using an app that I've recently discovered called Cozi.  It's linked to my husband's phone and either one of us can get the items needed when we are out and about.  When we cross the items off it crosses them off both our lists which I think is super duper clever as it saves us getting duplicates.

Back onto the Shopping Organiser...
This was bought from Staples and is called an 'Arc' organiser.  What I like about it is the pages are punched so they can be moved around, unlike a normal notebook.  This is a useful facility when you have changeable content.


Opening it up, you can see I keep my store cards in the front:
 ..and all my vouchers in named plastic wallets in the back.
This is a sample page of store cards in the business card wallets:
The business card organiser was bought separately and made by Adoc. They have the same size of punched holes as the arc. 
The A5 plastic wallet pages I use are made by Adoc but Arc make them too.  
I've labelled each shop I get discount vouchers for and put everything I have to do currently with that shop in its own wallet page:
I highlight dates, to make sure that I know to use them (if I need or want to!) before they expire.  I can also see when I need to remove them.  (The plastic wallets are useful for seeing both sides of a voucher too).
In the back pages I have some lined and graph paper for various notes. Here I have put all the Opening Hours of  my local supermarkets, just in case the need arises to go to a certain one for emergency bread or tea bags at 6pm on a Sunday!:
 This is page 1 of 3, we have a whole set of local supermarkets and luckily I'm not loyal to any!

So, this is my system, hope you found it useful (and not just a tad obsessive?!...) Join me again soon for some more organising tips,
Nicky 
{Creative Flourishes}


Tuesday 13 May 2014

Organisation Series Part 2 Handbag

I have loads quite a few handbags and with the weather warming up I thought I would be brave and start to use one of my 'good weather' cotton handbags.

Since I've been on a bit of an organising frenzy lately, I thought I'd show you a few of the ideas that I have found that are working well for me at the moment.  I say 'at the moment' because I do switch about if I find a technique that I thought would be perfect simply isn't working.  

OK, let's start with the contents as a whole:
Here we have the bag, a Shopping Organiser (containing all my shop cards plus other interesting info, I'll tell you about that in my next post), my pencil case, umbrella, 'gubbins' bag (details to follow), glasses case, coin purse, charity craft magazine, notebook (closed with a hair band) and my notes & cards wallet. 

In detail, we have my pencil case, which is a make up bag that is in clear plastic so I can see which pen I want (I have moods which dictate which particular pen I want to write with at any given moment.  Hopefully I'm not alone in this..?)
My glasses case:
...which isn't exactly glamorous, but really helps me find it in the darkness of the handbag's black lining. 

My coin purse:
Again, clear plastic.  I love seeing at a glance whether I have the right change for something.  Before I had this I used to hand out notes at the cash desk, rather than struggling to count out the correct change which meant that I ended up getting lots more unnecessary and heavy change in return.  I'm really pleased I changed (groan!) to this type of purse.  The purse, incidently, is called a 'Clippy'.

This charity magazine was in my bag because I just happened to have bought it from 'The Stroke Association' when I attended one of their open days recently:
It has some interesting items to make and includes the instructions.  A useful item to peruse in a coffee shop, preferably with a cake...

And then there's my notes & cards wallet (the blue & green item on the bottom row).   I keep all my notes(£)  in there, along with my bank and library cards.  Store cards are kept in the Shopping Organiser, which as I said will be a whole new post.  

Finally, the gubbins case and its contents and they are:
1. Personal items 2.Tissue packet 3.Comb 4.Emergency pound coin holder, straight from the 1980's!  5.Teeny Paper knife  6.Pocket game called the 'Left-Right' game. We love playing this as a family whilst waiting for food in cafes and it's great for keeping the boys out of mischief too!  7.Hearing Aid Batteries for me  8. Pink Swiss Army emergency set, including scissors and tweezers  9. Photos of boys in Paperchase wallet. 10. Plasters. 11. A clothes stain remover pack  12.Lipstick and lipbrush  13. Anti Chaffing cream for when my glasses rub my ears 14. Mascara  15. Stylus for my phone and 16. Bubblegum flavoured lip balm.

Not much make up but then I don't wear it very often.   If I do, I put it on before I go out.

There are pockets in the front of the bag where I keep my keys:
This for me was a very useful tip.  The amount of times I've struggled in the rain outside my front door,  pulling all the stuff out of my bag to try and find my keys.  This simple idea has greatly increased my sanity levels.  (I have also put red tape on my car door key, it looked so much like the ignition and this alone has saved me countless minutes...)

Finally (phew! very long post), I have my phone and emergency chargers:
Again, kept so that the phone can be grabbed rapidly, if it rings.  That was another thing that used to get lost amongst the abyss that was my bag previously.

Thanks for stopping by today. See you soon for some more organising tips,

Nicky
 {Creative Flourishes}


Monday 12 May 2014

Organising Series: Part 1 Craft Bag


Hello again! This week I'd like to show you some of the techniques that I've been using recently to contain some of my everyday clutter.  Today's 'show and tell' is about my travel Craft Bag which is where I keep my every day Filofax (This one is from WHSmiths and called a 'Clipbook') and also my art journal, (not pictured), stored underneath the Filofax.

The bag itself I think is one that people normally use for beauty products and I was very pleased to obtain it for just £5 from my local Cancer Research shop.  It was brand new and in immaculate condition, yay! Being black, it doesn't look that exciting from the outside, but that doesn't really matter as it's what's inside that counts, isn't it?


And what a lot there is!  This is it all rolled out showing you (nearly!) everything I've managed to cram into all the nooks and crannies of the bag.  Hopefully you can read the labels OK, you may need to click onto each of the individual pictures though.  I've broken down each of the sections so you can see them in more detail.


I was also so pleased to find the label 'Stamping Up' punch (top right) at another charity shop for just £1.50! What a bargain!  I've never seen one before (at these places) and probably never will again.  You do have to get things as you see them though.

When preparing this post, it did make me realise that I've got an awful lot of glue in there, but that's OK, they are different types and I never know which one I'm going to need so 'it's all good'.  I do love having some of my favourite art products all in the one place, and this system makes it so easy to just grab them when I need to. 

The main compartment was a bit difficult to photograph as it contains loose items, but you should be able to get the main idea.

A bonus tip for you:  If you wrap some 'Press 'n' Seal' around your opened packet of baby wipes they still stay moist when the sticky goes. 

I have put some more pens in the Derwent Pencil Wrap which rolls up and that is sealed with velcro.

Lots of lovely colours!

I love washi tape and use it to decorate my filofax diary entries, it's great for adding a pop of colour onto a boring black and white page. 

...and Supaclips are a much more fun and colourful alternative to staples too! 

Not forgetting the side pocket:
...and finally, in the outside zip pockets (see top picture) I keep my magazine cuttings & stickers that I also add to my journal and filofax. 

Please join me for the next episode in my organising series where I will be showing you the contents of my handbag,


Nicky {Creative Flourishes}


Wednesday 30 April 2014

The Art of Whimsical Lettering

Back Again! And today I'm pleased to be showing you some samples that I have made doing one of my favourite artistic activities, lettering. 

I preordered this book, 'The Art of Whimsical Lettering' by Joanne Sharpe from Amazon UK way back in December and have very patiently (fib!) been waiting for it to arrive.


I have decided to diligently work my way through the book, completing all the exercises in the order that they come, rather than 'dipping my toe in' here and there.  This technique is what I find works for me, but, as the saying goes, 'each to his own'.  I have even resisted the temptation to look ahead to see what treats are coming up as for me that is like peaking at a christmas present.

Anyway, on to the exercises that I've completed so far (I've had the book for two whole days!) and to show you my approach, which is different to what is suggested.

In the book we are encouraged to get a journal type book to do all our lettering in and if the pages are too thin to stick two pages together to counteract any bleedthrough from markers, paints, etc.  What I've decided to do differently is to not have a journal but to keep all my completed pages together in ring binders.  I will be using an A5 size for most pages, and then using an A4 for when I do bigger pieces.  

I have an A5 notebook with wonderfully smooth paper in (called Optik Paper) that I plan to do most of the exercises in and will swap around with other types of paper as needed.  I have graph, tracing and watercolour paper amongst others that I can add to my folders using a hole punch.

(For those in the UK, the A4 folder was from Paperchase and the Snopake brand of A5 folder was from Rymans). 

I can't tell you what I had to do for the exercises, because that wouldn't be fair to the author of the book, but I can show you how I completed them.


The exercises you see here aren't meant to be seen as complete like works of art are, they are just simply for practicing lettering.  Practicing is something that is very much encouraged in this book, to be carried out every day, if possible. 

I can tell you that exercise #4, on the right hand side of this page was to look out for and cut out printed examples of lettering that we like: 
I'm sure I could do pages (& pages!) of that!

I've always loved lettering and even had a job doing calligraphy in the past, so am loving finding new fun ways to present it creatively. 

I will be back soon with some more of this, plus other crafts that I've been doing recently.
Thank you so much for stopping by today,

Nicky {Creative Flourishes}

Wednesday 5 March 2014

Spring is in the Air

It's Spring! No, not in reality, but in my latest page of my handmade mother-in-law's calendar:
You may remember from a few posts ago that I'm rapidly trying to finish this scrapbook calendar that I gave to my MIL for christmas but rather rudely snatched back (no, asked nicely) to improve on the pages that I'd already completed. 

For this May page I changed the theme completely. Before I added all this 'Springness' it had quite a boring picture of my boys playing with a remote controlled boat on the canal.

To be honest, I'm not normally a flower person, but the calendar already had the outline of flowers printed on the bottom of the page so I went with it.

...And when I remembered that picture on the left of my son holding that crocus I knew that I just had to use it.  These pretty type of images are the type of embellishments that I would save for when I make cards for my MIL so they were perfect for this themed page for her too. 

I have also completed the July page.  The background page for this had the predetermined theme of 'Photo Star' so I found embellishments and stamps with a camera & an old film theme, together with lots of different sized stars.  These also conveniently tied in with my youngest son's magician costume (right) which also featured stars on it. 

I've quite enjoyed the process of making this calendar and seeing these old pictures again. I still can't believe how quickly the time has gone as these 'little boys' are now 14 and nearly 12. To me it only seems like yesterday that they were wearing these outfits, not 10 years, aaah!

Thanks for stopping by today, I will have more to show you soon,
Nicky {Creative Flourishes}

Friday 21 February 2014

Crafty Birthday Gifts including Brusho

It was my birthday on Wednesday and rather than my husband get me things I didn't want, I steered him in the direction of my Amazon wishlist.  I like the idea of this because by using a simple browser add-on I can add items to my list  from all over the web, not just Amazon.  Most of  the gazillion items I have on my list are craft items and art technique books which is quite a minefield when you don't know the difference between a hot glue and an ATG gun. 

This was one of the great items I had seen on my internet travels and really fancied the look of:

Colourcraft Brusho paints and DVD

Thanks go to my husband for the paints and my sister, who bought the DVD from off my wishlist.  It's a great DVD, presented by Joanne Boon Thomas showing lots of great techniques you can do with Brusho.  You can see a preview of one of them on youtube here.  
 
Another item I had seen on a Donna Downey video was a 'Fresh Water Rinse Well.' This isn't one of life's essentials, but when your craft room is up in the attic and the route to your water supply is down some rickety stairs, it sure makes life easier!  Besides, what are birthdays for, if you can't have the odd frivolous luxury item?  What it does is clear away your old painting water and replace it with clean:
 
 Brilliant!.. and the gurgling sound you get with the fresh water is an additional bonus. 
 
I spent my birthday afternoon playing with these new 'toys' and I was absolutely in my element. The first thing I did was to make myself a colour swatch page of the 24 Brusho colours:
Brusho paints are highly pigmented powder paints that you add water to, like watercolours.  You only use a teeny tiny bit at a time so they will last for yonks.  I love vivid colours so was pleased to see they dry almost as bright as they are when they are wet. 

This, however, was the effect I saw that attracted me to them in the first place:
To do this you wet your page and then sprinkle on tiny specks of the paint.  The colours 'explode' onto the page and then blend into each other as you add more.  I'm thinking that they'll make great backgrounds for journal pages.

I also tried normal blending, using the colours like normal watercolour paints (my sons got me a paint pallette and brushes) and also did some flicking of the colours to make spots:
..which again will be useful for all kinds of backgrounds, cards, journal pages, etc.

All in all, I'm really pleased with these gifts and am itching to explore them more when I next get to do some more crafting.

Thanks for stopping by today and
have a great weekend,
Nicky {Creative Flourishes}


Related Posts with Thumbnails