Welcome to my creative online journal

Friday 30 April 2010

Simpson's Fridge Magnets

Sorry crafters but tonight's craft isn't an inspirational one, its a 'qwiksave indulges her kids' craft.  In fact, it could hardly be classified as a craft at all, because all I have done is produce some Simpson's fridge magnets:

I have loads of different types of papers for using in inkjet printers that I have had for yonks and  been meaning to do something with some day.  I have Magnetic Paper, Self Adhesive Plain Paper, T-shirt transfer papers for light and dark fabrics, Fantastic Plastic, Shrinkable Plastic, Various sized Sticker papers, Ceramic mug transfer paper and even some Mouse Mat Paper (phew!)  So I thought I ought to start using it! (lol)  Which is why I made some Simpson's fridge magnets tonight: 

Think my sons are going to be overjoyed when they see them tomorrow! 

I must admit we have had lots of magnetic characters on our fridge, washing machine and dishwasher over the years.  I think the first ones we had were the Teletubbies (sigh!)  As you replace them each time it makes you realise that it is (yet) another sign that your kids are growing up. 

(The Simpsons pictures were from Google)

See you tomorrow,
qwiksave

Thursday 29 April 2010

Graphic Numbers

A long while ago I nearly became a Graphic Designer. I won't tell you the ins and outs of why it didn't happen but I am quite a messy worker so would have found it difficult working within the confines of neat, precise and  the very accurate way of working that is associated with the graphic world.   I am still attracted to design work and can spend many a happy hour pouring over websites, blogs and books containing graphic images.

Today I have had a go playing with my grungeboard numbers and my favourite non-Photoshop imaging programme, Picnik and made up these:


(Click to enlarge)

I'm still playing with Picnik (its only nearly midnight!) and will print out my favourites and put them on my arty noticeboard for inspiration. 

See you tomorrow.
qwiksave

Wednesday 28 April 2010

Letter Writing

Some people don't look at their children's toys as potential crafty materials, but I do. I think, 'when they grow out of that I'll be able to use it for such and such' or 'I wonder if they'd miss that, because I could do such and such with it now!' (lol) [I should point out that I don't actually act on that one, I'm not that bad!]  Sometimes I don't just use the toys my children have, I actively look for potential (cheap) new or secondhand toys or games that could be used for crafty purposes when I am out & about on my (frequent) shopping jaunts. 

This card that I made a few years ago (which some people may recognise) was made with an old name jigsaw, plastic letters and a few crafty embellishments:
The centre of this card is a photo of a Daniel jigsaw placed on a blue background.  No toy was damaged in the making of this card! 

And that is the idea I have, using letter toys to make personalised cards.  You construct your message with the toy letters and take a photo, then simply print the photo out and stick it onto a card. (Embellish as required).  Maybe make it into a decoupage type too, if you print out several copies.

...And you don't have to stick to just children's cards:
This was made today from a Travel Scrabble game, bought from a charity shop for £1.  If I only photograph the image rather than actually sticking down the letters, I can reuse the idea again and again. 


Still on the letter theme, whilst blog hopping yesterday, I came across a (free) site that lets you  do some whacky things with words that you type into it.  Here are some examples of ones I have done today:

Heart effect

Wave effect

..and Spiral effect
The site is called festisite, and to use your constructed word shapes after you have written them you save them to your computer and print them out.  They would look interesting on the front or inside of a greetings card.

Thanks for looking today
and I'll see you tomorrow,
qwiksave

Tuesday 27 April 2010

This is My Life

One of the projects I've mentioned I plan to have a go at is to write and scrapbook my life story for my own children and for future generations.  I am reading a good book on how to go about this that I got from my local library, the book is called "Your Life Your Story" by Cherry Gilchrist and I would recommend it if you are thinking of doing the same:
(Available at Amazon  ISBN:978-0-7499-4270-0)

I am working through the book and one of her suggestions that I like the idea of was to use a ringbinder that you can separate (using subject dividers) into different ages of your life. This will help because you can write about areas of your life as you remember them but they will be separated into their own 'compartments'. You will be building your story separately but still be working towards completing the whole thing. (Hope thats clear!?)

Anyway, the point is, I wanted a ringbinder that I will enjoy using (it needed a certain 'look') and I came up with this:

It was a plain red ringbinder that I have modified to make it look like 'one of those books' from the TV series of the same name (older readers will know the one I mean!)
I put flock letter stickers (very touchy feely!) onto some gold card:
and added Paperchase photocorners around the edge.  I also embossed the line around the frame using a blunt point and a ruler....

..and glued gold card triangles onto two of the corners:
I think I'm going to enjoy writing in my 'luxury book' - and also think it would make a great gift to make for someone else (fully completed if possible!)

See you tomorrow,
qwiksave

Monday 26 April 2010

Bug Rocks

Tonight's craft was....looking at YouTube Videos of how to make jewellery using cold resin!  Well, no it isn't even though that is exactly what I have been doing tonight.  I feel I would be cheating you if I put that as my craft (see how I'm thinking of you!) so I rapidly did something else too! (lol). 

Outside our back door we have a path leading to our garden and on the left hand side of it is a bit of 'dead space'.  It used to have a wheelchair ramp for disabled people to access the back door before we owned the house but now it has wood bark chippings as mulch to cut down on the weeds. 

I want to make our back garden a little more interesting this Summer with quirky homemade (preferably!) ornaments and decoration, but something that the boys would appreciate too. So I made these to start off  with. I thought they could hide amongst the wood chippings:
(That frog is green not blue in RL))
They are a stone frog and a ladybird made out of gessoed stones painted with acrylic paint.  (They still need to be varnished)  Maybe add some other friends...

When we bought the wood chipping mulch at the tail end of Summer last year, there was a real frog (or toad?) hiding in amongst it. We still don't know if it had been in it since it was at the Garden Centre.  We haven't got a pond but we did have a paddling pool up, which it might have appreciated (I had visions of it having a Pool Party with all its mates late at night but that might be TMI!)

Here is the photo I took of it:
 
Frog? or Toad?

(Incidently, I was doing the research on the resin jewellery because I fancy trying my hand at that, wondering how easy it would be... )

See you tomorrow,
qwiksave

Sunday 25 April 2010

Midnight Crafter

I just took this picture of the moon 5 minutes ago:

..from the window of my attic space craft room.  The room is not tidy yet, I've just cleared enough of a space to craft in it, lol. 

I am definately a late night person though, 'I don't do mornings' (well, apart from the very early ones that start after midnight!)  Most of the crafts you see me do on here are produced very late at night, because that is the time I do them.  It does make it tricky to take photos though as artificial light does not produce very good pictures. Sometimes I will take another picture in daylight the next day to replace the nightime shots.  There you go, a little secret I have let you into about the way I work and blog! ;-)

Tonight I tried a new technique I learned from a blog the other day called artsaveslives.  The technique is called 'inlaid embossing'. 
(Ooh, my crafting light has killed the sparkle on these!)

Anyway, to do this effect I covered a chipboard shape with clear embossing ink and then embossed it with silver embossing powder.  After it had heated and cooled down I stamped the image on top with some more clear embossing ink.  I then put black embossing powder on that and heated that up.  

Think I may use them as embellishments for scrapbooking pages or maybe tags.  Tags seem very popular in crafting these days.

Here is the heart:
..and here is the flower:
(I used just part of the stamp with the girl on - a freebee from a recent 'Craft Stamper' magazine)

See you tomorrow,
qwiksave


Saturday 24 April 2010

Victorian Times

We had quite an interesting day today, my son's junior school had a Reunion event on.  It's an old Victorian school so they planned a few events to celebrate the fact.
They had a pretend strict teacher from the 'Victorian' times to tell us what life was like in school at that time.  The children from today dressed up in some clothes from the Victorian era and my son wore a cloth hat.  The class were also shown how the pupils learned to write on blackboards:

They also put on a performance of 'Oliver' in the hall:
(My son is 3rd from the left)

...and got the children to play with old fashioned toys in the playground, like Hoop & Sticks.  They also sold some nostaligic sweets.  I bought a bar of 'Old Jamaica' which Cadburys have revived, its a lovely Rum 'n Raisin dark choccy bar, mmmmnn!

As for a craft today?  My mother-in-law has finally fixed the old sewing machine she gave me and all I have done today craftwise is to practice making some straight lines on scrap cloth.  My plan is to (hopefully) use the machine for making cards and scrapbook pages.
Hope this old machine is up for it!

See you tomorrow,
qwiksave

Friday 23 April 2010

First Aid Decoupage

I've done a very quick craft tonight, its been a busy evening as my boys went to a birthday party and then attended Beavers and Cubs. Lots of ferrying was done.  When we got back we watched an old video of 'Apollo 13', the film with Tom Hanks. My older son can't wait to be able to zoom off into space!

My quick craft tonight is a before and after thingamabob:
BEFORE:

It's our First Aid Box made out of an old baby changing container.
Add a few bits of olde decoupage...
AFTER:


(pictures are photocopies of images  from 'Creative Photocopying' book)

Have a great weekend.

See you tomorrow,
qwiksave

Thursday 22 April 2010

How do I.....?

On with the drawing theme from yesterday and here is another one of my pictures from a while ago:

This one was drawn and painted with gouache paints.

Today I did a little cartooning.  I decided to make a colouring in picture for my friend's daughter, Megan.  I had a go at colouring it in too, but I desperately need some Promarkers to do the job properly!:

   
These are just made-up characters.  I would love to know how people go about making and selling characters for greetings cards.  How do you put drawings on to pdfs?  Is that how people sell digital stamps?  Hopefully someone will come along and tell me all I need to know!... 

See you tomorrow,
qwiksave

Wednesday 21 April 2010

I can draw!

I can actually..as these pictures I made (admitedly a long while ago) show:


I can draw, but I don't any more, and that's a bit sad in a way.  I'm one of these crafty people that is dabbling in all sorts of crafts (as you can see!) but not focusing on any one.  There was an athelete who was famous in 'I'm a Celebrity, get me out of here!' for repeatedly saying 'Focus!' (sorry, can't remember his name!) but, should I?  Should I be focusing, working towards a specific target or is it OK to jump from one thing to another?   This is the question I am asking myself today....

My boys don't do a lot of crafting/painting, except what they are 'made to do' at school.  So today I got them something to fire up their creativity:

It's a large piece of canvas that is treated so you can put it in the washing machine - but you must remember to only use washable paints.   I thought it would be fun in the garden in the Summer to just free them from their 'I can't draw/paint' mindset. 

We had a little play today just randomly making marks and taking a print from it:
Hopefully we will have some more fun with it as the weather gets better!

See you tomorrow,
qwiksave

Tuesday 20 April 2010

Scrolls and Script

Recently I splashed out on a few crafty bargains. When people on MSE (moneysavingexpert.com) have mentioned sales at craft shops my ears prick up (kind of anyway!)  I know, its not very money saving, but they are sales after all! lol

Anyway, one of the things I splashed out on was the script cuttlebug folder.  I know its not new, in fact its been out yonks, but I don't mind being a little behind the times with my crafting!

With my new cuttlebug embossing folder, I created this card:


In the middle section I've used the embossed script.  I used a rubber stamp for the pen, the word 'love' and the scrolls.  I also coloured the pen gold on the nib and pocket clip and it is covered in glossy accents to make it look 3-d.  The edge of the card was inked to distress it with a black ink pad. I layered it up using glue dots.

I managed to get one of those old books with a beautiful pattern on the edge of the pages:

It was called a 'Minute' Book:


 This was another one of my charity shop bargains today at £1.75.     

Thanks for visiting my blog,
See you tomorrow,
qwiksave

REALLY BIG BLOG HOP

This is a massive blog hop (aiming for 1000!) run by clips-n-cuts who is celebrating 100 posts. Follow the instuctions (Click the frog at the bottom to start) and join in! (If not, just click the pics and enjoy your own blog hop)

Monday 19 April 2010

With love from us to you

Today's project I may need to warn you is a bit soppy!  As some of you know, my husband is working in China at the moment and only comes back to the UK every few weeks.  Well with all these aeroplane problems, I'm concerned that his next visit may be delayed which will be hard on all of us, we're finding it quite tough going as it is.  He only started this job in January so we hadn't been used to him being away and have had to get used to it! 

So today's project was a digital scrapbooking page (basic elements there, I just added to it) for him from us, his family:

This one uses the (paid) facility on Picnik.

I've had to do a quick craft today because since I visited my sister at the weekend I've been feeling a bit guilty.  Her house is immaculate (her husband runs a cleaning business) and mine is....... well, not! My excuse has always been 'I'm too busy being creative' but there's only so many times you can say that (believe me, I've tried!).  Anyway, to cut a long story short, I've been tackling our house with vigour today, giving it a proper Spring Clean, something which is long overdue.  Gotta be done though (bah!)

See you tomorrow

qwiksave
x

Sunday 18 April 2010

The Lightsabre Gang

As you know, I've been away for a couple of days visiting my sister in Milton Keynes so I haven't been able to craft (I did however spend hours on her computer reading everybody elses blogs - I've been loving Shimelle's scrapbooking party, which was very inspirational!)

The weather has been really sunny, with lovely blue skies but it still has that nip in the air which keeps me indoors.  We did a couple of trips to shops like Toys'r'Us for me to get my little nephew something for his birthday and I had my first ever trip to Costco.  What a place!  It's a giant warehouse with goods packed up to the ceilings and GINORMOUS packets of everyday things.  I saw the biggest can of tuna I have ever seen in my life!  But, amongst all this they also had really expensive jewellery in there too, just across from the washing machine aisle they had a diamond necklace that would cost you, get this, £11,000!!  There were also Prada handbags costing a mere £1,000....  Its another world I tell you.  I did spot some scrapbooking goodies I would have liked to have got, including a nice vintage set for £13 for 300 sheets and a great storage caddy but I was coming home with the kids on the train and was already carrying 4 bags (blast!)

Just took a couple of pics of my kids and their cousin in my sister's big garden.  It has a children's mini fort in it!:
These brave knights didn't have swords,
they had...

..Light sabres!
(Pics modified using Picnik)

Finally today, I can show you a card I received yesterday in the post from kayc, who is from a card swopping group on the internet called craftrak.com.  It's fairly new so not many people are using it yet.  It was a nice card I received, but was very small (7.5 x 10.5cms). 

For details of how you swop, (think you have to register) pop along to the website http://www.craftrak.com/. (I haven't done any swopping  myself on it yet so am not necessarily recommending it).

See you tomorrow,
qwiksave
x

Friday 16 April 2010

Girl's 10th Birthday Card

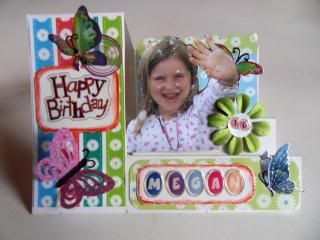
Stop right there! - but only if you're one of my bestest mates and have a daughter named Megan whos 10th birthday is coming up soon, because I am showcasing the card I have made for her.  Well, OK, you can look if you want, but sssh, don't show Megan....  The rest of you feel free to carry on!....  :-)

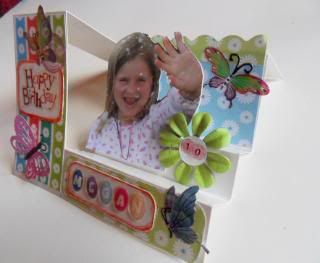
Here is the card in its present state:
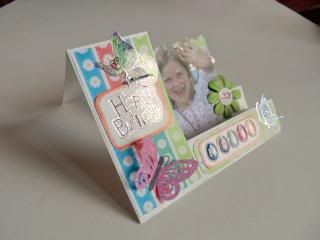
It's a pop-up card and it took me HOURS to make!  Behind this innocent fascade there are loads of complicated cuts and folds.  You can see more in this side view:
It wasn't my own invention, I got the idea from this fab italian blog called Hobby di Carta (that I always use Google to automatically translate for me) and even though the step by step instructions were pretty good,  it was still a very tricky card to make.  In fact, I can honestly say that this has been the most difficult card (technically) that I've ever made. But even though it was hard, it was fun too and getting myself through that challenge meant that I got to do the bit I like, personalising the card afterwards.
 
(Sorry about the quality of this pic, its a bit too reflective)

To decorate it I used loads of free papers from cardmaking magazines, the daisy designs were from 'Simply Cards & Papercraft'.  The stickers were from my stash and I made use of two recently purchased punches, the dimensional butterfly and the scalloped edge, both from x-cut/docrafts. 

(This photo of Megan isn't the picture I will be putting in the finished card, I'm going to get a more recent one, and one without bubble mixture on her hair and face!)

To finish today's post, I'm just letting you know that I'm going away.  No, not to this fantastic place, (Wow! Read the whole post! - and be a follower too, this lady is SO creative!) I'm just going to visit my sister in Milton Keynes for a couple of days.  So have a great weekend, and I'll see you back here soon....

qwiksave
x
Related Posts with Thumbnails