Welcome to my creative online journal

Thursday 30 September 2010

More Horror Pix

I've been doing some more horror activity using Picnik tonight and I think one particular picture might be a little too much for young eyes so I have modified it.  I still wouldn't recommend letting young children see this post, I wouldn't want to give them nightmares. 

This picture is still a little spooky, but its not really when you realise...

That 'thing' in the background is just a Lego Star Wars Model, lol.

This is the one that looked pretty bad until I put this canvas texture on it and lightened it.  The original is what I consider may not have been suitable for youngsters:
But its only my husband! lol.

Sorry I've been a bit indulgent with this, the same craft activity two days in a row?!  This is not what I do normally, as my regular followers will know.  I won't do it again tomorrow, honest!  In fact I am hoping to show you pictures of lots of crafting goodies from the Stamping & Beading Show, Artisan, where I am going tomorrow, yay!   I'm just off now to make my 'Must Buy' list! :-)

Thanks for reading and for any comments you may leave,
See you tomorrow,
qwiksave

Wednesday 29 September 2010

Ghoulish Pics

Regular followers to my blog will know that I am very keen on the free photo-editing program called Picnik - I've mentioned it stacks once or twice!  Well there is even more reason to like it now, because they've got these fab Halloween effects that you can put on your pics at the click of a button.

I've only had chance to do one pic so far tonight but will be returning to do more just as soon as I've put this blog post on.
I tried to do more grizzly stuff like adding fangs, but Picnik must be having some teething problems (groan!) because they wouldn't resize.

This was the original:
Aaaaah! (No, only joking)

I didn't know this feature (the Halloween theme) was on Picnik until I went on it tonight, otherwise I'd have hunted out a better picture to work on. 'Better' meaning us not looking quite so 'nice'. 

I should mention that some of the features aren't free, they are subscription only and some of the horror effects are really scary! I was so scared I didn't dare add some of them!  Ooooh!

I'm off to go and have some more ghoulish fun,
Thanks for looking and for any comments,
See you tomorrow,
qwiksave

* * *
PS. This is as scary as I dared go tonight!:
I best get my beauty sleep or I'll be a monster in the morning!  (lol)


Tuesday 28 September 2010

Memory Card

No, not that kind of Memory!  This is a birthday card for my sister.  My original plan didn't work so I had to resort to 'Plan B' even though I hadn't got one! lol.

It's not finished yet, its a WIP but here it is:
You can't tell from this picture, but the black & white photo (which is a photocopied version of the original) has had wax applied all over it. 

I had this brave idea to do this craft (applying wax to a napkin) and to make a card using it. 

But meanwhile,  isn't that a cute picture of one of my two brothers and sister with me?
(I'm the one in front with the frilly skirt!)  

I think I'm going to have to go with 'Plan C' now (ie make another card) because I've just remembered my sister doesn't like pictures of herself when she had really short hair (she is on the right) because people mistakingly thought she was a boy.   A shop Father Christmas even gave her a toy motorbike for a present that year!  :-O  Oops! As you can imagine, she tried to keep her hair very long after that! 
***
Going back to my original plan (thats Plan A remember), I did do the part where you melt the wax on the napkin, as you can see:
I had planned on making my card on a hippy/70's style theme (hence this choice of napkin) but it just didn't fit in with the photo I'd chosen. 

This picture shows the beeswax block first being melted:
It is melted on the plate of the hot iron (this is an old travel iron) and then the iron itself is swept across a glossy piece of cardstock several times.  The napkin (just one layer, separated first), is put down (face up) on top and more melted wax is added onto the top of it.  It gave the napkin and the photo the appearance of more depth.

As I say, its back to the drawing board on this one. The photo turned out not to be suitable (embarassing short hair) and nor was the napkin (wrong style).   This is going to be one of those crafts I'm going to leave for another (more co-ordinated) day.


Thanks for reading and for any comments,
See you tomorrow,
qwiksave

Monday 27 September 2010

Qwiksilver Coasters

I lurve surfing gear! This might seem a little odd when I live slap bang in the middle of the UK and about as far away from the sea as you can get,  but I just love the designs on the clothes of 'surfing dudes' (lol).

This is why tonight for my craft I made 4 coasters out of a qwiksilver advertisement:

 I used some blank (fill your own pictures) coasters - 99p for 6 (new) from a charity shop.
Summer may be over (sigh!) but I will have these as a reminder of sunnier times all year round!

Also from a charity shop recently, I got an original acrylic artwork which was just my kind of thing:
It was painted by a South African artist and all that scribbly writing effect around the outside that looks like biro is what it looks like, biro!  I'm just loving all that texture going on and will be framing this one up soon.

Finally, today I altered the Christmas card that I put on yesterday.  It had far too much space!  I've added acetate and snowflake confetti and I'm much happier with it.  

Hope all is going alright with you and your world.
Thank you for looking and for any comments,
See you tomorrow,
qwiksave

Sunday 26 September 2010

Christmas Card 9

One of my intentions this year was to get all my Christmas cards done during the year so I don't end up trying to make 30 individual handmade cards on the night before the Last Posting Day (like last year, oops!)  I have done quite well, I've made 8 so far and one tonight, makes 9:

So thats one a month.  Not bad. 

(I changed the one that I made last night into this - I've added acetate which I've painted white snowflakes on to and also stuck on some pink and white snowflake confetti. I'm much happier with it now!)


Here's the other 8, which you may remember as they have been previous posts on here:
The one I've done tonight isn't my favourite - created using Stardust Gelly Roll pens and peel offs but it is good to use stash up rather than always buying new (says her, who is off to buy more stash at Artisan (a bead and stamping show) on Friday! :-P)

Thanks for reading and for any comments,
See you tomorrow,
qwiksave

Saturday 25 September 2010

Retro Pegs

This is something that has been on my 'To Do Sometime' List for quite a while  I have often seen them on blogs and thought what a great but simple idea they were:
Decorated pegs.

The pegs I have used here are genuinely old ones so I haven't covered them completely as it seems a shame to cover up their genuine heritage.

In fact, in respect of their history, I used retro papers on them
I liked the idea of using matching buttons on them too.
I have used 3 layers of Modge Podge on the paper to protect them and strong glue dots were used to stick the buttons on.  At a later date I think I might make some matching accessories.

Hope you're having a good weekend,
Thanks for stopping by and for any comments,
See you tomorrow,
qwiksave
 

Friday 24 September 2010

Time Jewellery

For tonight's craft I decided to change some jewellery I got in a sale a while ago.
It needs a few finishing touches but here it is so far.

To make it I used:
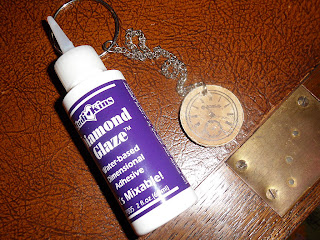
First of all I drew around the circle shape of the necklace (2 for 75p!) and then used the foam tool to ink the circles with distress ink.  I then stamped the clock face on top.  I cut it out and stuck it onto the jewellery.  As my handcutting wasn't very circular, I used a file from the Basic Grey Filing Kit (not shown) to round off all the edges.  I plan to add some gold around the edge before varnishing it with Diamond Glaze:
If I like it I will wear it as a necklace (I spotted one in town with a clock design) instead of this chain setup.

Hope you have a good weekend. We had a bit of good news yesterday, my eldest son was elected to be Year 6's school councillor!  Well done to him.

Thanks for stopping by and for any comments,
See you tomorrow,
qwiksave

Thursday 23 September 2010

Cinderella and Bags!

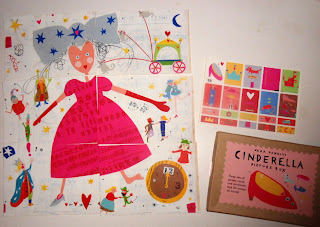
This image I'm showing you now isn't one of mine, but I wish it was!:
It's a set of 6 postcards that you join up together to make up this image of Cinderella.  They are part of a set of 3 and they are illustrated by an artist called Sara Fanelli

This is the little box set they came in:
(Apologies for the pesky flash shadow from my camera!)...and those images on the top right are (play) stamps.  There is also a Pinocchio version available.  In the box is a mini-storybook of the fairy story included too.  This isn't a sponsored link, in fact I'm embarassed to say I got this new fab art work set from a charity shop for just 50p recently!  50p for such a talented illustrator!  Thats a bit sad, really.  

Here are the other two:

I love the quirkiness of all of the designs, and the use of lettering too.  What a great bow!  There are lots of other things going on in the background of the pictures that children would love to discover too.

* * * * *
I did do a craft today but it didn't work (HP website fibbed when it said you could emboss an image straight out of an inkjet printer without using embossing ink!)  but I did do something else that I can show you.  I got the idea from the american 'Craft' blog.   It's space-saving, plastic bag, origami!

Do you have a bag like this one?

I don't mean, 'do you have a Tesco Cath Kidson bag?'  I mean, 'Do you have a bag that is overflowing with plastic bags?'  With all the good intentions in the world, we don't always remember to take our reusables with us when we go out shopping. 

Well, after a bit of plastic bag jiggery pokery with my 10 year old tonight, we got it down to this:
All the plastic bags are still in there - they are just folded down into smaller pieces:
Reduced from this into this!
Now they are perfect for taking out with you in handbags and pockets!

For the full instructions (EVER so easy!) go here to A Lil Bird Told Me  (found via the american Craft site) and have your own fun reducing your own plastic bag collection down to a minimum.

Thanks for stopping by and for any comments you may leave,
See you tomorrow,
qwiksave

Wednesday 22 September 2010

Haloweeen Jars

I'm not that keen on Halloween (I have been known to hide in a back room pretending I'm out) but I do quite like the graphic images that get created around this time. It is also terribly difficult to avoid in Blogland at the moment, it seems anyone and everyone in the crafting world is already well under way with their spooky decoration preps.

So tonight I have given in and done a little something myself:
Halloween jars (Very difficult to get the exposure right!)
They were created using jam jars with tracing paper taped around them.  The stars & moons were stickers and the spider and web were drawn.
The nightlight candle is inside the jar and as the tracing paper is around the outside they should be safe, but take the normal cautions with candles, especially around children.

I quite liked making these and could even be tempted to make other halloween decorations for around the house.  I've certainly given myself plenty of time!

Thanks for looking and for any comments,
See you tomorrow,
qwiksave


Tuesday 21 September 2010

Autumn Sunshine

What a lovely day it has been weather wise here today, warm sunshine, I loved it.  I loved it so much I went into the park with my camera today:

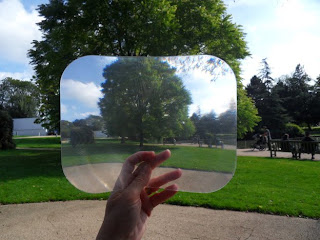
I took some photos but not straightforward photos, I had a clever optical gizmo with me (a £1.50 charity shop buy)
It's one of those mirrors for putting on the backs of caravans and vehicles like it.
It gives a great wide angle effect which is fun to combine with the view you get from a normal camera lens.

You can have quite a bit of fun with one of these, they look good with people shots too.

This was kind of my craft today but I also have been sorting out my pen storage.  I had all my colour pens (& my kids colouring pens too) all thrown in a drawer like this:

So have been sorting them into categories in these:
and
(Trays £1 each, you've guessed it, charity shop!)

It is much easier to select the right type now.

Thanks for popping by and for any comments,
See you tomorrow,
qwiksave


Monday 20 September 2010

2011 Coaster Calendar

OOh, I'm early with this one! It's a calendar for next year using a beer coaster.
They are ever so simple to make - you just cover a coaster with some nice patterned paper, add some suitable embellishments and a ribbon to hold them up.
I've made mine suitable for a male receipient (although I'm not sure who yet!) as it has a 'mechanical' feel about it with the circles.  I also added distressing to the edges using a file and black ink.

It's most unusual for me to be this organised this early, a first in fact!

Thanks again for stopping by and for any comments,
See you tomorrow,
qwiksave

Sunday 19 September 2010

Awaiting my Craft

I am still in the process of doing tonight's craft - I am looking for an image on the web of some pedestrian crossing lights.  Why? You may well ask.  Because my husband [who has returned to work in China today :-(  ] and I have a little jokey thing between us about our younger son who, whenever we ask him to do something, invariably will keep saying, 'Wait', while he finishes off a stage on his computer game or something.  We decided that we would make him a t-shirt that has the 'WAIT' symbol on it (hence the pedestrian crossing image) as an in-family type of joke.

I have, however, been having difficulty getting a Copyright Free picture of the pedestrian lights, which is why I am still searching.  While I have been looking for them though, I came across this great image:

What an enormous traffic light 'tree!'

This is the type of image I'm looking for, but this one is of such a diddy size that it wouldn't be suitable for printing on a shirt:
So I shall plough ever onwards in my quest!

BREAKING NEWS.....Paperchase have got a brand new website with shopping! Yay! Shipping Worldwide.

Thanks for stopping by and hope you've had a great weekend,
See you tomorrow,
qwiksave

Saturday 18 September 2010

Cupcake Case Flowers

I've been making a home decor item for tonight's craft.  It's one that is so easy you could make it with young(ish) children.

Here we have:
Faux flowers made of shiny little cupcake cases.
To make them you use straws and drawn (or stamped) leaves and buttons stuck to the centres of flatened shiny cupcake cases .

Stick things all together (I used glossy accents for the buttons, sellotape for the rest) and to keep them upright, insert the straws into plastercine that is put into the bottom of the plant pot.  

Hope you are enjoying your weekend.
Thanks for popping by and for any comments,
See you tomorrow,
qwiksave

Friday 17 September 2010

Gift of Dreams

I'm feeling a bit sorry for myself today, I've been to the dentist and had my very first extraction! Owwww! Certainly makes me want to take a lot more care of all my others! :-(   I liked what the dentist prescribed though, 'you need to lie on the sofa and have flowers and chocolates!' lol.  This was directed at my husband who was there with me - shame it didn't happen though! (bah!)

Tonight's craft:
...is this scrapbooking page of Christmas 1999 - Love the lettering on this Bo Bunny Paper (free with one of the papercrafting magazines this month), that says this:
'You are the Gift that made all my Dreams come true"
I've always loved this picture of myself when heavily pregnant, taken the month before my eldest was born:
I did ask my husband to deliberately chop my head off when he took the picture - it made it more photojournalistic!
I just thought it suited the sentiment on the Christmas themed paper perfectly.
* * * * *
My two boys have had their first lesson in Fencing after school (in school) today, hope they don't start practicing - on me!

Have a great weekend.
Thanks for looking and for any comments you may leave,
See you tomorrow,
qwiksave

Thursday 16 September 2010

Photo Album & Christmas Frame

Fortunately my camera fault from yesterday was only minor and fixable so I can show you the photo album that I covered yesterday:
(click to enlarge)
When we went to Birmingham on Tuesday I managed to sneek a peak in TK Maxx.  Sometimes, if you are prepared for a jumble sale style rumage, you can get some great craft bargains there, like these:
Packets of transparency shapes made by Memory Makers.

As you can see, these are what I used on my album cover, together with a title that I made using Picnik.  The cover, before I covered it in gesso was very bright:
 
..which is why I toned it down.

I have sealed the album in 3 coats of modge podge and used an inkjet spray sealant on the title. I just need to print all the pictures off for the inside now:
 
* * * * *
Tonight's craft is a little moneysaving tip.  If you already have some flourishes stamps you can make a nice frame for your christmas cards:

You don't need to buy the new flourishes stamp set (sold by a well known craft retailer) that have holly & berries on them.  Just draw them yourself around the flourishes:
They are quite simple to do (you could add some glossy accents for shine) and it gives the frame a nice Christmassy touch:
Thanks for looking and for any comments you may leave,
See you tomorrow,
qwiksave
Related Posts with Thumbnails