Welcome to my creative online journal

Monday, 31 October 2011

Happy Halloween

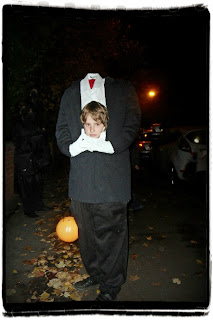
For this year's Halloween our older son decided he wanted to wear a costume that he had worn before, that of a headless man!

This was it! (remade for this year):
He got so many compliments his dismembered head nearly swelled with pride!

...and this was his brother (with a titchy bit of special effect):
The headless costume was made from a cardboard box tube that has a hole cut out for the head.  The shirt and jacket are put around the cardboard and false hands made from gloves are attached to the sleeves.

I took a small group of boys round the houses, but we were very good and only went to houses displaying pumpkins.

We displayed our own this year. It was from a design we've seen on the internet:
Yuuuuuuuuckk!

HAPPY HALLOWEEN!

Thanks for looking and for any comments,
qwiksave

Sunday, 30 October 2011

Shrunken Apple Head Halloween Puppets

The apples I left to rot for a month shrunk considerably and during the last week I have made them into character puppets with hair and clothes:

The one on the left with his beady eyes looks more worried than scary so my husband and I made this little animation today:


"Aaaaaah! I can see children in scary Halloween Costumes!"
resize images

"Hide!"
"Have they gone yet?"

The apples were on sticks which were decorated with black material for clothes and buttons were stuck on with a glue gun down the front. I also added felt hands.

Matted string was also glued on for hair and beads for the eyes.   They were made into puppets that hide in their paper cups by pushing a hole into a paper cup with the stick.

Booo!

I was given the idea (thanks Marc) to put a torch in the pot so they are going to look extra scary come night time.

Thanks for looking and for any comments,
qwiksave

Saturday, 29 October 2011

Halloween Door Decorations

My boys went with their grandparents to a Severn Valley Steam Railway Halloween event this week and came back with some great haunted themed colouring books.  The only problem is that my boys don't willingly colour in anything, unless its for a competition where they might win something, like Lego or when they have to do so for something at school.   So, if I was going to have these pictures on display for Halloween this year, I was going to have to be the one to do the colouring in, unless...

I scanned them in to my computer and used a few settings on the free part of Picnik - Contrast, Invert and Neon and this was the result:

So for a little bit of effort I have managed to make some great child-friendly pictures that I can hang on our front door for the young Trick or Treaters that come round on Monday.

Thanks for looking and for any comments,
qwiksave

Friday, 28 October 2011

Just 2 more days to go...

Today I finished of the birthday countdown calendar that I started the other day (post here).  See that post for the free black & white or pink & yellow printouts of the text part of the calendar, available from Heidi Swapp.

I did the '2 days and 1 day to go' cards first:

I think I may have got a little carried away with the distressed effect but I still like them (and they are for boys!)

I also made some minor modifications to the ones I'd already done and here are all 6 in their entirety:
..And then I made the card for the birthday itself:
..and our family birthday countdown calendar is complete.


Thanks for looking and for any comments,
qwiksave

Wednesday, 26 October 2011

Sleepy Sheep

It's been a while since I entered one of my photos to the Gallery at the Sticky Fingers blog, but I love following both the challenges and the day to day adventures of Tara and her family.  They are Official Toyologists for Playmobil and Toys'r'us and get to play with test out some great fun toys.  Never mind the children, I want to do that job! lol.

But when I saw the theme of this challenge, Faces, I remembered a picture that I took earlier in the year that I thought was perfect, and it is this one of a sheep sleeping:


It was taken during lambing time in early Spring and it was situated in a marquis at a children's farm visitor centre (Hatton Country World, near Warwick).  Loads of noise was going on around it, young spring lambs jumping up and down, children squealing with excitement at the exploits of the recently born baby lambs and there this sheep was, very calm, standing up and dozing.

Strangely enough, looking at this picture now makes me feel calm, almost sleepy, but maybe that is the unconcious association that I get about 'counting sheep to get you to sleep'. 'You are feeling sleepy.... you are feeling sle...'   Zzzzzzz

To see how others have interpreted the word 'Faces' take a look at The Gallery here

Thanks for stopping by and for any comments,
qwiksave

Countdown to Birthdays

I love the way the american crafter, Heidi Swapp, really relishes birthdays!  I've seen on her blog some fantastic parties she has done for her family.  Just take a look at the latest party she did for one of her sons on a halloween theme here.  Such fabulous make up for the young party goers and all done in secret too, Wow!

On her blog also was this free printable download to a Birthday countdown.  Its a page of number countdowns starting from day 6 and comes in masculine black and white or, for those that want, there is a pink version too.  With predominantly male members in my household I had to go for the former, even if I had wanted the pink (& yellow).  The link to both versions is here.  

I took my number sheet along with lots of coloured papers to my Tuesday craft group and made up a few of the pages.  I made them like little scrapbooking pages with a similar theme and layout on each:

This was number 3:
(The edges creased a little whilst applying the distressed effect but flattened out when put in the frame)

These are some of the other numbers:
..and this is how they will look in the frame:
The frame was a £1.50 bargain charity shop find.

I made sure I steered clear of any pink, I'd be sure to get complaints from my boys if I hadn't! 

Thanks for looking and for any comments,
qwiksave

Sunday, 23 October 2011

Stencil 101 - Christmas & Halloween Tags

I haven't done a 'hands dirty' papercraft for quite a while and when making these tags today I realised how much I enjoyed it.  Gotta do more, many more!

These tags started as exercises in what type of inks, paints, tools and techniques work best with stencils.

I hadn't got any parcel tags or a die for a tag so I used a template and watercolour paper and cut each tag out individually.  I love the texture that shows through on the watercolour paper, it gives it that extra bit of interest.


The 'Stencil 101' is a free online course run by Julie Fan Fei Balzer of Balzer Designs (link in my sidebar, email her to join) and its fab!  My vast collection of stencils had been gathering dust because I couldn't work out how to use them properly and now I am having fun discovering how. 

One element I have particularly loved whilst making these was layering.

This tag has three layers - the 'R' was stencilled and cut out of the tag and some green textured paper was stuck on from behind.  I used red distress ink on the surface layer of the tag, plus some subtle stars with white shoe polish.  The third layer I made with Whiteout paint and punchinella, which made the teeny dimensional stars.  

Other news and I spotted that our High Street stationery & fun gizmo shop, Paperchase, have just started stocking Washi Tape!  Woohoo!   I can finally buy some without having to pay postage, yay!  Hope they stock it as an all year-round item and not just for Christmas.  

Thanks for stopping by and for any comments,
qwiksave

Saturday, 22 October 2011

Creative Photographic Playing

Regular followers of my blog will know how much I love Picnik, the free online photo service owned by Google.  Today was no exception and this time I worked with pictures that I had recently taken using the hipstamatic app on my iPhone. This meant that they already had a distressed effect on before I even started altering them again...and again...and again. (Such fun! ☺)


I should point out that some of these effects aren't available on the free version of Picnik, I do pay for a subscription.  Don't ask me how I did each of them though, I just enjoyed 'playing' with the images and the various editing tools.

I made more than these three and my plan is to put all of them into a mini handmade book with pockets, like this one I made last year using just one 12 x 12" piece of Tim Holtz paper.   (Instructional video available on that link):
Have a good weekend, thanks for stopping by,
qwiksave

Thursday, 20 October 2011

Not for the squeamish- Snail Painting!

I spotted this activity on an american blog called Filth Wizardry and thought my boys would love doing this!  Well, one boy did but the other one was bored. I think the snails moved a bit too slowly to keep his interest.

The snails didn't seem to mind taking part in the activity, they didn't even retreat back into their shells when we changed their food colouring colour, lol.  We also gave them a bath of clean water before putting them back where we found them.
Another activity I we did was for the younger boy's primary school.  We were asked to bring in a repurposed pot with a winter plant in for the school garden.  Not knowing much about plants I 'cheated' and made a pretend lollipop tree:
(Ignore the unkempt lawn grass on the bottom!)
The 'lollipops' are coloured table tennis balls stuck onto balloon sticks.  I painted the ping pong balls with clear nail varnish to give them shine. The pot was found put out for rubbish by our local corner shop.

Finally, another shoe picture, fancy these?:
Available in my local River Island!

Thanks for looking and for any comments,
qwiksave

Tuesday, 18 October 2011

Christmas Craft - Chocolate Mint Decorations

My readers from the craft forum of Moneysavingexpert.com will probably recognise these christmas decorations made simply using card, stickers and some creative doodling.


You can see from this picture that they aren't flat, they are a mint chocolate and cardboard 'sandwich.' 
The mints inside are wrapped chocolate mints called 'Elizabeth Shaw' Crisp Mints and they are glued inside the punched scallop shapes with some temporary glue dots.

The card scalloped circles have a smaller punched circle stuck on the outside, which is decorated with stickers or a stamped image:

(This design is thanks to Helen of the Itsallfiddlefart blog)
The lettering, snow and the spots around the outside were doodled before putting the decoration together.

I made these at my craft group today - I was going to make them last year but I scoffed all the mints before they became decorations I hadn't got the correct size of punches! ☺

Thanks for looking today and for any comments,
qwiksave
Related Posts with Thumbnails