Welcome to my creative online journal

Wednesday, 22 April 2015

Hama Bead Decorations

As mentioned in my last post, the next project on my art to do 'Now' List was crafting with Hama Beads.  I have loads of these things, many of which have been gained on my many charity shop expeditions. 

The first task for me in making my decorations was to sort some of the beads into separate colours.  Not strictly necessary but I did it whilst watching TV so it wasn't too much of a chore - and no, I didn't separate all those you see in the top picture, just enough for me to use.

I love the effect of the sparkly beads and decided to make myself a small window decoration.  They were just randomly placed inside a circle board and some black beads were added around the edge:
..before ironing to fix with the special waxed paper.

I love the way it looks like a stained glass:
..sparkling in the sunlight.

For my next project I decided to make a hama bead camera, spotted on Pinterest here. (and modified by rounding the corners).
The pointy edged tweezers were brilliant for this task and so much easier than clumsy fingers.  Using them I was able to pick up two beads at a time which really helped to speed up the process.

Here on the left is my finished camera, added to my display of vintage cameras:
The circular lens part was made separately and glued onto the hama beaded background.

It may not function but it looks the part.

The next craft I have on my art techniques 'Now' list is Foiling. What will I make with that, I wonder...?

Check back soon to see that craft and
thanks for popping by today,
Nicky
@Creative Flourishes


Monday, 20 April 2015

Shrink Plastic Keyring

If you saw my last post you may remember that I have made myself a list of lots of art techniques that I am going to have a go at as part of my 'Now' List.  When I wrote the list I just wrote lots of techniques down one after another, without really thinking about any sort of priority. The main criteria I gave myself was that I must already have the equipment to do it with.  When I came to do the list I considered picking and choosing what I fancied doing but then I decided that was kind of cheating because I would probably never end up doing the trickier choices.  So, I am going to faithfully go down the list and do every one as it comes, even if it's difficult and one that I would normally avoid.  My first technique, shown on my last blog post, was Lino printing and the next on the list was to make something with Shrink Plastic.

This is what I made:
I have a travel art bag (shown in detail in this blog post) so this would be ideal to add to the zip pull.

This art equipment keyring wasn't what I planned when I first got out the shrink plastic. That was to colour my none-art equipment themed shrink plasticables (made up word) with alcohol inks.    

The first theme I had was made up monster-y characters that I had drawn in my sketchbook many moons ago.
On the left are the pictures that were traced on to the clear shrink plastic with a fine black Sharpie.

I poured various colours of alcohol ink onto a craft mat and smooched the cut out plastic monsters in it.  Mixing colours I thought would add interest... but when they came out from the oven...
...I didn't like the result and was going off the idea of monsters anyway.  Where would I put them..?

So, I found myself a children's vintage craft book, called '365 Games to Make & Play' (from 1979!) and spotted these stationery images on the opening pages:
...which were perfect for tracing and shrinking.  A tip I remembered reading on Pinterest was to sand the back of the shrink plastic before colouring, and for this I used an emery board.  I also punched out a hole in  each piece, before cooking, with my Crop-a-dile.

The stationery/arty items were coloured with Sharpies and the very bright monster-y characters shown here on the right with Neon Pro-makers:
As I didn't have lots of small rings to place my individual items on I just threaded them onto one jump ring and added a keyring.
..And another 'Now' art technique can be crossed off the list, what's next?...(checks list)...Hama Beads....

See you next time, thanks for stopping by,
Nicky
Creative Flourishes


Wednesday, 15 April 2015

Not a Bucket List, a NOW List, Lino Printing

I picked up an interesting book recently about improving what you do with your life on a day to day basis.  I wasn't particularly unhappy with the way that I spent my time but reading this book did make me think that maybe I could spend it a little more wisely and with more purpose.  More details of this further down the page but in the meantime..

In February, during my blog hiatus, I had another birthday, like you do, and for this particular one I asked for and got, a 6x6 gelli plate.  Last week I finally gave myself time to play with it.

Wow! What a colour!

I just tried out various texture tools and mark makers and for the one above, I cut a zig zag pattern on the edge of an old credit card and used it to make the pattern used as a background in this journal type page:
It has been put on my notice board as a reminder to lose the odd few pounds that I've gained whilst 'hibernating' during the Winter months.   I added the circle shapes using various lids and the silhouette is a stencil cut out from an old fashion book.  The ruler Washi tape was added as a hint to losing the inches!

I did have fun using the gelli plate and will definately be returning to it again soon.  This was another one of many textured backgrounds that I made on the same day:
Back to the book that I spoke of  earlier and it has the quite cheesy name of 'How to do Everything and be Happy' and it was written a few years ago (but still available) by Peter Jones.

One of the ideas he mentions in the book is to have a NOW List, not a Bucket List as it is a list of things you could do now, if you have the money, time etc.  This idea appealed to me and I even made myself a journal page about it:
This is what its about really, not that I'm planning on going anywhere soon (hopefully!)...

One of my 'Now' List categories is Art and I have a subcategory list that contains lots of art techniques that I would like to do. I have all the equipment (I am an avid art materials collector!) but have just never got round to doing them. This is my chance! And whilst I'm at it, I can show you them as I do them (will also get me back into regular blogging again), ....starting off with Lino Printing, which I did earlier today...
Yes, I was very pleased to get through this particular craft with all my fingers intact!  Especially as I haven't done it in about 30 years ahem, a very long time!  I even used that extra tough stuff, real lino! It came in an old Reeves Kit that I got from a church sale for about 50p a while ago....  

The item that really saved my fingers though was this:
Made by my clever husband a while ago when I said I needed it, otherwise I couldn't do lino printing (and still didn't do it then either!)....  It's actually made from a wooden toy (spot the giveaway!) purchased from a charity shop.  Basically, as I think you can see, it's a wooden board with two blocks screwed on to it top and bottom.  The bottom block anchors it to the edge of your work bench and what is does is it prevents your lino from moving around too much whilst you are trying to carve it. 
It was invaluable to me today as it stopped me burning my fingers!  'How so?' I hear you ask... Well, because I used lino which was as tough as nails to carve,  I had to keep warming it up under the grill to soften it and sometimes it got rather hot!  Putting it down on this meant no toasted fingers for me so it was very useful!

For my design, I thought I'd use an alphabet & number stencil.  All I had to do was trace through the back to get my reverse image:
..which went almost to plan.

I followed some of the instructions in Julie Fei-Fan Balzer's book, but wished I had got 'Speedycarve' to carve out of, rather than the very tough lino.  I was aware that she said that you 'glide' not 'gouge' whilst I was gouging!...

First job was to carve a 'moat' around the edge of your design:
...before removing all the other surplus.  For some reason my other pictures of the process turned out to be out of focus so I'll cut to the chase and show you my finished prints:
As I was printing them and seeing parts of it not printing I thought to myself, it's got character!....  and it has, really...but I simply must get myself some Speedycarve....

Thanks for looking today,
pop back for some more 
'NOW' List crafts coming up soon,
Nicky
Creative Flourishes


Monday, 6 April 2015

Colour Your Own Calendar Cubes

 I'm still bit by the crafting bug at the moment but my grungy artistic side just couldn't help but put it's own stamp on my latest project.

As another item to review I had been sent a set of these Colour-In Calendar Cubes by the educational crafty website, Baker Ross.  When I first got them I did wonder how I could do anything other than just colour in the pre-printed images in a 'normal' fashion.

This is how they come in the pack:
..and you get five of each block to colour and make up into cubes.

But my 'non normal' side got to work and said to me, 'never mind the lines and never mind if you can't see the dates on the calendars, just get some colour down and have some fun!'  

So, being rather keen on that idea, I did! 
I got out my Brusho dye paints (which have definately got a mind of their own and are in no way restricted by lines), some normal and twinkling h20 water colour paints and some table salt for added effect.  As the calendars are printed on card they were able to tolerate all this water media without buckling.

This is how one of the cubes looked, before folding and gluing:
...and this is how the two cubes looked completed:
(November's was my favourite grungy side, all those lovely colours representing the firework's sparks).

However, I did think that I'd do another 'normal' set of cubes, well, 'normalish' so I could see the dates to see what they would look like.  For these I used Promarker Neons...
..and they are pretty dazzling, literally.
Both types have their own appeal, but I know which ones I prefer....
Can you guess?....

Thanks for stopping by today,
Nicky
Creative Flourishes


Wednesday, 1 April 2015

Spring Crafting: Easter Egg Baskets

Maybe it's the fact that Spring is on the way, but I have been feeling myself in a very crafty frame of mind lately.  This has very usefully coincided with the Spring craft set that I was sent to review by Baker Ross.

This is the set and it contains lots of materials to make all kinds of Spring decorations:
(Looks at cover): A cardboard birdhouse with birds, flowers, a tall nightlight with a butterfly and grass scene, a romantic greeting card, hanging birds and the items I made, three decorative easter egg baskets. 

The craft kit was made in Germany and the instructions were just pictures, numbers and arrows but I found it easy enough to work out.  The baskets in particular were very simple to put together.
You don't actually need scissors as the die is very simple to pop out in three pieces (the third piece was for a tag for the basket but I didn't need to use that).

 I used the scissors because I distressed the edges of my basket with them and I also inked the edges with two shades of Ranger's Distress Inks. I have always liked the vintage grungy look and am not really a pretty flower type of gal normally.
 To make up the baskets you simply fold up the sides and slot them together.  It didn't say to glue them but I found it made them stronger and this glue pen that I was also sent did an excellent job.  I just held it together  while it set.

Next I put the handle on and for this you do need some additional items which I did happen to have, split pins. Despite not being a flowery person, the split pins I had were flower shaped.  I made a hole in the handle and also in the basket and inserted split pins onto both sides.  And there you have it.  I made one for the small Smartie chocolate eggs you see above, one for my collection of polystyrene decorated eggs:
(Created with tissue paper, pens and fabric, made in previous years)
..and one for some Cadbury Creme Eggs:
The baskets are fairly strong but best kept for decoration, rather than carrying around stashes of eggs.

 Hope you enjoyed this make and may I wish you a very

 
for this weekend.

Nicky,
Creative Flourishes


Tuesday, 31 March 2015

Painting Porcelain Tea Bag Holders

Hello again! I decided it was about time I came back to my poor, much neglected, blog and what better way to start again with than with a mini tutorial on painting porcelain teabag holders.

These particular teabag holders came as a pack of 5 from the UK educational and children's craft website, Baker Ross. You may remember I painted some seaside themed plaques that were also from that site for my bathroom doors in my last post (link here).

Instead of the porcelain pens I used then I used porcelain paints.  It was this set here.

To start with, I decided to try doing a polka dot effect on my teapot shape by sticking small sticky dots onto the teabag holder:
...before painting on top of the whole thing with my chosen colour, orange.  (The wooden stick in the paint is a bamboo skewer used for stirring the paint before use):
I was a little disappointed in the colour as I was hoping it would come out more opaque, so, to get round it I waited for the first coat to dry (which was only about 20 mins) and then put another coat on.  And then another...

Whilst I was waiting for the coats to dry I painted another teapot white as an undercoat.  I also painted that one orange on top after it had dried but even with the undercoat it was still more transparent than I would have liked... 
Both of them had an undertone of yellow which I didn't add but can clearly been seen here underneath the orange. 

I then painted another teapot white all over and added orange in parts.  I also added white to the middle of the all orange one. 
Unfortunately, when I came to take the sticky dots off the top one some of the paint came with it.  Maybe I should have left it longer to dry before taking the stickers off?...

 Finally, when they were all dry I added some of my own freehand lettering:

I decided to put these quotes about tea on them because I think it makes them look more quirky than putting 'Dirty Teabags,' which is what they are really made for.  

To finish them off I put them in the oven for the time and temperature stated on the paint instructions which means now they are both water and dishwasher proof.  Very useful for something that will need washing frequently.  

After all that I think it's time for a cup of tea. Put the kettle on, Polly!


Nicky, 
Creative Flourishes


 Disclosure:, Baker Ross gave me these products free of charge  for me to review.  All opinions are my own.


Thursday, 31 July 2014

Seaside Themed Ceramic Plaques

When you have visitors coming to your home and in some cases, stopping over (like children's sleepovers), it is a good idea to let these guests know whereabouts they can find your facilities. We have two such rooms next to each other so it would be very useful for these guests to know, at a glance, which door is which.

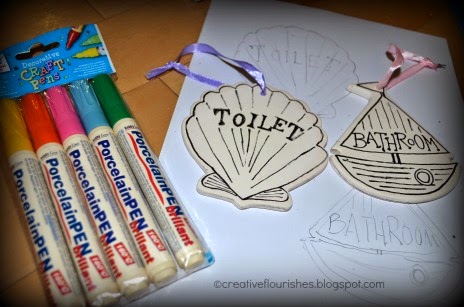
The online craft supplier, Baker Ross, who sent me the glitter used in yesterday's post also very generously sent me a set of seaside themed ceramic plaques and some porcelain pens to decorate them with.  I decided to use mine to make some signs for my bathroom doors.

The plaques arrive completely blank of decoration but are cut in various shapes to guide your creativity.  What I did to mine was to draw around the shape on paper so I could work out using pencil what design I was going to add to them. 
 
Then, using a black porcelain pen that I already had I drew directly on to my plaque using my proposed drawings as a guide.  This particular pen incidently caused me a few problems, I got spots everywhere when I was shaking it (my fault) and it created some very messy splodges onto my plaque when I was drawing onto the plaques (pen's fault!) Fortunately, just by trying, I found out that you can get rid of these errors by scraping them away gently with a craft knife.  A useful tip to know if you make any mistakes too.

Having completed my outlines, I then used the set of coloured pens that I'd been given.
(This was Set A)

I thought they were going to be subtle and maybe a bit pale but they weren't, they were bright and glossy.
These were the other shapes in the set that I have yet to decorate:
After decoration the instructions on the pens say to allow 4 hours to dry before heat setting in an oven.  See pens for complete directions.

To put them on my doors, I took out the ribbons that came with the plaques and used nails.

There! No confusion now (except that there does happen to be another toilet in the bathroom too...) .  I just need to work out what I am going to write and draw on to the other shapes now...

Thanks for stopping by today,
see you soon for some more creative ideas,
Nicky
Creative Flourishes

 Disclosure: I have not been paid to do this review, I was sent the products to try out free of charge but I did not and will not receive any commission on any links listed.

Wednesday, 30 July 2014

Make Your Own Super Sparkly Glitter Gems

I have to admit that I am a girl that loves sparkle and as a result I love glitter!  Well, very luckily for me I have recently been sent a few pots of the wonderful sparkly stuff to try out from the lovely people at Baker Ross, a UK web craft supplier (I'm sure my international readers will be pleased to learn that they also deliver their products worldwide, just check out their website for details).


I spend a great deal of my time procrastinating searching through the boards on Pinterest (my boards are here) and came across this idea to make some glitter gem magnets.  This seemed like the perfect project to try out my new glitter pots...except that the ones that I made didn't end up as magnets.  They could be of course, just by sticking a magnet to the back, but you can also use them for other things like rings or necklaces.  As I've been once again watching my weight, mine have been added into two jam jars to indicate how much weight I've lost (like this pin here).  To see my weight related posts, take a look at this separate Creative Flourishes page here.

Anyway, enough waffling, on with how to make them, or how I made them. Starting with gathering your materials together:
I also used some different nail polish colours, other glitters I owned, teeny nail decorations and a jar of clear nail polish to seal them.  I couldn't take photographs whilst making them so there aren't any other 'in progress' shots but basically what you do is turn over your glass nugget and spread an even layer of glue on the bottom.  Different to the pinterest post I used, I added glitter using my fingers and patted it down into the glue.  After letting that coat dry I added more glue & glitter to fill the gaps.  I used the traditional way of putting the excess glitter back in the pot using bits of folded scrap paper.  I should also add that I did mine outside - on a non windy day!

These were the ones created with the Baker Ross glitters:
..which I noticed are now on offer down from £3.50 to £2.99.

I love the way the gems magnify the glitter particles.  I'd never noticed that they were teeny little hexagons before!
 
So pretty:

As you could see the backs of my gems when they were in the jar, I added some dark sparkly nail polish to the back of some of my gems but that isn't necessary for jewellery or magnet use.  I should also point out that the nail polish made them and the jar smell very strong!

Don't forget to seal the gems with clear nail polish or varnish of some kind and when dry they are ready to use.
*Sparkle, sparkle*

Hope you enjoy making some of these and
Thanks for joining me today,
Nicky,
Creative Flourishes


Disclosure: I have not been paid to do this review, I was sent the products to try out free of charge but I did not and will not receive any commission on any links listed.


Related Posts with Thumbnails