Welcome to my creative online journal

Tuesday, 31 May 2011

Stamp Resist Technique

I have a fish themed craft to show today:

 I've been working on more pages of my altered book, 'New Techniques to You' and today my new technique was a Stamping  Resist.

These are the tools I used:
A Ranger Watermark resist pad - although any clear embossing pad will do
Clear Embossing Powder
A heat embossing tool
and two dye based inkpads in blue shades.
(Also a fish stamp (see below) - not shown)

I stamped the fish with the Watermark resist pad randomly all over the old book page, covered it with Clear embossing powder and heated it.  I then rubbed the pale blue stamp pad over the whole page and wiped the excess ink of the fishes with a baby wipe. 
I then went over the whole page with the darker ink pad
On some of the fish I didn't wipe of the excess and it gave this lovely texture.

(Fish stamp was from a set from The English Stamp Company,  I got it from a charity shop with two pots of gold paint, a star stamp and a roller for £3! Bargain!)  I love getting craft equipment bargains at charity shops ;-)

This was the completed page:
Another fun technique to add to my reportoire!


Thanks for looking and for any comments,
qwiksave

Friday, 27 May 2011

Father's Day Photography

Shhhhh!  Don't tell my husband but I've been hunting out photos that I took of him with our two boys as a present for Father's Day.

Awww! A sleeping together shot.

A funny one! Joshua's turn to push his Dad! 

 ..and a lovely shot of him when he first became a dad!

Just three of the many shots I'll put together, possibly in a scrapbook format, for Father's Day this year.  Don't panic, Father's Day (in the UK) isn't until June 19th.  

Thanks for looking and for any comments,
qwiksave


Wednesday, 25 May 2011

Quick Journal Page

Thanks for looking and for any comments,
qwiksave

Monday, 23 May 2011

A Jar of Smiles

Chocolate Button Smiles!

This is what I've been making tonight, a jar full of chocolate buttons with icing sugar smiles for my dear family.
Some didn't make the grade so didn't end up in the jar! ;-P (YUM!)
I handmade the lid and the label and stuck smiley stickers around the sides.
 Happiness is a jar almost full of chocolate buttons!
:-)

Thanks for looking and for any comments,
qwiksave

Friday, 20 May 2011

Art Top Tips Book

Today I re-covered another one of my enormous collection of notebooks (see this post!).  This one is for my collection of art, craft and photography tips:
When I think of collections of tips, I can't help but remember the very silly (but funny!) collection of tips that the adult comic Viz used to produce (actually they may still do them, I don't know?..)  I managed to find two of the books they made way back in 1995 from a charity shop and they cost me 50p each.

I used the cover of one to make mine up:
I photocopied the page then did a bit of cutting, pasting and stamping with an ink blot stamp:
...and drew roughly around the edge.
(The folding scissors shown here on the left have since been removed, they didn't really work).

I have started to add some sensible crafty tips into my book but thought you might enjoy a few of the daft ones taken from the Viz books:

1. Make your own 'glitter' this Christmas by wrapping grains of sugar in kitchen foil. 
2. Throw large, peeled carrots into your garden pond.  They are indistinguishable from expensive Koi Carp.
3. On trains, the plastic triangular packs in which sandwiches are sold make ideal elbow protectors.  Wear them on your sleeves to prevent your elbows getting wet when your coffee gets spilled all over the table.
LOL.

You might also want some serious craft tips from my book:

1. Keep Silica Gel packs to use with your stored photos.
2. To prevent journal pages sticking together, use a couple of drops of Liquid Car Wax on a cotton rag and buff the pages lightly (not tried).
3. Permanent markers can be removed from hands with Hand Sanitiser (also not tried).

As this post seems appropriate, I would like to link it up with Top Tips Tuesday.

Thanks for looking and for any comments,
qwiksave

Wednesday, 18 May 2011

Christmas Carols?!

My followers from last year may remember this altered book I started.  It was a book that I called 'New (Techniques) to You' and originally it was an old hardback book with a religious theme.  Whilst I have kept the theme of the book the 'same,' I have been altering all the pages so that I can explore various art techniques that I haven't tried before. 

Today I added the words to a Christmas Carol - I love singing hymns and carols, and always have, ever since we were 'made' to sing them all those years ago in school assemblies.  I do like the original tunes though and think its a shame that so many of them have been changed these days.  If I have occasion to sing them now I can't seem to help but revert to the tune that I used to sing them.

(I have added journaling to the pages but have blurred them out as they are my own private thoughts).
The technique I tried for this page was to add white gesso and then some black gesso.  After leaving it to dry for a few minutes, I then wiped over it with a baby wipe. It has created a 'broken-up' texture that still shows part of the original image.  The edges were touched up with some more of the black. 
On the facing page I used a dry brush with the black gesso (on top of the white gesso). 
  Love this dated carol singers picture from the early 1980's!

* * * * *

Apologies for the fact that you haven't seen much of me lately, my husband is on the scene more now. He has returned home from Germany and this week has started his new job, just 15 minutes down the road!  Also our second son just celebrated his 9th birthday, tell me - where does the time go?

Thanks for looking and for any comments,
qwiksave

Sunday, 15 May 2011

How to make Image Transfers for Journals

I discovered (from a book) another new, very simple way of image transfer. This method lends itself more to journalling or mixed media art because the end result isn't a very 'clean' copy.  Well, it is 'clean' in a way because one of the ingredients is washing up liquid!

My practice sheets - these are image transfers from a black and white pen drawing and a newspaper.

To make this easy image transfer you only need two ingredients:
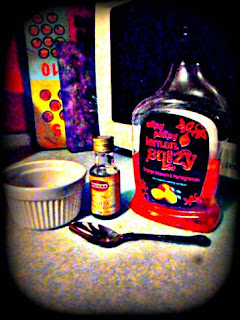
Washing up liquid and Vanilla Essence/Extract

All you need to do is mix 1 teaspoon of each together in a small bowl and brush a thin layer onto the front of your image
You then turn it over onto another piece of plain paper and rub on the back with the back of a teaspoon (not shown) and the image transfers.  In the one above of the man I was able to use the same picture 5 times so it is a bit like making your own stamps.  You have to remember that you get a reverse image though.  Also note that Permanent markers work better than non-permanent because the latter can smudge.

   This technique can also be used for newspaper pictures. If you look closely enough on the top picture you can see the Royal Wedding 'Kiss'.
Another thing to bear in mind is that the transfers take on the odour of your washing up liquid, so make sure you choose yourself a nice smelling one!

As my washing up bottle says, 'Easy, Peasy, Lemon Squeezy!'

Thanks for looking and for any comments,
qwiksave

Wednesday, 11 May 2011

Children's Theme Book Illustration

This is what I created yesterday using an old book costing 50p and some watercolour pens:

The old paper worked very well with the Berol felt tips, it absorbed the colour so well that it gave a 'Promarker effect', meaning no tell-tale colouring streaks.
I love the way that you can still see the text underneath.
A 'Spring' themed picture ready for framing.

* * * * *

I also did some more doodling in my sketchbook:
(Click to enlarge)
A while ago I was showing you how you can make stencils into a sketch by redrawing over the lines roughly after you've stencilled them.  This time I did it with some of my picture stamps (most of these were free with Craft Stamper magazine).  The stamp on the left is 'as is', the way the stamp normally prints, and the one on the right is with it's handrawn modifications. 
Useful when you want a 'sketchy look,' rather than clean lines.

Thanks for looking and for any comments,
qwiksave

Sunday, 8 May 2011

Covered in Muck! Scrapbook Page

I created a very mucky scrapbooking page for american National Scrapbooking Day, which was yesterday.  

Detail:
(Those of you that were with me last year may remember this sequence of photos, see here)

The full completed page looks like this:
I used a layout and full instructions given to us yesterday in the form of a 'Make and Take,' (a free pdf from Elle's Studio):
To make mine, I used distressed patterned papers to suit the muddy theme, and, because I hadn't got any red paper, painted some plain paper with red paint.  I added stamps of ink blots with brown distress ink to represent the mud and roughed up all around the edges with a sandpaper file.
Hope you've had a great weekend. My eldest son starts his SATs (junior school tests) tomorrow so this week is going to be quite a busy one.

Thanks for looking and for any comments,
qwiksave

Saturday, 7 May 2011

Fashion Dilema

I am in need of a fashion overhaul, I have got to the stage now where I really 'don't know what to wear!'  I have to face facts, I'm no 'Spring Chicken,' so, (in theory) I need to be wearing things more appropriate for my age.  But this is where my dilema comes in, I'm not ready for so-called 'Middle Aged' fashion (I can barely say the words!)

I made this today:
Which I intend to put in a folder for fuddy duddies for me to put potential fashion ideas for myself.

I actually love looking at the creativity of the fashion industry on TV, in magazines and on blogs BUT, as I've put on the bottom of that sheet, some designs are so way out of the everyday and some are just downright crazy!

I found a couple of books that I've had on my bookshelves for yonks that may give me some ideas:
The first one says '10 steps' and the second one says 100! lol.

Hope they are not too old to be of any use, but what I am looking for is a 'fun, creative look' without the 'mutton dressed as lamb' element.  I feel like I've been drifting into a 'boring clothes' style because they are, dare I say it? 'practical'.  The trouble with 'practical' is that very often it is boring.....


Now, where did I put that Desigual catalogue...?

* * * * *

Another crafty thing I did today was to doodle in my new 'Doodle' sketchbook:
Just a random pattern, not knowing what was going on next, or where it was going.  Just basically having a bit of spontaneous fun.

Do have a great weekend.
Thanks for looking and for any comments,
qwiksave

Tuesday, 3 May 2011

May's Calendar Complete

Lots (and lots) of pictures to show because it looks different when you tilt it in the light.
(Click pics to enlarge)

 To make the background I didn't draw all the flowers,  I used a (posh!) wallpaper sample page:
 Those lines (above) you see are all silver.  Which gave me the perfect background to make a batik effect:
(Picture shown yesterday) 
I blended watercolour paints and pens and then splashed the page randomly with a plant sprayer.
Today I blended the colours more and for a 'lily pond' effect, I sprayed the whole background with gloss acrylic varnish.  I then positioned my paper flowers (from sale, Oxfam), and stuck them down.
To finish off, I added the numbers by hand on the paper flowers and coloured the chipboard title letters with matching soft pastels.

To see everyone else's fabulous creativity for this year-long project, click here:
The Kathryn Wheel

Thanks for looking and for any comments,
qwiksave

April Finished, May in Progress

Here is my April calendar - with its Easter CHOCOLATE themed background (yum!)  You may remember I had to double up on some of the dates because I hadn't cut enough squares.  Worked out OK though.   This is part of a year long project from The Kathryn Wheel.  Do pop along  and have a look at what other people have done, there's some amazing creativity!

I have started May's calendar but not completed it yet.  Here is a taster:
and this is a 'Work in Progress' shot:
(Apologies for the reflection, this paper has shiny properties)

I still need to add titles and of course the dates.  I will be adding those and will show you the finished item very soon.

Hope you enjoyed your (long) weekend,
Thanks for looking and for any comments,
qwiksave

Sunday, 1 May 2011

Where did you get that hat?

This was me on Royal Wedding Day yesterday.  In a rather silly but fun top hat with a blue veil.  I would like to say I made it (I'm sure I could!) but no, it was brought from a shop locally.

This is my husband wearing it!:
He's not only looking glum because of the hat, or that he wasn't quite so much into Royal Wedding as some, but rather because he hurt his leg quite badly in the Street Party's Spacehopper race!:
I've also got a shot of him at the moment that his 'horse' chucked him off, but I'll spare him that embarassment. 

We had a fun time at my inlaw's street party (but the decorations didn't quite match the standard of the one's in my previous post, the 1977 Silver Jubilee). They had lots of races, some for the little children and some for the big!  I was in a dress so couldn't really join in.

Our sons dressed up for the part too:
(The 'pretend stamp' effect was created using Picnik)
My Congratulations and Best Wishes to the Happy Couple.  The wedding was absolutely brilliant!
* * * * *
Finally, a craft.
I created these notebook covers using a children's paint splatter kit,  bought cheaply at a charity shop.

Hope you are enjoying your weekend, 
Thank you for looking and for any comments,
qwiksave
Related Posts with Thumbnails