Welcome to my creative online journal

Showing posts with label christmas card. Show all posts

Saturday, 11 December 2010

Free Digital Christmas Cards

Despite making some christmas cards throughout the year on this blog, I have still got quite a few left to do.  I have found a quick alternative way of making them that makes them personalised too.  It's probably no surprise to my regular followers but I would like to recommend Picnik.  There is  a section there that is completely free, although you can pay for more effects.

Today I have used this year's school photo of my boys as I know some of my relatives would love this type.
I added the snowflake frame effect to the original picture.

I was a bit disappointed in some of the selection because there were a lot that said 'Happy Holidays' on them, here in the UK we don't tend to use that phrase, but it is an american site.

Here was another with a pencil effect:

You can also modify cards you have made using craft materials both before and after they have been printed too.  You may recognise this button tree I made recently:

The same card can look so different.

I'm not sure I'll be on tomorrow, I have come down with something nasty.  My boys have got better and I have caught something.  Today one minute I have been sweating and the next minute freezing, my throat feels like sandpaper and I haven't managed to eat anything.   Fortunately my husband has come back from Germany for the weekend, but he's going back on Monday - I'm  not looking forward to the school week!  

 Thanks for looking and any comments,
May see you tomorrow,
qwiksave


Wednesday, 1 December 2010

Recycled Christmas Card

Tonight I've been rummaging around in my collection of old buttons and produced a 'green' Christmas card:
I've stuck* the button christmas tree onto some corragated cardboard from an old box and then onto some mulberry paper.
I even used a bit of newspaper saying 'recycling' as the bucket.

(*will stick it down soon! :P)

To tear around the mulberry paper I used a wet paintbrush around the edge.

Just need to do some finishing touches to it and then sometime tomorrow I'll show you the finished card.

Thanks for looking and any comments,
See you tomorrow,
qwiksave

Saturday, 27 November 2010

Stamped Christmas Card

With all these other makes going on, I've been neglecting one of the most important crafts of Christmas - making my own cards!  With the weather the way its been, I now have the perfect opportunity to stay indoors and get them done.  That saying, I did make one today!
I've used a scrapbooking paper with swirls already on it and I have Christmassified (do you like that word?) it by adding stamps of holly, snowflakes and baubles.

 In the middle I have done the sentiment.  The wording 'Merry Christmas' was stamped onto plain paper and 3-d dots were placed behind it to bring it out of the worded background.

I think I'd best start on the others that I need to do, post haste!

Thanks for looking and for any comments,
See you tomorrow,
qwiksave

Thursday, 18 November 2010

Christmas Paper Piercing

I'm in the middle of experimenting with Paper Piercing. Just look at this mess on our dining table!:
Here are a few examples of what I have been working on so far:
This silver snowman was made by using a stencil to cut the shape out of a textured handmade paper
..and this tree was cut out of red script wrapping paper that has had tracing paper put on top. The tracing paper has freehand swirly lines that I made with a gold calligraphy pen.

Another tree (WIP) example made with a different area of the textured handmade paper:
Think I'm going to be able to make some great Christmas cards using this technique. 

Off to do some more (fun!) experimenting...

Thanks for looking and any comments,
See you tomorrow,
qwiksave

Saturday, 23 October 2010

Christmas House Glitter

I've got a stash box specifically for glitter and I very rarely use it.  It's a shame because I love the sparkly effect it can give.  Glitter is difficult to get right though.  Years ago, it was big chunky stuff that you would put on with glue and it would rub off on the envelope you put the card in - I've probably still got some of that in the box, untouched and unloved.  Now, thank goodness, its made of cleverer stuff, and doesn't (very often) rub off.  So why don't I use it?  One of the reasons is its difficult getting the right shade of glitter, by that I mean the white one that has the sparkles in it.  So many of them have green sparkly bits in them - why?  You have to look very carefully when you buy.  Not all glitter is the same.

For some of my personalised christmas cards to my family last year I added glitter highlights to a snowy picture of the house I grew up and lived in for over 20 years.  My family loved the card - particularly as the house is no longer there. :-(  (It has been knocked down and has now got a block of flats in the space).

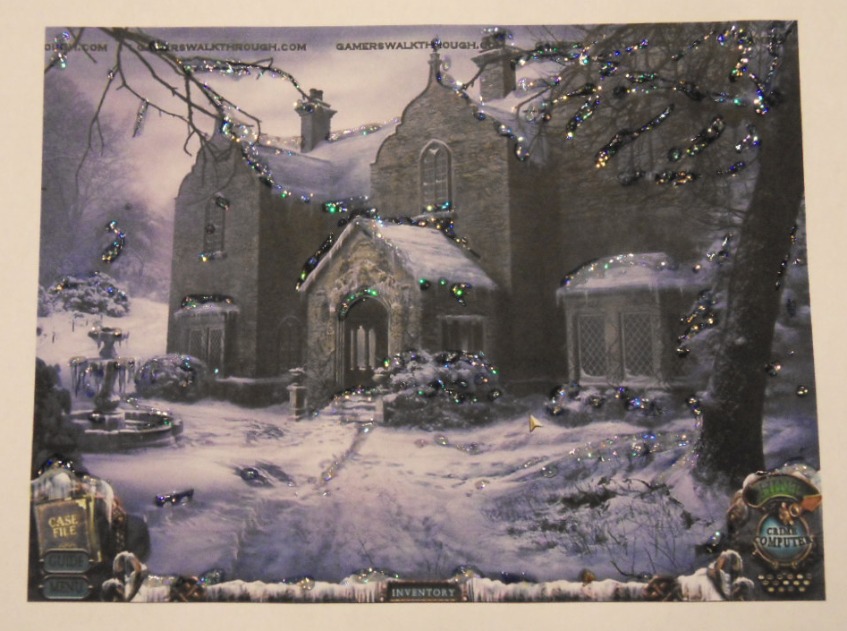
This is an example of how to do it (not my old house! :-)  ) using a picture from the internet:
(From a game site called Gamers Walkthrough - these are screengrabs from a game)

First take a picture of the house in the snow.  Print out the picture and then add glitter (or glitter glue)  to where the snow is at its highest points. Also to window frames, icicles, branches, signs...

Another example (picture from the same site):
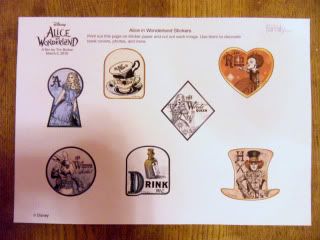
Last year I also did one of these of my children's primary school adding fun snowman stickers.  My friend said at her house they don't keep christmas cards, but I noticed that this one was still up on display in February! :-) 

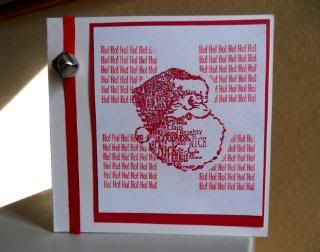
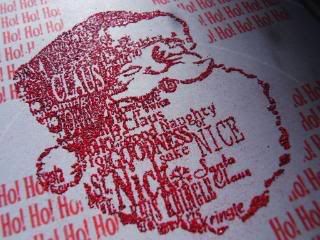
The best glitter glue I found for multicoloured glitter particles, used on these two examples was called Craft Twinkles Writer in Crystal by DecoArt (bought in Hobbycraft).

* * * * *
Other news and its half term next week, my husband came back from Germany today, yay, and my son came back safely on Friday from his Outward Bound school course.  His suitcase was a bit heavy when I carried it back from school.  It turned out that he'd brought back 4 rocks from the top of a mountain!  Boys, eh!..

Thanks for looking and for any comments,
See you tomorrow,
qwiksave

Sunday, 26 September 2010

Christmas Card 9

One of my intentions this year was to get all my Christmas cards done during the year so I don't end up trying to make 30 individual handmade cards on the night before the Last Posting Day (like last year, oops!)  I have done quite well, I've made 8 so far and one tonight, makes 9:

So thats one a month.  Not bad. 

(I changed the one that I made last night into this - I've added acetate which I've painted white snowflakes on to and also stuck on some pink and white snowflake confetti. I'm much happier with it now!)


Here's the other 8, which you may remember as they have been previous posts on here:
The one I've done tonight isn't my favourite - created using Stardust Gelly Roll pens and peel offs but it is good to use stash up rather than always buying new (says her, who is off to buy more stash at Artisan (a bead and stamping show) on Friday! :-P)

Thanks for reading and for any comments,
See you tomorrow,
qwiksave

Friday, 10 September 2010

Graphic Christmas Cards

I must confess to watching the very last episode of 'Big Brother' tonight so again didn't leave myself a great deal of crafting time but I managed to do some:
A couple of Christmas cards to add to my collection. 

I'm pleased I decided to do a few throughout the year, then I won't have that mad panic (the one I had last year!) having to do 30 handmade cards all on one night in order to beat the postal delivery times.  I've also decided to do 'simple' designs (as in flat) so I won't get caught out paying extra for that added thickness charge.

The picture above makes them look gold, but they are silver:

Simple lettering, straightforward mounting.

Thanks for looking and for any comments you may leave,
See you tomorrow,
qwiksave

Tuesday, 1 June 2010

Bargains and Christmas Card

I haven't had a shopping post for ages, and I know how much you we all love shopping! :-)   I have got some great charity shop bargains to show you and one I got today was a MEGABARGAIN!

But first of all, I'll have a quick show of what I did tonight, I made Christmas (yes, I know its JUNE!) Card Number 4:
I decided that I won't be making cards with  layers because the Post Office charge you more  (What a silly rule).  Anyway, this was a simple embossed card that used Seafoam White embossing powder which looks very much like snow.  I used a Versamark pen on the snowflakes and on the writing.

Onto the bargains and this was one of my finds:
Another of those magnetic clipboardy things with bird magnets...  £2
 
Massive box of 3d letter stickers (all letters are there caps & small) £3
These weren't charity shop, but all on sale at Craft-ed. These are the type of cartoons I would do if I was going to bring out a range... reckon they will look good in my kid's scrapbooks.

...and this was my megabargain:
A LOVELY tin with all these paints, pallete and brushes, £8
The tin itself is gorgeous:
(and those borders are punched out of the tin!)

Ooh I do love getting a good bargain!

Back to normal tomorow as my children are back from their grandparents. I'd almost got used to my own company...

See you tomorow,
qwiksave


Sunday, 7 March 2010

Christmas Time Again!

I've made another of my Christmas cards using my Inkadinkadoo snowman stamp.  This one is qute different from the type I made last time.

To make this one, I stamped the image onto the back of some acetate and covered it with distressed stickles.  I then applied some silver ink onto that from a silver inkpad with my finger.  Then I applied holographic glitter and white tissue paper that stuck onto the stickles.

While that was drying, I made the distressed frame by applying an acrylic paint dauber (Sail Boat Blue) roughly around a tri-fold frame card.  I added silver pen and then black around the edge of the frame.
Finally, I added snowflake confetti to the front of the acetate.

To finish off, I thought crafters may like to pick up this page of free Alice in Wonderland 'Stickers' (Printables) from the Disney site (at the time of writing).  Link here

They would be great for altered art projects. There are also a few other 'Alice in Wonderland' crafts there that you may be interested in.

Sunday, 28 February 2010

Jingle Bells

For today's task I have been making another of my Christmas cards.  Some cards I make I will use layers and sketches found on the net but this one was designed to be flat:
First of all I stamped and cut out the santa onto a post it note to use as a mask then stamped him onto the white card.  I then embossed him with red glitter embossing powder.  I put the cut-out mask in place (directly over the embossed santa) and stamped the 'Ho Ho Ho' background. (This proved to be much trickier than I thought, because it was a wooden stamp, not clear.  Note to self, only try this again using CLEAR stamps!)

(Santa stamp from Inkadinkadoo collection)

I stuck it onto red card, which I then mounted onto the white background card.  I finished off with a working bell (he, he) attached to a ribbon.

Jingle, Jingle!

qwiksave x
Related Posts with Thumbnails