Welcome to my creative online journal

Showing posts with label calendar. Show all posts

Tuesday, 3 May 2011

May's Calendar Complete

Lots (and lots) of pictures to show because it looks different when you tilt it in the light.
(Click pics to enlarge)

 To make the background I didn't draw all the flowers,  I used a (posh!) wallpaper sample page:
 Those lines (above) you see are all silver.  Which gave me the perfect background to make a batik effect:
(Picture shown yesterday) 
I blended watercolour paints and pens and then splashed the page randomly with a plant sprayer.
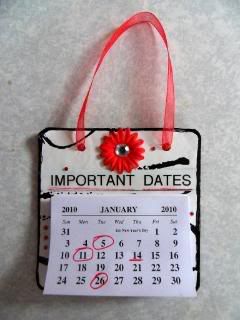
Today I blended the colours more and for a 'lily pond' effect, I sprayed the whole background with gloss acrylic varnish.  I then positioned my paper flowers (from sale, Oxfam), and stuck them down.
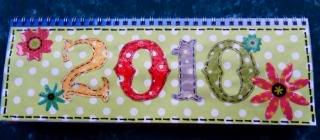
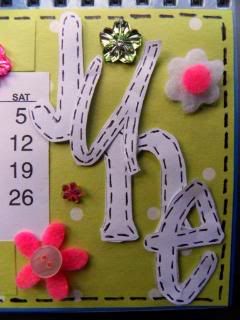
To finish off, I added the numbers by hand on the paper flowers and coloured the chipboard title letters with matching soft pastels.

To see everyone else's fabulous creativity for this year-long project, click here:
The Kathryn Wheel

Thanks for looking and for any comments,
qwiksave

Wednesday, 2 March 2011

March Calendar Complete!

Indulge me a little won't you?  I have lots of pictures of the journaling calendar I have made as part of the Kathryn Wheel project to show you:

This is the finished item:
But you can't see all the fabulous colour from one little piccy, it needs lots!

Like this early one:
Which shows you what is underneath all those circles, silver foil and tissue paper, stuck on with a pva and water mix.  At this point there was some pink, but that had to go!

Detail (the creases were deliberate, for texture!):
This is a detail of the dates circles.  Created using old book pages punched out and covered in gesso.  The outside circle was a stamp coloured with pens.  The numbers were peel-offs in different sizes for interest:
And this is the Month circle detail:
Depending on the light, the calendar can look quite different:
But I love the luminous quality it gets.
And there you have it.  The finished item that I gave the taster for the other day:
Don't forget to check out other people's fab calendar creations for this year long challenge here There are so many different styles of interpretation.


* * * * *
Other news and my eyes still aren't right so I've been to the hospital to see the Eye Specialist today.  The good news is that the eyes themselves are fine.  It is just some sort of skin irritation/allergy around the eyes that is the problem.  I've just got to keep up with swallowing all the millions of pills and applying the creams I've been given.


Thanks for looking and for any comments,
qwiksave

Tuesday, 4 January 2011

Moneysaving New Year Tip

I've thought of a little tip for saving us a few pennies (and time!) in the New Year, and with VAT going up in the UK today, we could do with it!

I've simply used the crafts I made this time last year and changed them to this year.

For example, this was a 'Memories of 2010' jar that I made. It was used to put in little slips of paper with memories of days in the year that we wanted to remember - usually good memories! :-)

Here it is with 2010:
Simple bit of correction pen on the '0':
..and rewrite with a '1':
Job done! Saving both time and money. :-)  Now we can create some new happy memories!

Another one:
This 'Important Dates' Calendar
Just take off the old and stick on the new year's calendar.

If you like the calendar craft you have done, and/or spent a lot of time on making it, (maybe you have received one as a gift?) think about how you could make it last longer than just the one year!

I would like to add this tip into the Top Tip Tuesday challenge.

Thanks for looking and for any comments,
qwiksave

Monday, 20 September 2010

2011 Coaster Calendar

OOh, I'm early with this one! It's a calendar for next year using a beer coaster.
They are ever so simple to make - you just cover a coaster with some nice patterned paper, add some suitable embellishments and a ribbon to hold them up.
I've made mine suitable for a male receipient (although I'm not sure who yet!) as it has a 'mechanical' feel about it with the circles.  I also added distressing to the edges using a file and black ink.

It's most unusual for me to be this organised this early, a first in fact!

Thanks again for stopping by and for any comments,
See you tomorrow,
qwiksave

Monday, 25 January 2010

Rich Autumn Gold

Y'know some days aren't going to go to plan, like when you wake up in the morning and discover to your horror its 10 minutes to 9 and your kids should have been in school 10 minutes ago!!  Yep, that is exactly what happened to me this morning, and what can I say but ooops the embarrassment!...  Lesson learnt, keep that mobile under your pillow and set it on vibrate, foolproof! (er, maybe!)

Anyway, other things didn't go to plan either, including my plan to do lots of crafting today.  I only managed to get one more page of the calendar done, the page for September and October:


I think its one of my most favourite pages out of the whole calendar, could it be because it has swirls on it?  Probably. First of all I stuck the orange paper down, then rubber stamped in brown a tree leaf on it (yes I know I said no rabbits for April but leaves are more swish, OK?  lol)  I then got out my swirly stamps and  heat embossed them with a lovely rich gold (ideally I should have rubber stamped the swirls and embossed them before sticking the page into the book because the spirals got in the way but then it was that kind of day!)  I finished off with sticking the letters down with my glue dots, which have now RUN OUT!  How will I be able to complete the last page tomorrow? Panic! :-o  Are there any shops open at 5 minutes to 12 on a Monday night that sell glue dots?...

Sunday, 24 January 2010

Glossy accents and Sunshine!

Was hoping to finish the calendar today, its not quite finished, but very nearly there.  I realised I hadn't shown you the title page, This I modified today by adding some Glossy Accents, a crafter's wonder product that changes a flat object into a 3d one. I used it on the numbers so it would match the embellished glossy flower stickers.  The numbers were made using the Grungeboard letter template onto the same papers I used inside and I handwrote the stitches again to match the inside pages:


I made the page for July and August today, again using my stash of sparkly gems.  I even discovered some mosquito gems that I didn't know I had.  I kept the theme to a bit of orange and lots of yellow/gold to reflect all the sun we're going to have this Summer! (lol)


Once I'd  completed putting all the gems on it again lacked something so I had the ingenious idea of adding some flight lines for the mosquitos.  I used the broken line technique I'd used for the letters and it worked so I then decided to change all the flowers into 'suns'.


I have added all the papers and calendar months to the last few pages so shouldn't take me too long to finish tomorrow, I might even have chance to do another craft!

Saturday, 23 January 2010

Sequins, Sticky Dots & Bling!

I have been continuing on with the calendar I started yesterday.  I've done a March & April page and a May & June page today.

The March and April page I separated into two colours, grey and yellow.   I had a vague idea to put Easter embellishments on the April side and did for a while, but then hurredly took them off - they looked really naff!  After all, this calendar isn't intended for the kids, its for me (and maybe my husband!) so no rabbits allowed!


I kept to the same layout as the previous months with fake stitching and paper letters and for this one embellished it with lots of sparkly sequins.  I have to say how I appreciated the sticking power of my roll of sticky dots, all the sequins stuck on with no problems.  It really sparkles, hope you can see that in the photos:


The March side I kept to blue and silver sequins, which 'spilled over' into the gap between March and April


...and for April I kept to golds and orange sequins, very lush!

For May and June I went the flowery route.  I'm not a flowery prerson normally but I did want this calendar to at least reflect the seasons.


Initially I just had the felt and button flowers but there was something missing in the gaps.  So out came my massive box of sequins of every description that I impulse bought from QVC a while back.  It gave the page a lift & shine in a way that only bling can.


Loved the mixture of typefaces!

Think I know what tomorrow's task will be! 

Thursday, 7 January 2010

Dates to Remember!

I occasionally forget events and things I'm supposed to remember like returning library books or school holiday dates- so the item I've made today should help me.

It's an 'Important Dates' coaster calendar for my notice board:


I got the idea of the coaster calendar originally from someone on my favourite forum MSE, who got it from someone else...

I made one in December, a 'shabby chic' one that I was going to give to my son's teacher but in the end wasn't sure that she would appreciate it. I'm glad that I didn't give it away though because I like looking at it on another of my noticeboards!


They are made by covering a beer mat (you can BUY these from ebay apparently!) with patterned paper, gluing on a calendar and adding embelishments like flowers and ribbon. The one that I made today (top pictures) was also outlined with a black marker pen.
Related Posts with Thumbnails