Welcome to my creative online journal

Thursday, 18 November 2010

Christmas Paper Piercing

I'm in the middle of experimenting with Paper Piercing. Just look at this mess on our dining table!:
Here are a few examples of what I have been working on so far:
This silver snowman was made by using a stencil to cut the shape out of a textured handmade paper
..and this tree was cut out of red script wrapping paper that has had tracing paper put on top. The tracing paper has freehand swirly lines that I made with a gold calligraphy pen.

Another tree (WIP) example made with a different area of the textured handmade paper:
Think I'm going to be able to make some great Christmas cards using this technique. 

Off to do some more (fun!) experimenting...

Thanks for looking and any comments,
See you tomorrow,
qwiksave

Wednesday, 17 November 2010

Hand Printed Wrapping Paper

I've just started experimenting with printing my own wrapping paper using brown parcel paper and foam and clear stamps. 

This first one I have tried is of a scroll design which I have stamped in red with a gold snowflake.
One tip that you might find useful is to let your stamp design go off the paper (onto scrap paper) to make it look more professional.

I also stamped this one with green trees and gold flourishes.  I do like my flourishes, can you tell? ;-)
Some stamp pads work better than others.  
This white Stazon is very subtle in RL - and the stamp kept sticking to the paper!
The roll of paper that I used for this was just 99p from my local newsagents but it's a bit on the thin side.

Quite a fun 'production line' activity with some useful wrapping paper to use at the end of it.  You can also be creative with your ribbons, and use other natural products instead, like rafia, etc.

* * *
I did two posts yesterday, please check out my second post, Same Scene 39 years Later!! challenge post if you haven't already.  Wouldn't want you to miss it! ;-)

Thanks for looking and for any comments,
See you  tomorrow,
qwiksave

Same scene 39 years Later!!

I very rarely ever enter any challenges on other blogs, but when I saw the subject of this one I knew I had just the right thing.  It took a lot of hunting through boxes and discs but eventually I found these two photos which I would like to enter into the Sticky Fingers Week 35 Challenge The Gallery: Before and After.


We were asked to recreate a photo we already had.  I chose this one taken in, ahem, 1966. That's me on the left, with my sister sitting down on the right:

It's not strictly the same people sitting there in this picture, as these are my two sons at the same age as my sister and I were.  This was taken in 2005, and we got as near to the same spot as we could on the beach.  The beach is Tenby in South Wales.

It was fun doing this challenge and may I do many more of them!

:-)

Thank you for looking and for any comments,
qwiksave
x


Tuesday, 16 November 2010

Christmas Ornament Shrine Completed

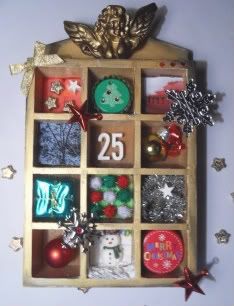
Ta-Da! Finally finished, phew!:
I had a few technical issues with my Christmas Ornamental Shrine, as in I couldn't use the loose items like the icing snowballs and silver balls that I used yesterday because the shrine is for hanging on the wall and they'd all fall out! lol.  So I had to go on a hunt for other things to fill the spaces, which was not easy when you consider that most of our christmas items are still in the loft.


The first change, you may have noticed, is that I changed the 'Merry Christmas' title I had on the top for an angelic cherub, which I have 'dirtied up', I mean distressed, with black, along with the edges of the shrine.   
Another thing I did was to create depth with some objects being placed further forward than others:
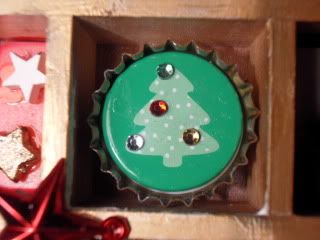
To get this brad to be at the front of the box I put it into a bottle cap.  This bottle cap was also brought forward by sticking another bottle top behind it.
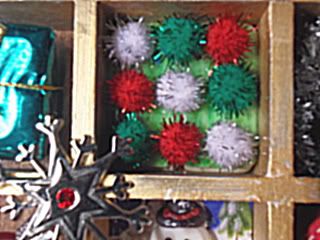
These glittery soft balls were brought forward by sticking them onto mini-dominos that I coloured green with a promarker.

The photos in boxes 3 and 4 were brought forward by sticking them onto some 'Cut n Dry' foam and the badge on the bottom right was also raised to the front using a bottle cap.

I had a bit of fun with this snowman scene:
To do this, I cut out a snowy background out of an old christmas card and stuck it on to the back and then I added 'artificial snow' (Snowtex) to the front. 

As you can see, this project was a bit more complicated than first appeared.  It wasn't just a case of finding things and sticking them down.  Every last bit needed its position to be considered...which took a long time and is why I was a bit late writing this blog post, so please accept my apologies for that.   

I like how it has turned out (and better in RL), but I didn't end up covering the side & back walls as I'd planned, maybe I'll do that on any future one I do.

Thanks for looking and for any comments,
See you tomorrow,
qwiksave

Monday, 15 November 2010

Mini Christmas Shrine

You've caught me still working on a project, but this is how its looking so far!

Its a thimble case that I am altering by putting Christmassy items in it. 

I sanded it down, gessoed it and covered it in gold paint.  So far I have only managed to paint the outside frames but I have plans to cover the inside pages with various Christmassy papers, stamped images, words, etc.  Its a 'do where my inspiration takes me' project.  I have put some objects in the boxes now to see what type of objects will work in my finished masterpiece.

Thanks for looking and any comments,
See you tomorrow,
qwiksave

Sunday, 14 November 2010

Personalised Cards & Gift Tags

I love sending (and receiving, but no-one ever does! :-(   )  personalised presents and cards.  When I gave my cousin the mini photo album of her son taken over 20 years ago, she was absolutely delighted.  This is why I will be making the majority of my presents & cards in a personal way this Christmas.

I was delighted to find that the HP Creativity website have got LOADS of items to personalise (free) including these gift tags that I have made.   (Some of the options incidently, use Smilebox technology, which is a program that gets put on your computer. There are other options including Disney Xmas - these are on the theme of 'A Christmas Carol' but you don't have to use these).

I also used something else 'free' to make these pictures:
and
The background papers were 'free' as in they came with a cardmaking magazine this month, 'Papercrafting Essentials'.  You can, of course, get papers free on the internet if you hunt around.  Crafting can be an expensive hobby, so its good to keep the costs down when you can and 'free' and 'personalised' feel good! 

Thanks for looking and for any comments,
See you tomorrow,
qwiksave

Saturday, 13 November 2010

Homemade Christmas Decorations

I've been looking at decorations and Christmassy items in shops again today and this time I took along my Christmas notebook.  I was sneaking into the corners of shops and drawing ideas, lol.

I've also been looking at ideas for things to put in my glass baubles that I got from a charity shop:
These icing silver balls worked great!
Very difficult to photograph, but this was a set of mini lights (like a teeny version of the lights you put on the tree).  They worked a bit, but as they are battery lights you would need to keep taking them out to turn them on and off.

One idea I did spot in a shop which I thought would be easy to make myself was this decorated twig:
I have attached self-adhesive holographic stars to the branches:
..which is a nice simple thing to do.  I even went out in the dark with a torch hunting for a windswept branch so I could make this tonight :-)  

Think it looks great and only costs pennies. Very MSE! ;-)

Thanks for looking and for any comments,
See you tomorrow,
qwiksave

Friday, 12 November 2010

Altered Book Butterflies

I've taken a break from my Christmas posts today to complete a couple more pages of my ongoing altered book, 'NEW Techniques To You'
I was given some commerical industrial waste from a toy company years ago of stencils.  The cardboard insides I think were used for mobiles.

I have stuck the stencils onto the middle of the pages that I did recently in my altered book and they look really effective.
The white side was the front of the stencil
..and the lettering was on the back.

Each butterfly 'pops' out of its background.
in lots of interesting colour and texture:
I really like the effect.

Thanks for looking and for any comments,
See you tomorrow,
qwiksave

Thursday, 11 November 2010

Personalised Christmas Decorations

I've been looking at Christmas decorations in the shops today, looking at what ideas I could steal adapt using my own crafting skills. 

This was the result:
Personalised slate hearts

I didn't make the hearts out of slate (I wonder how you do that - possibly not that difficult?), I have just personalised each of them with a Uniball Signo White pen.  My slate hearts cost £3.99 for 4 from a local homeware shop.  I have looked on the net for you and spotted these (UK site) which look good and are made from roof tiles.

You could use chalks on them of course which would make the design less permanent, but I liked this particular collection to always have the names on.  I have also written the date (top picture) on the back of each.
I think they are going to look good either as a room or a tree decoration and not only that,  I could also use the photos I have taken of the hearts as yet another kind of decoration.  :-)

Thanks for looking and for any comments,
See you tomorrow,
qwiksave

Wednesday, 10 November 2010

Gift Card Card

I found a great video tutorial for a different style of greetings card that you can add a shop gift card to.

This shows you the inside when you open it up:
There is a small card inside the bigger card that contains the gift voucher
...and this is how it looks closed (I used a temporary glue dot to keep the smaller card closed).

It's difficult to both photograph and describe so please take a look at the brilliant step by step video tutorial that was found on the elvie studio blog . The card is easier than it looks and should, in theory, only take 5 mins to make!

I've done mine in Autumn colours for a birthday coming up soon but I think it would make a great Christmas voucher card using christmas themed papers.

Thanks for looking and for any comments,
See you tomorrow,
qwiksave
Related Posts with Thumbnails