Welcome to my creative online journal

Monday, 18 October 2010

Horror Decoupage

I had an idea to do tonight's craft whilst doing helping my son do his homework tonight.  He has been asked to do a finger puppet of some kind of character from the Tudor times.  I'll show you that after I show you the craft that it inspired.

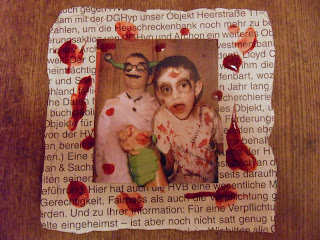
It was my next horror costume scrapbooking page:
(All FAKE blood I should add from our fancy dress supplies)

It's a decoupage page, the boy in the front and the hand were cut out and decoupaged:
I haven't cut out the shape of the scrapbooking page yet because the FAKE blood (sorry, it does look a bit too real!) is still wet.

This was what we did for the homework:

I got my son to cut out this image of Elizabeth I.
and then I added some decoupage to it.  After I had done that, I thought it would look good rounded around something, so found a polystyrene cup:
Sorry, these pictures aren't terribly successful. It really does look much more effective in RL.
(..and if I was cutting it out, I would have cut off all of the green, but it was his homework! ;-)

Doing the decoupage on this project is what gave me the idea to do it on my craft tonight.  Glad I did, it makes yet another way of doing a page to add to my Halloween Costume mini scrapbook.

Thanks for looking and for any comments,
See you tomorrow,
qwiksave

Sunday, 17 October 2010

Costume pages part 2

I'm sorry but I have been hunting high and low for that picture of my son with no head but haven't found it yet! 

I've done another couple of pages though:
Say Cheese!

I personally think those teeth are revolting, but you can tell my youngest son, who was about 3 at the time, was quite happy to wear them.

This second page is a bit spooky! That skeleton on the left seems to be like a ghost coming out of the page:
It's a rubber toy skeleton that I have photocopied onto the page by placing it on top of the copier.

TipMake your own designs and embellishments by photocopying 3d objects (using your home printer, if available)
I have then used distressing ink (black) to go around the edge of the page.

I've got a quiet week next week, my eldest son goes on a Residential with the school (he was the one that got sent home from Cub Camp in the Summer, remember?)  He's going to be sent with strict good behaviour instructions and hopefully this time will get to enjoy the many activities including abseiling, orienteering and canooing.

My husband also goes back to work in Germany for the week, so its going to be quiet with just me and my youngest to entertain. 

* * *
I wish to enter this tip into the Top Tip Tuesday Challenge

* * *
Hope you've had a good weekend,
Thanks for stopping by,
qwiksave

Saturday, 16 October 2010

Costume pages part 1

Aaaaaaaaaaaaah! This is the title of one of my halloween scrapbook pages that I've done tonight:
This 'lovely' picture is of my husband on one of our samba dress up occasions.

Admitedly this is a 'bit of a cheat' as I've added a post camera effect onto this - its a 'wrapped in cling film' effect which makes it look extra gory.  The arrows were real though, they were painted on with face paints. 
The photo effect makes it look as though the face is outlined with white, so I continued that theme by outlining the scallop around the edge of the paper with white pen.

Another theme I will be continuing thoughout this Halloween scrapbook will be that of splatters,  which I did on this one and also on another page I did tonight:
I also added a rubber stamped 'blood stained' hand. This is going to be the 'title' page of the book.

I have found most of the photos I've been looking for but there is a great one of my older son taken last year that I can't find.  We made him a great homemade costume that made him look as though he'd lost his head and was carrying it!

Thanks for looking and for any comments,
See you tomorrow,
qwiksave

Friday, 15 October 2010

Spider Make-Over

I really wasn't very keen on the way I did this mini-scrapbook cover yesterday so I have changed it to this: 
I found a great idea today on the Art Institute Glitter (?) blog about glittering up your plastic spiders:
You soak it up (to clean it) in rubbing alcohol before covering it in glue and then glitter.  I've covered mine in 'Glamour Dust' and he looks ready for the ball!

Overall, I'm much happier with the cover than I was yesterday:
Unfortunately I had some more printer problems again today- it suddenly decided to refuse to accept its usual cable connection - which meant I couldn't print off any more halloween costume pictures for this album.  I have managed to fix it now, with just a few choice words to jog its memory (lol), so should be able to crack on again with the inside pages.

Thanks for popping by and for any comments,
Have a great weekend,
See you tomorrow,
qwiksave

Thursday, 14 October 2010

Halloween Fancy Dress Album

My family and I love a good dress-up! Give us a good theme for a fancy dress party and we go to town!  You may remember some of the outfits and wigs I showed you here on this blog that my boys were wearing on one fun day in the Summer Holiday.  When my husband and I played in our local samba band a few years ago we occasionally got to dress up and we revelled in it.

So, today, I decided to make a mini scrapbook of some of the outfits we have worn, mainly for Halloween, which will be the theme of the scrapbook, but I will include a few of us in other fun outfits too.  In America they don't only wear horror type outfits for Halloween anyway.

So far I have just been working on the front cover:
I've sprayed white paint onto black paper, added a 'mock' silver web and a real plastic spider.  I'm going to look on the web for a suitable 'horror' font for the title...
That spider is looking a bit too realistic! Aaaah!

I've found a few pictures to include:
But there are loads more to find...

I'm also looking for more potential background accessories too:
..and these will make some good spooky templates.

Hopefully this WIP (Work-in-Progress) will be finished in the next few days! WTS - Watch this space!

* * *
Finally, I stamped a sentiment on the clay heart that I made the other day:

Thanks for stopping by and for any comments,
See you tomorrow,
qwiksave
Wednesday, 13 October 2010

Live well, Laugh often, Love Much

If you are waiting for my son's 'Morph' video, then sorry, it won't be yet - my hubby (the editor) has gone to Germany on business for a few days.  He's due back at the weekend.

Today, I've done a couple of things:
Live well, Laugh often, Love much - a lovely sentiment that I have stamped onto some vintage children's bricks...

...and I started to paint the clay beads and embellishments from yesterday.  They took longer than expected as I gave them an undercoat of gesso first:

Think I need to make some berries for the holly and after doing some further coats, I will probably stamp a sentiment on the heart.

Hope you are all keeping well. Thanks for popping by,
See you tomorrow,
qwiksave

Tuesday, 12 October 2010

Clay Embellishments & Beads

Inspired by my son making his 'Morph' video the other day, (which, incidently, he would like you to see when its complete!) I got out my self drying clay and some moulds that I'd been given and made myself some embellishments for cards and scrapbooking pages:

They still need some edge refinements but this is how they are looking, so far.

A few years ago my mother-in-law used to do a class in icing cakes and as she no longer wishes to do so again, thought I might like all her equipment.  She must have spent a fortune originally, so fortunately for me, I don't have to.
This is just a small selection of what she gave me.  They will be fun to use for my clay modelling.  I can make some beads and the holly leaves will make great christmas decorations.

I'm leaving the clay to dry out overnight and will paint them, possibly tomorrow sometime.
I've added holes in some of the decorations to make jewellery and scratched details onto the holly leaves and teddy with a scalpel.

I'm thinking they will look pretty good, once they've got a bit of paint and varnish on.

Thanks for looking and for any comments,
See you tomorrow,
qwiksave


Monday, 11 October 2010

Vaseline Peeling Paint Technique

Something I haven't done in a while is to do some more work in my altered book.  Some of you may remember the book I started altering earlier in the year called 'New (Techniques) to You' (Link)  in which I was going to change the pages using different artistic techniques. 

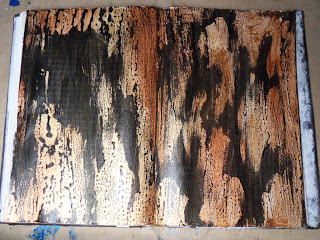
Well, that is what I have done tonight, I've made a luxurious gold, copper and bronzed background using a Peeling Paint technique:

It looks much more impressive in RL, a lovely rich texture.  Journalling is going to be added on top with a white pen.

I followed the directions on how to do the technique herebut because of disorganisation time constraints I ended up having to dry each layer with a heat gun.

This is what I did:
On top of a printed page that had gesso previously painted (& dried) on it, I painted three acrylic metallic colours and then dried it.
When those pages were dry, I added Petroleum Jelly using my finger randomly on the pages.
Black paint was then added and then dried (It resists the Vaseline).
Finally, I wiped the Vaseline away with a paper towel.

The metallic paint has given it a lovely sheen that changes with the light and I like the way you can still faintly see some of the lettering from the original book.   It was fun doing another technique that I haven't tried before too.

Thanks for reading and for any comments,
See you tomorrow,
qwiksave

Sunday, 10 October 2010

Table Name Cards

What a great party that was! My inlaws' 50th Wedding Anniversary.  There was a lovely moving speech that gave me some 'dust in my eye' listening to, a great band playing my kind of music to sing & sway along to and really yummy food (I could have eaten every one of the 6 choices of dessert!)  A really lovely, memorable occasion.

I didn't think I'd be able to get a craft done today but this morning I was asked if I would do the table plans, so thats what I did:
I don't think they were expecting them to be this elaborate! lol
* * *
Even my son had a 'crafty' time.  Him and his dad made an animation using a Plastercine 'Morph' and his naughty mate 'Chaz':

It was only a few minutes long but took ages to film.  Now it needs a touch of editing.

I'm glad to say that my framed canvas was also well received.

Thanks for looking and for any comments,
See you tomorrow,
qwiksave

Saturday, 9 October 2010

Finished Anniversary Canvas

It's Saturday lunchtime and  I thought I'd pop on here before I go to my inlaws to show you the finished Anniversary canvas:
I added some vintage buttons, gold scroll peeloffs for the corners, pearl gems and some gold paint for the edging.  I covered it all in 3 layers of Modge Podge.

My childen have been trying to work out which relative the people on the picture are. Some look so different (well it has been 50 years!) that we will need to ask.

Have a good weekend,
Thank you for any comments,
qwiksave

Related Posts with Thumbnails